Service manual
Expected use
NOSWORK is specifically designed as a collaborative, efficient and economical digital workspace designed for entrepreneurs and MSMEs. The features visible in NOSWORK are dissimilar, among which we can mention:
-
Participation: Allows simultaneous collaboration.
-
Flexibility: Customized functionalities.
-
Management: Workflows and real-time monitoring
-
Efficiency: More results with fewer resources
-
Tracking: Has a history of changes
NOSWORK provides a unique experience to users because it offers:
-
Documents, presentations and spreadsheets
-
Shared storage with version control
-
Email, Chat, Calendar, online meetings with screen sharing and recording (+200 participants)
-
Full access from mobile devices
-
Granular access controls Integration to other IT tools
-
Configuration according to the identity of your business
This document is a guide for using the NOSWORK application. Through its content, the user who interacts with the application will learn to work with the different functionalities that make it up.
1 DESCRIPTION OF THE MAIN PAGE
When the user accesses the system, the main page of the Landingpage is shown (See Figure 1, in which the services and elements that make up the system can be viewed.
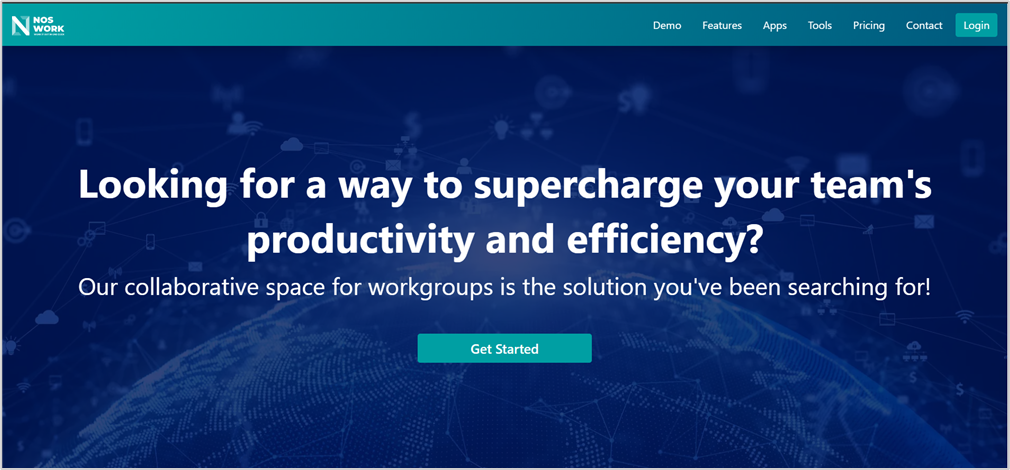 Figure 1 Landingpage
At the top of the Landingpage (See Figure 1), in addition to the system logo , each of the links that are part of the Landingpage can be displayed , which the user can access to view information. Selecting each link will display the corresponding section.
In addition, the Login button is shown that will allow the user to access the system and the Get started button that allows the user to register to start using the services provided by NOSWORK.
1.1 Links
1.1.1 Demo Access
The user selects the DEMO link located at the top of the main page of the Landingpage (See Figure 1), the system directs to the section intended for the demo. (See Figure 2).
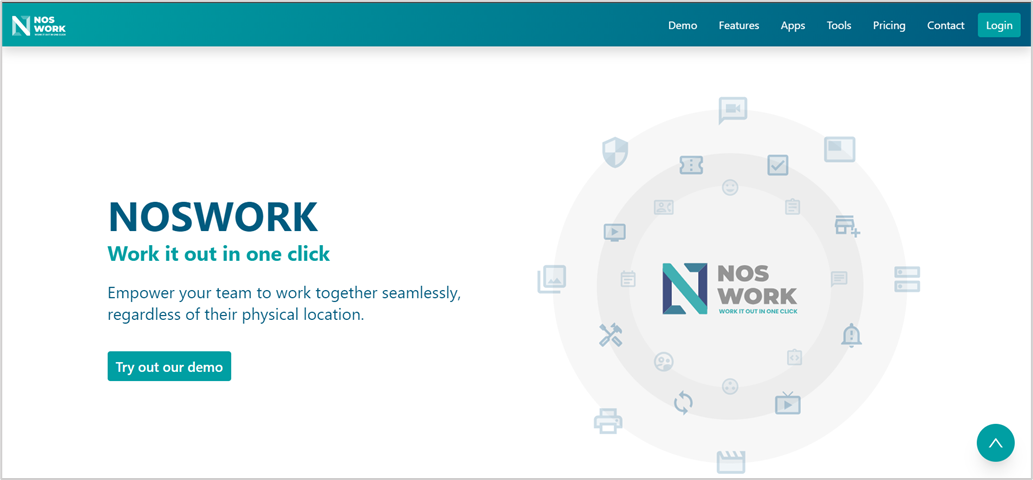 Figure 2 Landingpage/DEMO
At the top of the view intended for the DEMO (See Figure 2), in addition to the system logo , each of the links that are part of the Landingpage can be displayed , which the user can access to view information. Selecting each link will display the corresponding section.
In addition, the Try out our demo button is displayed , which when selected by the user
will show a view with information explaining the procedure that will be carried out to view the DEMO. (See Figure 3).
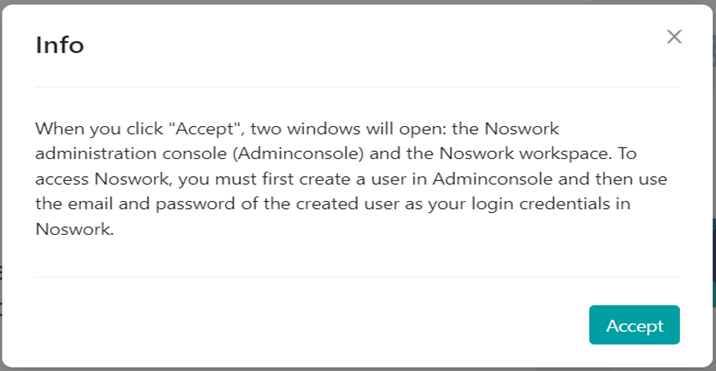
Figure 3 Information message
When the user selects the Accept button, the system redirects to two test views: the administration console view, where the user can manage the users according to the
selected plan (See point 1.1.5) and who will interact with the test view. of the workspace (See Figure 4) and the view of the workspace where the user can interact with the applications integrated into it (See Figure 5).
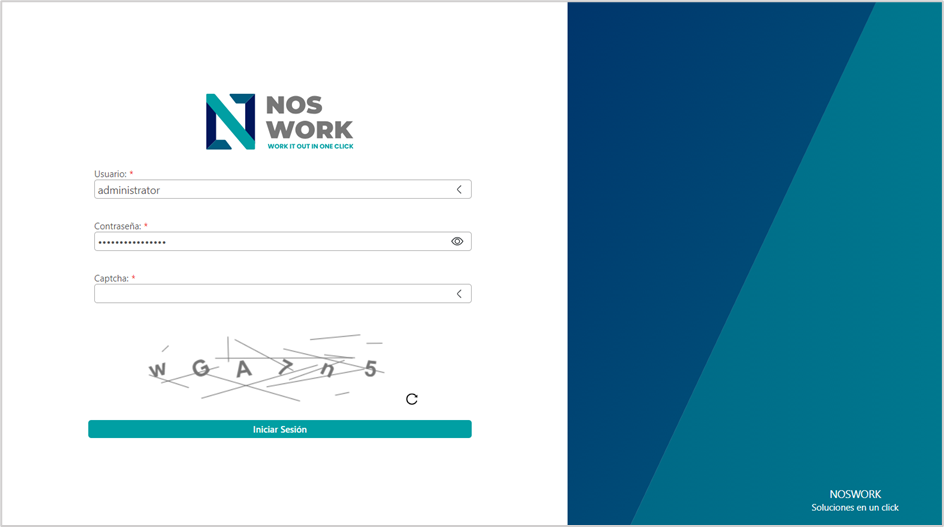 Figure 4 Administration console

Figure 5 Noswork
1.1.2 Access to Features
The user selects the FEATURES link located at the top of the main page of the Landingpage (See Figure 1), the system directs the view to the section intended for FEATURES. (See Figure 6).
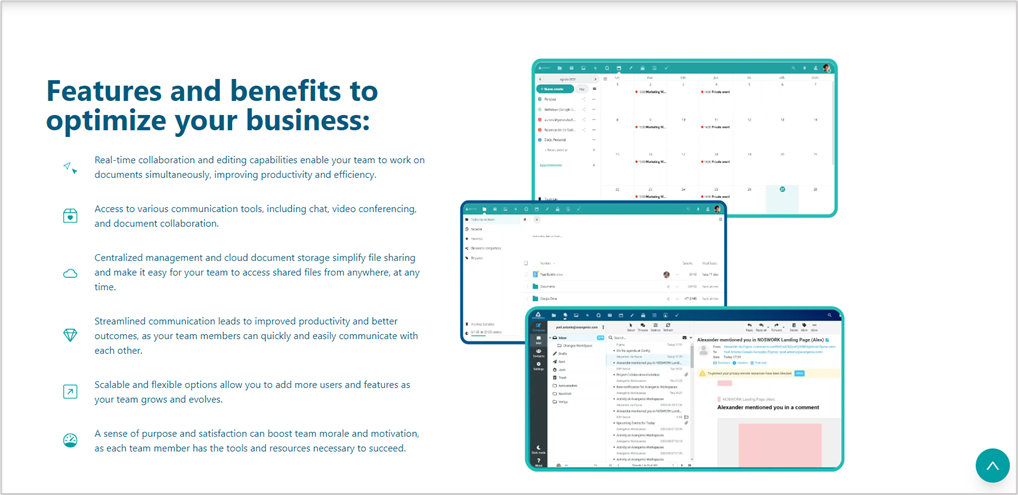 Figure 6 Landingpage/Features
In the view intended for FEATURES (See Figure 6), you can view the main characteristics and benefits that NOSWORK offers with the aim of optimizing the business of the user
1.1.3 Access to Apps
The user selects the APPS link located at the top of the main page of the Landingpage (See Figure 1), the system directs the view to the section intended for APPS. (See Figure 7)
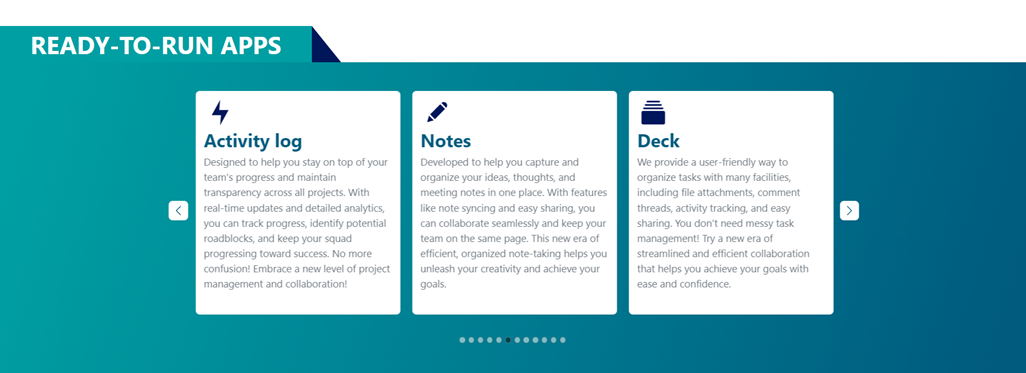 Figure 7 Landingpage/Apps
In the view intended for the Apps (See Figure 7), a carousel of applications can be displayed where the user, sliding along the arrows located on the sides of the carousel, can view each of the applications integrated into the Workspace and each of the them the following information: Logo, Name and Description.
The application carousel will automatically present each of the applications, but the user may be able to direct the presentation flow using the arrows located on the sides of the carousel.
1.1.4 Access to Tools
The user selects the TOOLS link located at the top of the main page of the Landingpage (See Figure 1), the system directs to the section intended for TOOLS. (See Figure 8)
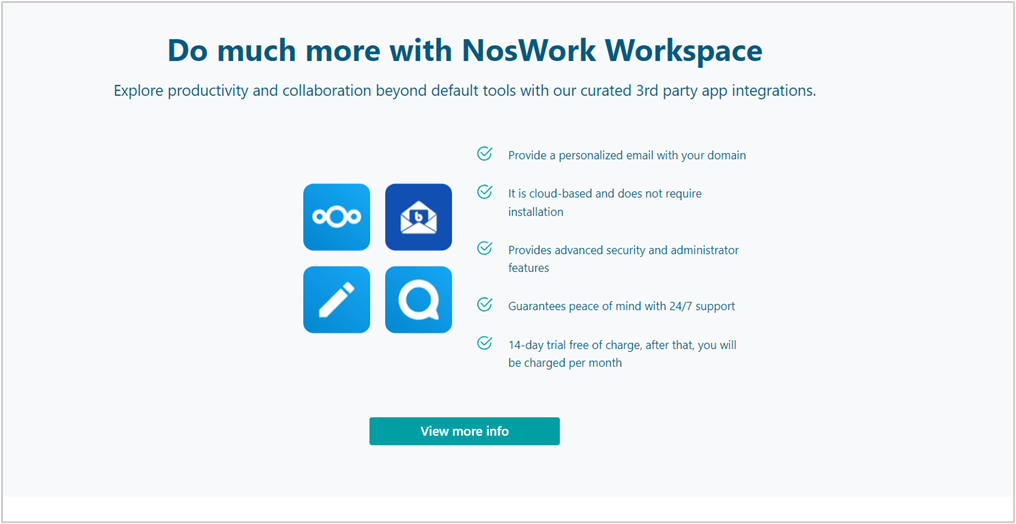 Figure 8 Landingpage/TOOLS
In the view intended for Tools (See Figure 8), you can view the available tools for your use.
In addition, the View more info button can be displayed , which once selected, will redirect the user to the application manuals view (See Figure 9), where they can obtain detailed information on how to link the mobile applications to the applications integrated in the workspace.
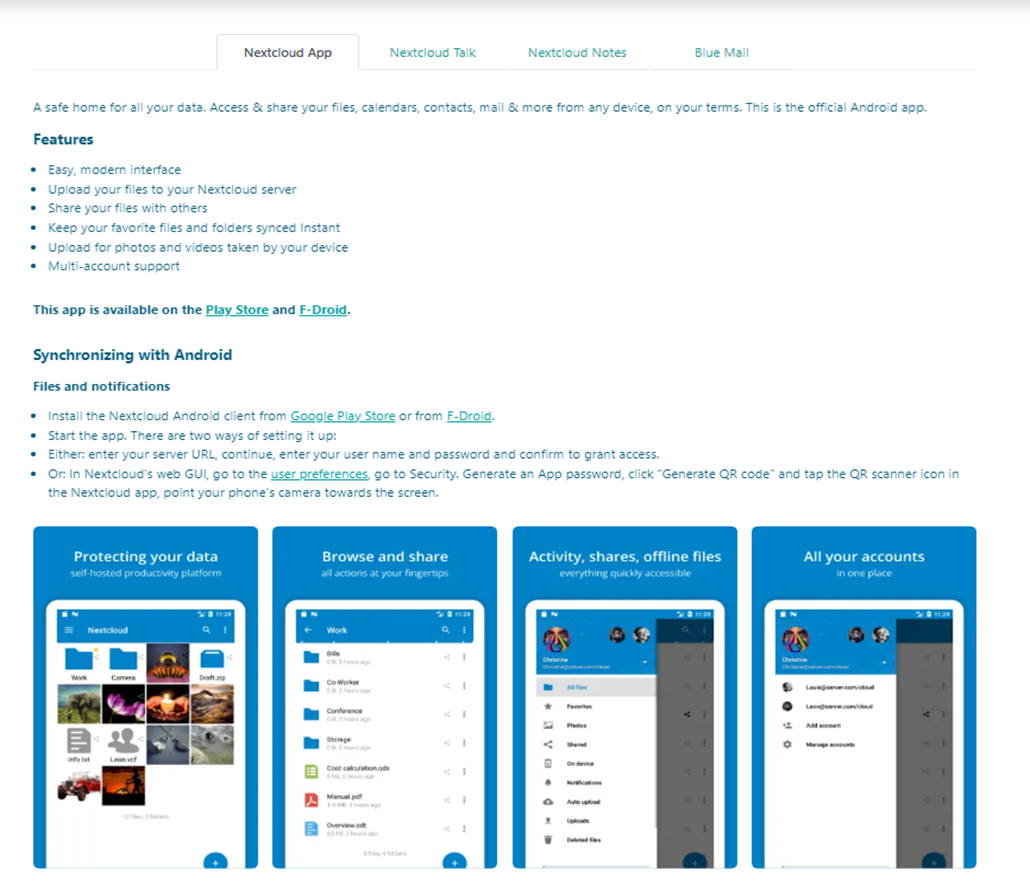 Figure 9 Application Manual
1.1.5 Acces to Pricing
The user selects the PRICING link located at the top of the main page of the Landingpage (See Figure 1), the system directs to the section intended for PRICING. (See Figure 10)
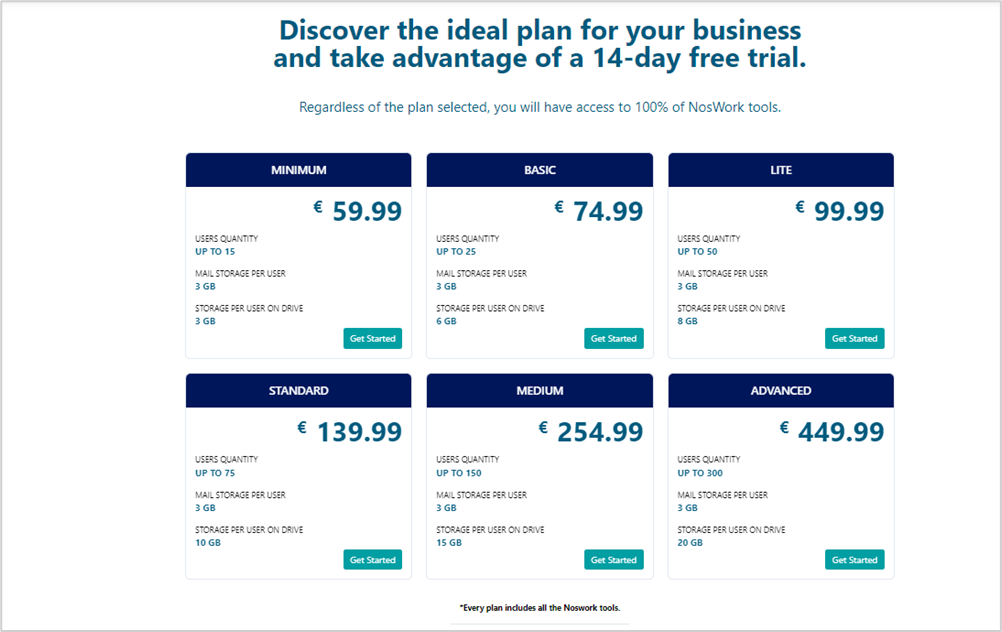 Figure 10 Landingpage/PIRCING
In the view intended for Pircing (See Figure 10), the plans that make up the NOSWORK service can be viewed. The user will be able to view the following data for each plan: number of users who can be part of the plan, email storage capacity per user, disk storage capacity per user and the price of the plan.
Additionally, the Get Started button is displayed , which once selected will allow the user to start the registration process.
1.1.6 Access to Contact
The user selects the CONTACT link located at the top of the main page of the Landingpage (See Figure 1), the system displays a form through which users can send any suggestion, question or concern to the NOSWORK support team. (See Figure 11).
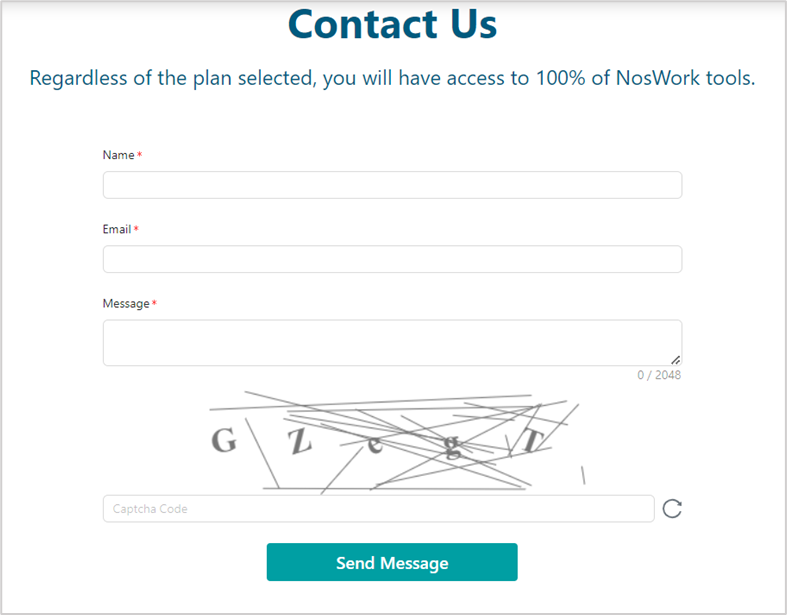
Figure 11 Landingpage/Contact
1.2 Registration in the system
1.2.1 Company Information
The user selects the Get Started button (See Figure 1) in the home or in the Pricing section (See Figure 10) and a form is displayed with two tabs: Star from scratch (See Figure 12) where the company data will be recorded to which the user belongs, and Sig in to your account (See Figure 15) to start a section in the system in case the user has a created account.
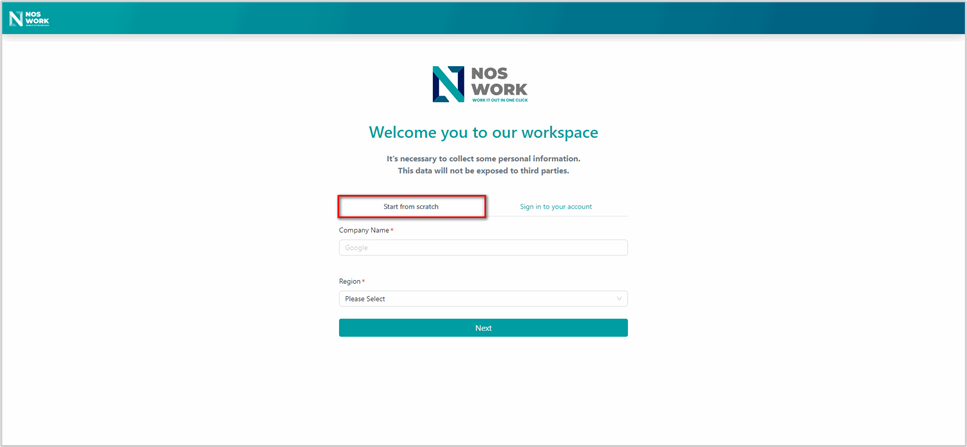 Figure 12 Start from scratch/Company
In the view intended for recording Company data ( Start from Scratch tab)
(See Figure 12) you can view the fields to save the name of the company and the region to which it belongs.
Additionally, the Next button is displayed , which once selected allows the user to save the company data and continue to the next step of registration.
1.2.2 Personal data
After having correctly registered the company data (See Figure 12) and selecting the Next button , the form is displayed in the Star from scratch tab (See Figure 13) where the user's personal data will be recorded.
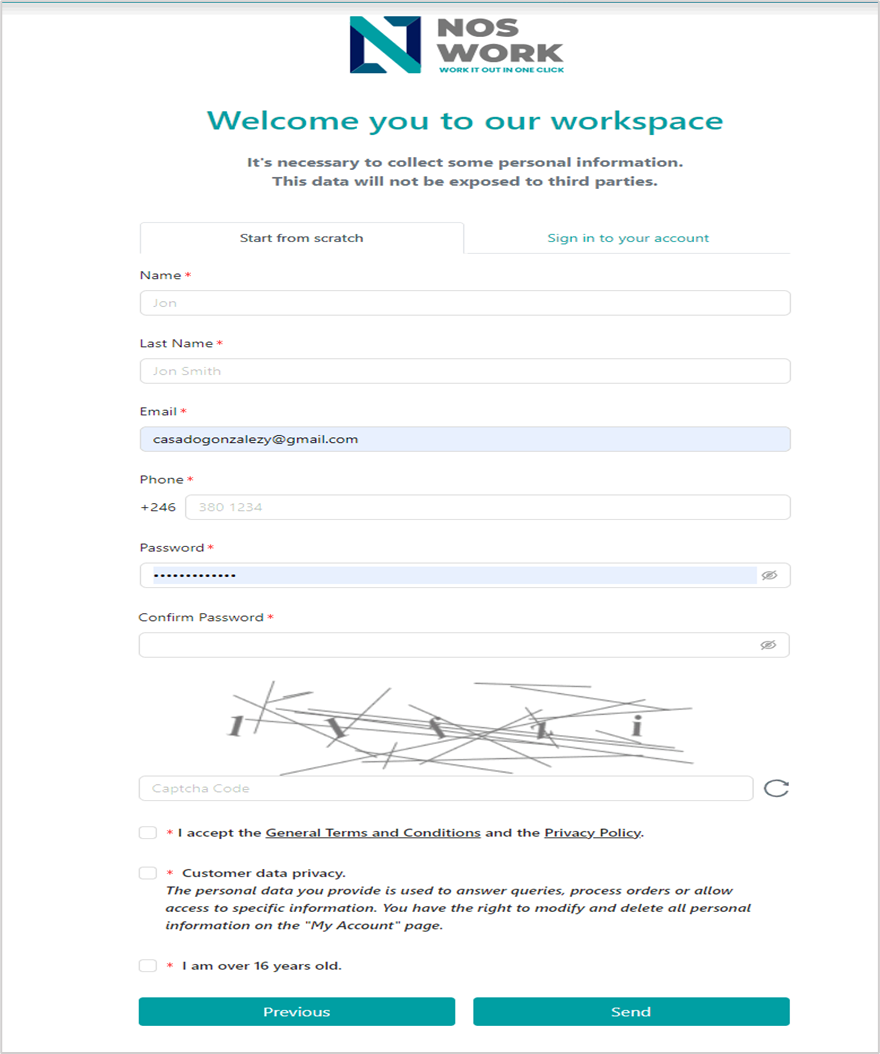 Figure 13 Registration/Personal data
In the view intended to capture the user's personal data (See Figure 13), the fields will be displayed to save the user's name, surname, email, contact telephone number and password.
In addition, the (mandatory) captcha code fields are displayed to verify that the user is not a robot, the checkbox type fields to allow the user to accept the Legal Terms and Data Privacy Policies, and also to verify that they have the majority of Necessary and required age to obtain NOSWORK services (16 years).
The Previous buttons are also displayed , which when selected will allow the user to return to the company data registration form, and the Send button , which when selected will allow the user to save the data and, in turn, shows a view with information explaining the procedure that will be carried out to verify your account (See Figure 14).
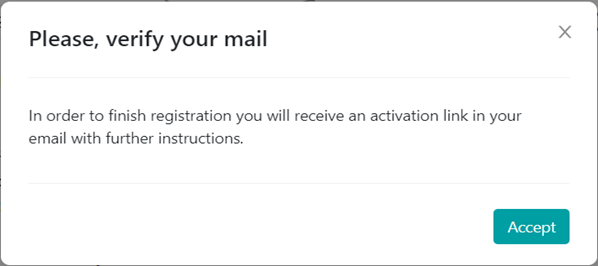
Figure 14 Information message
When the user selects the Accept button, the system sends the email to verify the user's account and redirects it to the Landingpage (See Figure 1).
1.3 Login to the system
After verifying the user's account through the link sent to their email, the system redirects the user to the access window to start the section and enter the system (See Figure 15).
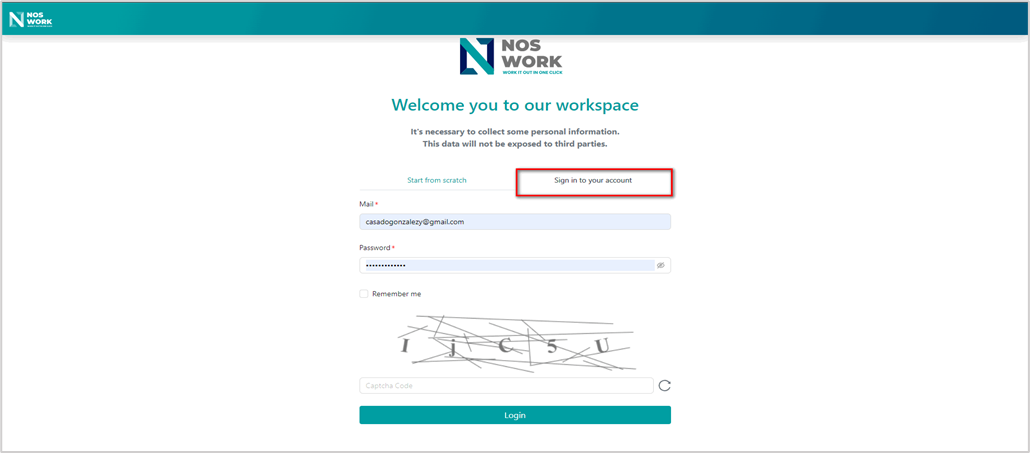 Figure 15 Login
In the view intended for Login, the fields are displayed to capture the user (email) and password specified in the registration process for access, the checkbox type field is also displayed to allow the user to remember their credentials for a period of certain time, and the Captcha Code field to verify that the user who is accessing the system is not a robot.
In addition, the Refresh button is shown associated with the Captcha field to reload the captcha code in case the user does not understand it or cannot identify it correctly. The Login button is also displayed, which when selected will allow you to validate if the data is correct and, if so, be able to enter your profile configuration in the system (See Figure 16).
2. My profile
Once the user has successfully completed the login process, the My Profile page is displayed (See Figure 16).
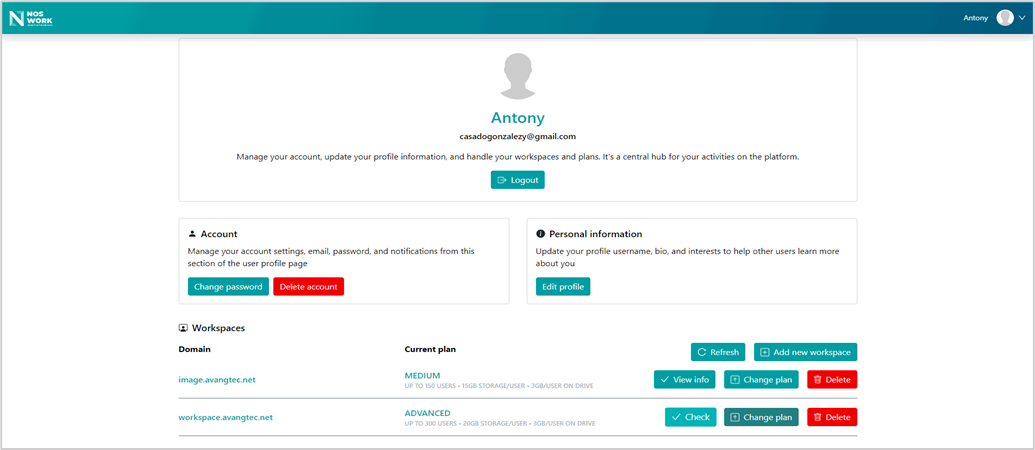 Figure 16 User profile
The My Profile view (See Figure 16) displays the authenticated user's information, as well as the actions they can perform from their profile. Below, each of the actions that the user can
perform as part of their account configuration is detailed and described.
2.1 Logout
In the My Profile view, the user selects the Logout option , located below the user information or in the menu located at the top, the system logs out the user and displays the Landingpage view (See Figure 1).
2.2 Setting up your account
In the My profile view in the Account section the user can conFigure their account, email, password and notifications. (See Figure 17)
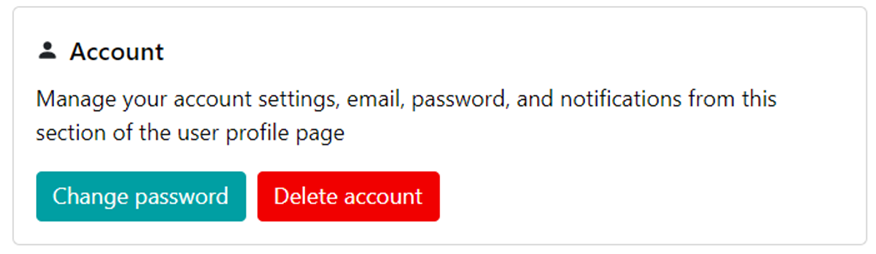 Figure 17 Account
2.2.1 Change password
In the Account section (See Figure 17) the user selects the Change password option, the system displays a form (See Figure 18), where the user can specify the information to change their password.
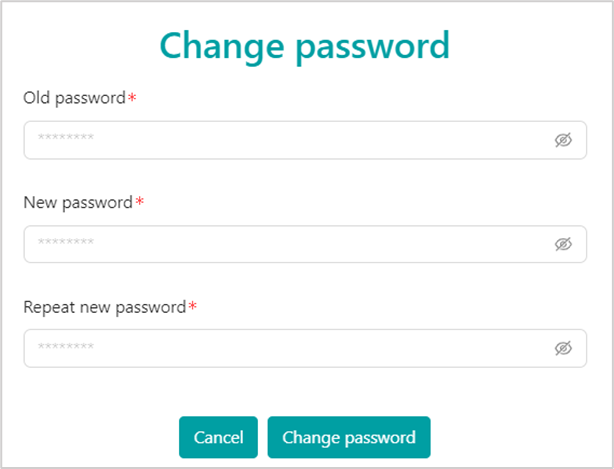
Figure 18 Change password
Once in the form to change credentials, if the user selects the Cancel option , the system returns to the My Profile view.
Once the information to change the password is specified, if the user selects the Change password option, the system changes the name of the button to Changing password until the user finishes updating the password. Once the password is updated, a message is displayed informing that the password was changed successfully. (See Figure 19)

Figure 19 Information message
2.2.2 Delete account
In the Account section (See Figure 17) the user selects the Delete account option , the system displays a pop-up window to confirm the operation (See Figure 20).
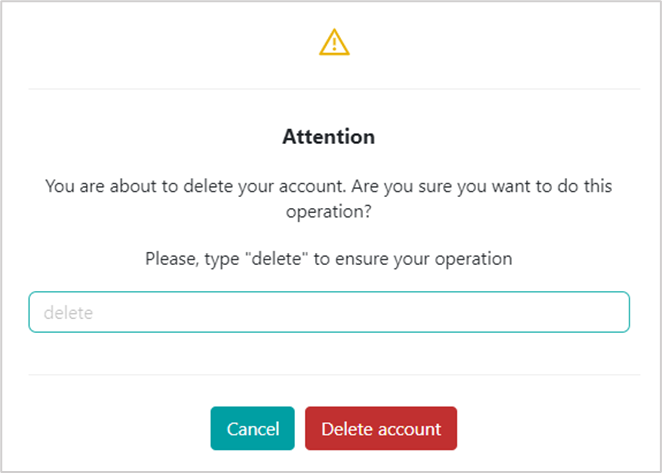
Figure 20 Delete account/Confirmation message
Once in the confirmation message to delete the account, if the user selects the Cancel option the system returns to the My Profile view.
To delete the account, the user must specify the word “delete” and then must select the Delete account button. Once the button is selected, the system deletes the user's account and displays the Landingpage view (See Figure 1).
2.1 Setting your personal information
In the My profile view in the Personal information section the user selects the Edit profile option, the system displays an Edit Personal Information form through which the user You will be able to edit your personal information. (See Figure 21)

Figure 21 Edit personal information
Once in the form to edit the information, if the user selects the Cancel option , the system returns to the My Profile view.
Once the data has been modified, if the user selects the Save changes button, the system changes the name of the button to Saving changes until the information is finished updating.
Once the data has been updated, a message is displayed informing that the update was completed successfully (See Figure 22) and you return to the My Profile view.

Figure 22 Information message
2.4 Gestión de workspace
In the My Profile view in the Workspaces section , the user will be able to manage all their workspaces and all their information will be displayed. If the user does not have any workspace created yet, only the Add workspace button will be shown in the section (See Figure 23), otherwise the list of workspaces is shown with the actions to be performed on each of them. (See Figure 24)
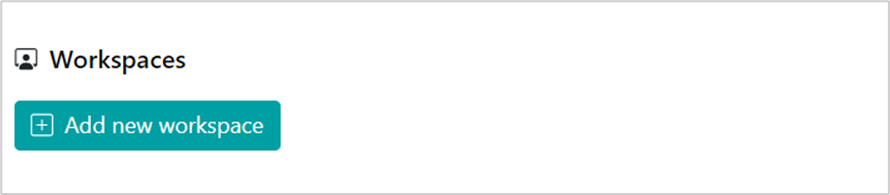 Figure 23 Workspace
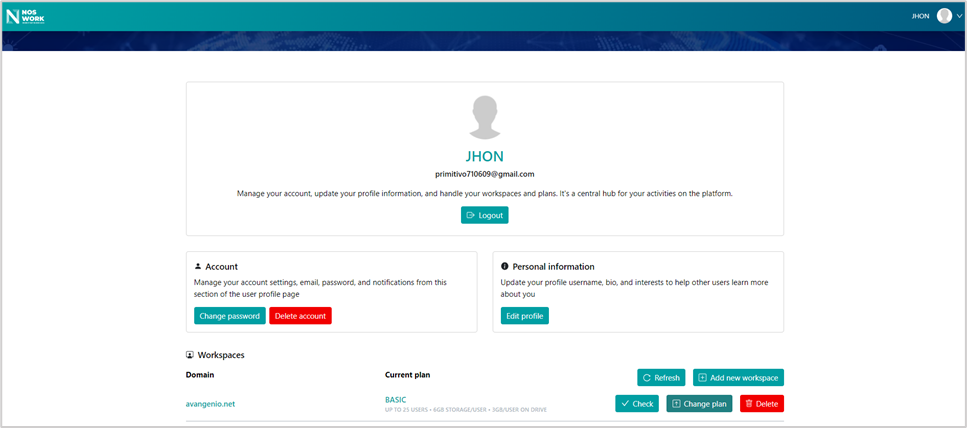 Figure 24 Workspace
2.4.1 Add workspace
In the My Profile view in the Workspace section , the user selects the Add new workspace option, the system displays the view that allows you to select a plan. (See Figure 25)
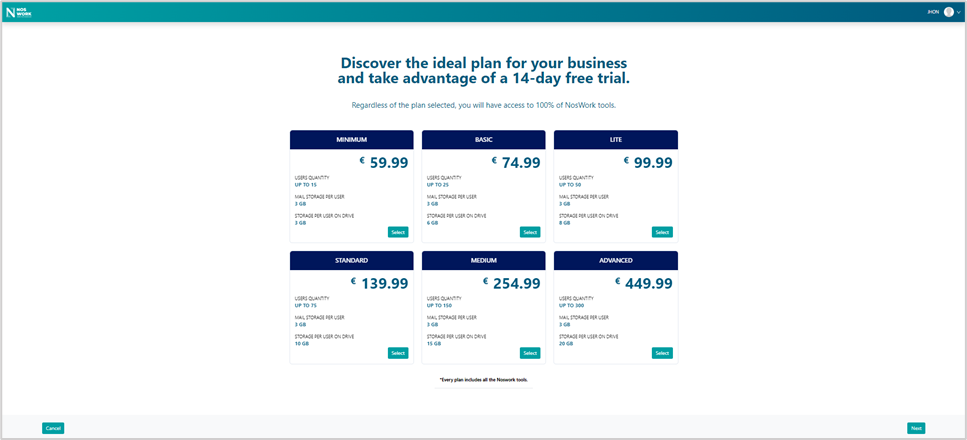 Figure 25 Add workspace
Once in the view to select the plan, if the user selects the Cancel option the system returns to the My profile view.
The user must press the Select button to select a plan, once selected the button changes its name to Selected and its color to blue. Once the plan is selected, the user must select the Next button, the system displays the view to define the domain used by the company. (See Figure 26)
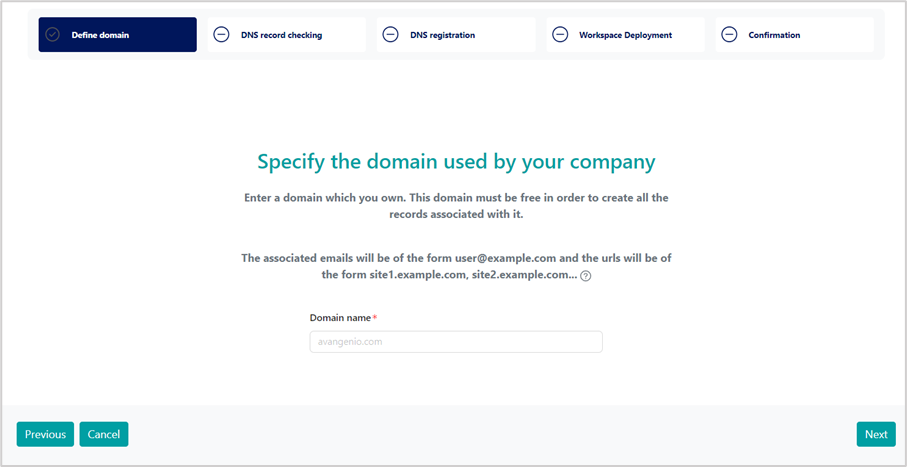 Figure 26 Add workspace/Define domain
Once in the view to define the domain, if the user selects the Cancel option the system returns to the My profile view.
If the user selects the Previous option , the system returns to the previous view.
In the view to define the domain, the user specifies the domain name and then selects the Next option. Once the Next option is selected, the system displays a pop-up window informing that the domain was added successfully. (See Figure 27)
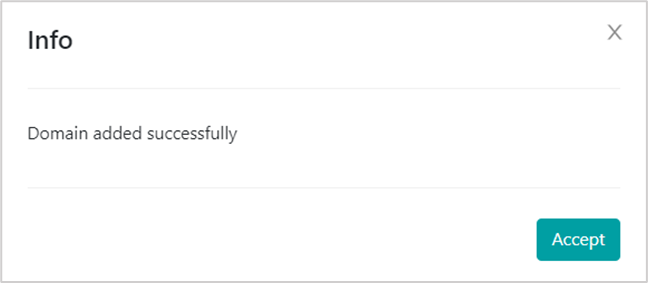
Figure 27 Add worksapce/Domain added
Once in the pop-up window, when the user selects the Accept option, the system updates the Define master step in green and shows the view to continue the workspace configuration: DNS record checking. (See Figure 28)
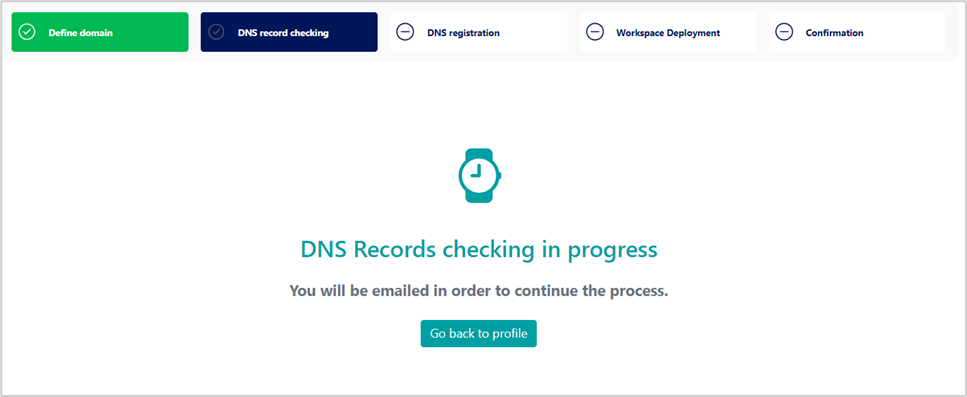 Figure 28 Add workspace/Check DNS
Once in the DNS record checking view (See Figure 28), the user must select the Go back to profile option. When selecting the option, the system displays the My profile view in which it can be seen that the information was updated in the workspace listing and you have to wait until the support team sends the DNS record. (See Figure 29)
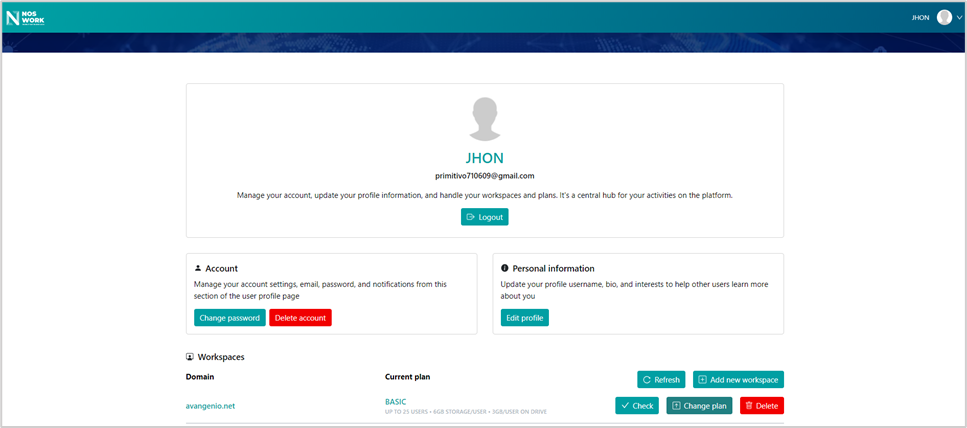 Figure 29 Workspace
Once the support team sends the DNS records, the Check button will flash as a sign that the user can continue with the process. The user selects the Check option, the system displays the DNS registration view that allows the user to continue with the process, and also displays the DNS record checking tab in green as a sign that this step has already been completed. (See Figure 30).
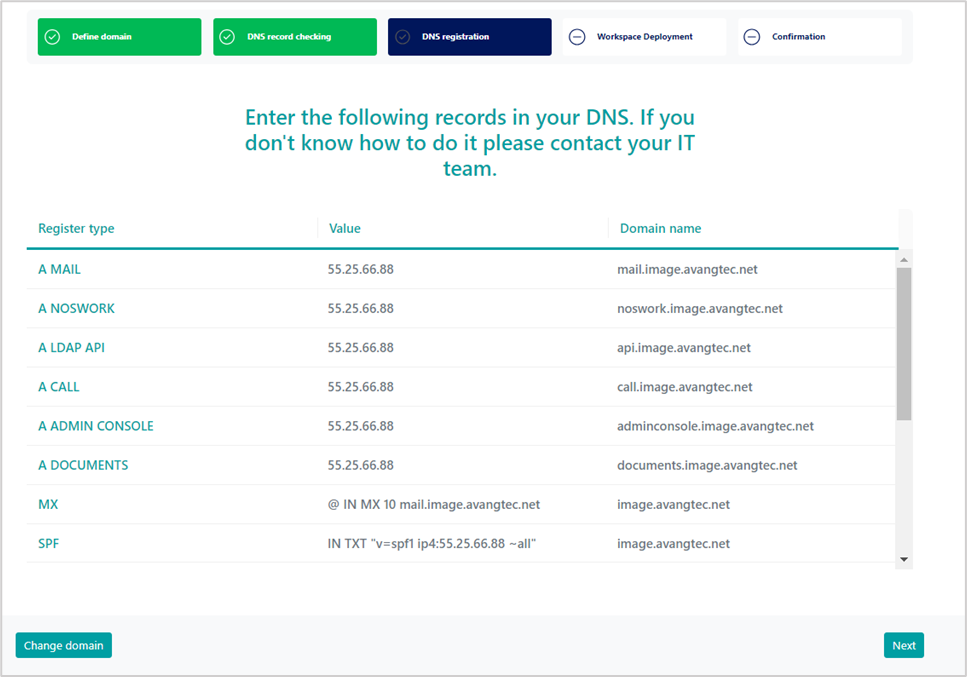 Figure 30 Add workspace/DNS record
Once in the DNS registration view, if the user selects the Change domain option , the system returns to the Define domain step and must start the process again. If the user selects the Next option , the system marks the DNS registration tab in green and displays the Workspace Deployment view. (See Figure 31)
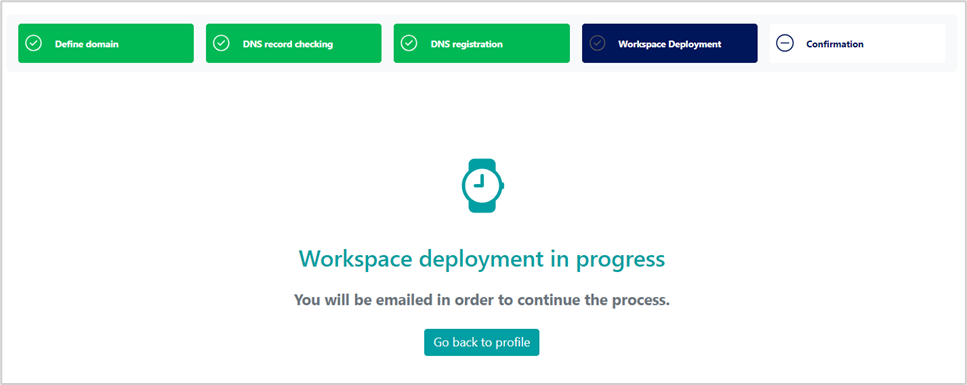 Figure 31 Add workspace/Workspace Deployment
Once in the Workspace Deployment view (See Figure 31), the user must select the Go back to profile option. When selecting the option, the system displays the My profile view in which it can be seen that the information was updated in the list. of workspace and you must wait until the support team sends the access credentials and links to the workspace and the Administration Console via email. (See Figure 29)
Once the support team makes the relevant configurations, the Check button changes to View info (See Figure 32).
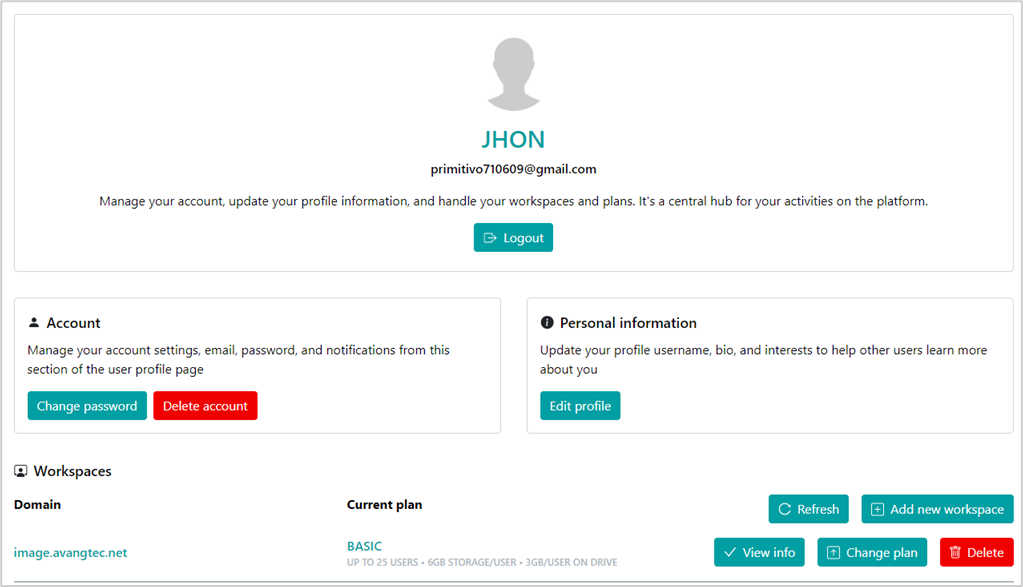 Figure 32 Add workspace/ View info
The user selects the View info button , the system displays the Confirmation view where the workspace information is displayed, such as: administration access URL, email URL, workspace access URL, administration user and password. (See Figure 33)
The password will be shown encrypted. If the user wants to view the password, they must select the eye icon located on the side of the password field. Once the icon is selected, the system must display the password.
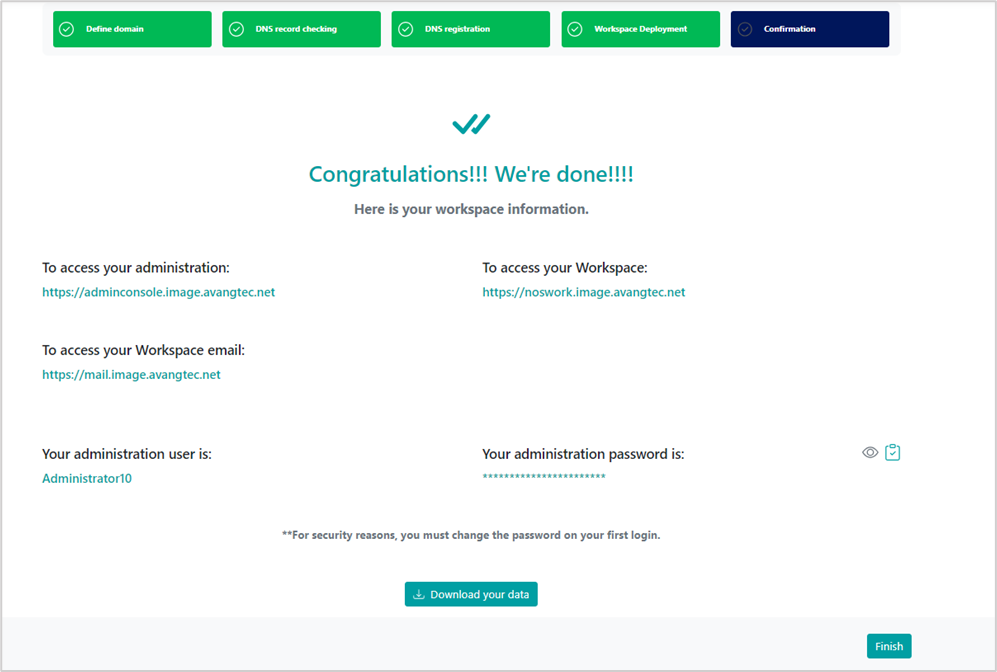 Figure 33 Add workspace/View info
The user selects the Download your data button, the system downloads all the access information in a file. The user selects the Finish button, the system displays a pop-up window to welcome the user. (See Figure 34)

Figure 34 Add workspace/Finish
The user selects the Accept button, the system returns to the user's profile with the updated list. (See Figure 35). Note: From this moment on, the Free Trial period of using NOSWORK services begins for users.
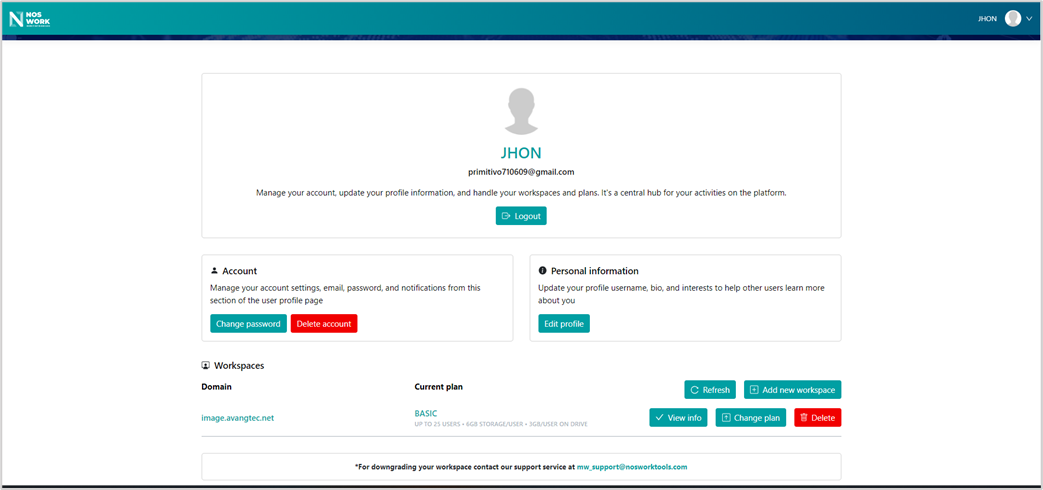 Figure 35 My Profile
2.4.2 Refresh
In the My Profile view in the Workspace section, the user selects the Refresh option , the system updates the data in the section.
2.1.1 Add new workspace
In the My Profile view in the Workspace section , the user selects the Add new workspace option, which is part of the floating options in the list of workspaces. The system allows you to carry out the same process described above to add another workspace. (See section 2.4.1)
2.1.2 View info
In the My profile view in the Workspace section, the user selects the View info option , the system displays the view that allows viewing all access information. (See Figure 33)
2.4.5 Change plan
In the My Profile view in the Workspace section, the user selects the Change plan option , the system displays a pop-up window with the plans and allows you to change the plan that is currently being used. (See Figure 36)
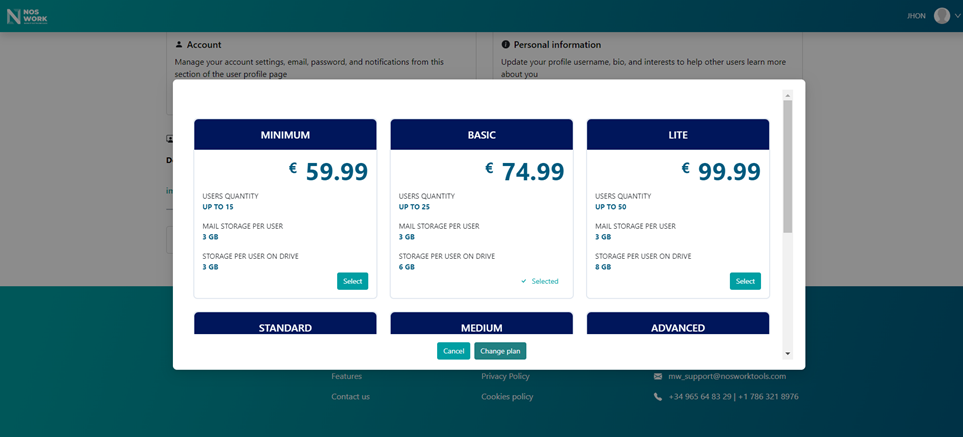 Figure 36 Change plan
In the Change plan view the system shows all available plans, the plan in use cannot be selected, but is shown as Selected.
If the user selects the Cancel option, the system returns to the My Profile view.
To change a plan the user must select the Select button associated with the plan they wish to change to. Additionally, you must select the Change plan button. Once this option is selected, the system sends the request to change the plan, returns to the My profile view and changes the Change plan button associated with the element in the table to the Changing plan button .
Once the support team accepts the plan change request, the view is updated with the new plan.
2.2.6 Delete
In the My Profile view in the Workspace section the user selects the Delete option, the system displays a pop-up window to confirm the deletion. (See Figure 37)
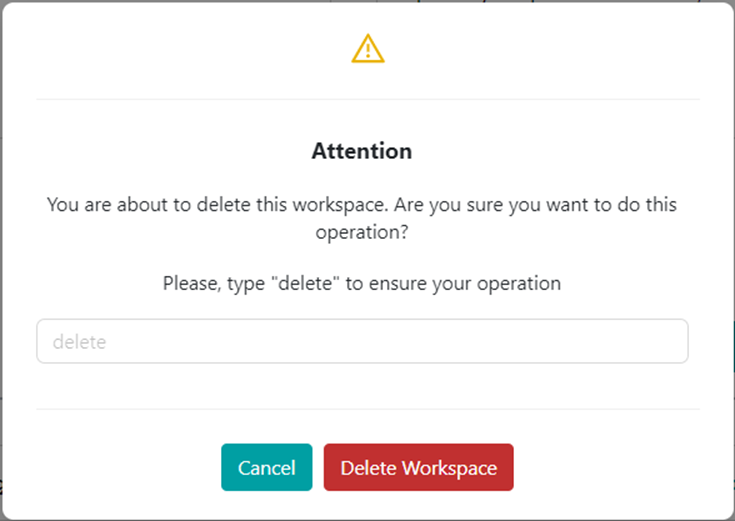
Figure 37 Delete workspace/Confirmation message
Una vez en el mensaje de confirmación para eliminar el elemento, si el usuario selecciona la opción Cancel el sistema regresa a la vista Mi perfil.
Once in the confirmation message to delete the item, if the user selects the Cancel option the system returns to the My Profile view.
To delete the element, the user must specify the word “delete” and then must select the Delete Workspace button. Once the button is selected, the system changes the name of the Delete Workspace button to Sending request until the operation is completed, and then changes the name. from the Delete button to Deleting (See Figure 38), and the View info and Change plan buttons are disabled

Figure 38 Delete workspace