Nextcloud user manual
EXPECTED USE Collaboration platform that helps thousands of modern organizations protect data and collaborate across divisions and beyond company boundaries.
To better meet our customers' needs, they have access to a special Nextcloud Enterprise build pre-configured, optimized and hardened for the special needs of large-scale production- critical enterprise deployments. Nextcloud Enterprise offers the following key benefits:
-
Enhanced Reliability: Nextcloud Enterprise receives additional quality assurance to provide the highest degree of reliability and offer a longer lifecycle.
-
Improved scalability: Nextcloud Enterprise is pre-configured and optimized for enterprise large-scale production needs, rather than users domestic.
-
Enhanced Security: Nextcloud Enterprise customers get priority access to security and stability fixes to ensure smooth operation right out of the box.
-
Certified Integrity: Nextcloud Enterprise is a certified codebase, tested and guaranteed for legal compliance such as GDPR and HIPAA.
Main features:
-
Regain control of your data
-
Colaboración remota más fácil
-
Customizable and scalable
-
Personalizable y escalable
-
No data leaks to third parties
1. ACCESS TO THE SYSTEM
You can connect to your Nextcloud server using any web browser. Simply point it to your Nextcloud server URL (e.g. cloud.example.com) and enter your username and password.
Figure 1 System login
1.1 Navigating the main user interface
By default, the Nextcloud web interface opens to your Files page. You can add, delete and share files and make changes based on access privileges set by you (if you are managing the server) or by your server administrator.
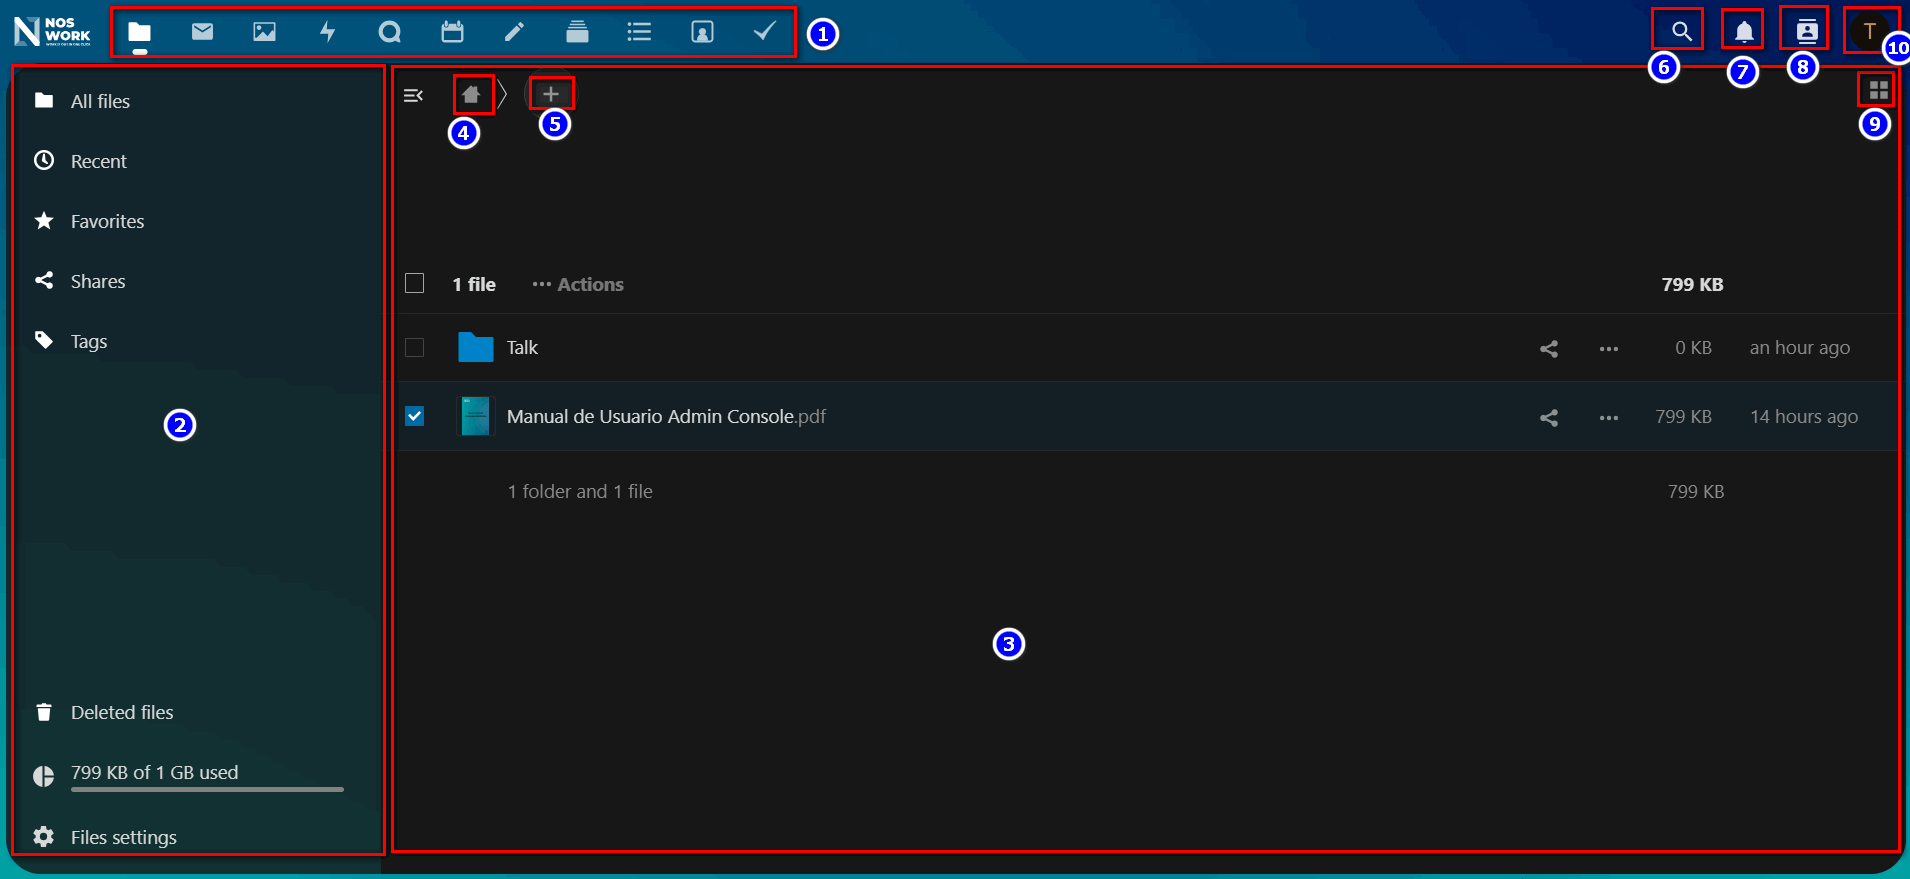 Figure 2 Main page
Application Selection Menu (1) – Located in the top left corner, you will find all the applications that are available on your Nextcloud instance. Clicking on an app icon will redirect you to the app.
Application information field (2): Located in the left sidebar, provides filters and tasks associated with the selected application. For example, when you use the Files apps, you have a special set of filters to quickly find your files, such as files that have been shared with you and files that you have shared with other people. You will see different elements for other applications.
Application View (3) – The main center field in the Nextcloud UI. This field displays the content or user roles of the selected application.
Navigation Bar (4): Located above the main viewing window (the Application View), this bar provides a type of navigation path that allows you to migrate up levels of the folder hierarchy up to the root (home) level. .
New Button (5): Located on the navigation bar, the New button allows you to create new files, new folders, or upload files.
Search field (6): Click the magnifying glass in the upper right corner to search for files.
Notifications button (7): provides a list of the user's pending notifications about activities that they have allowed to receive.
Contacts Menu (8) – Gives you an overview of your contacts and users on your server. Depending on the details provided and the apps available, you can directly start a video call with them or send them emails.
Gallery Button (9): It looks like four small squares and takes you directly to your image gallery.
Settings Menu (10): Click on your profile photo, located to the right of the search field, to open the Settings drop-down menu. Its Settings page provides the following settings and features:
• Links to download desktop and mobile applications
• Server usage and space availability.
• Password management
• Name, email, and profile photo settings
• Manage browsers and connected devices
• Group memberships
• Interface language settings
• Manage notifications
• Federated cloud ID and social sharing buttons.
• SSL/TLScertificate manager for external storages
• Your two-factor configuration
• Nextcloud version information
1.2 Accessing your files
You can access your Nextcloud files with the Nextcloud web interface and create, preview, edit, delete, share and re-share files (See Figure 3). Your Nextcloud administrator has the option to disable these features, so if any of them are missing from your system, check with your server administrator.
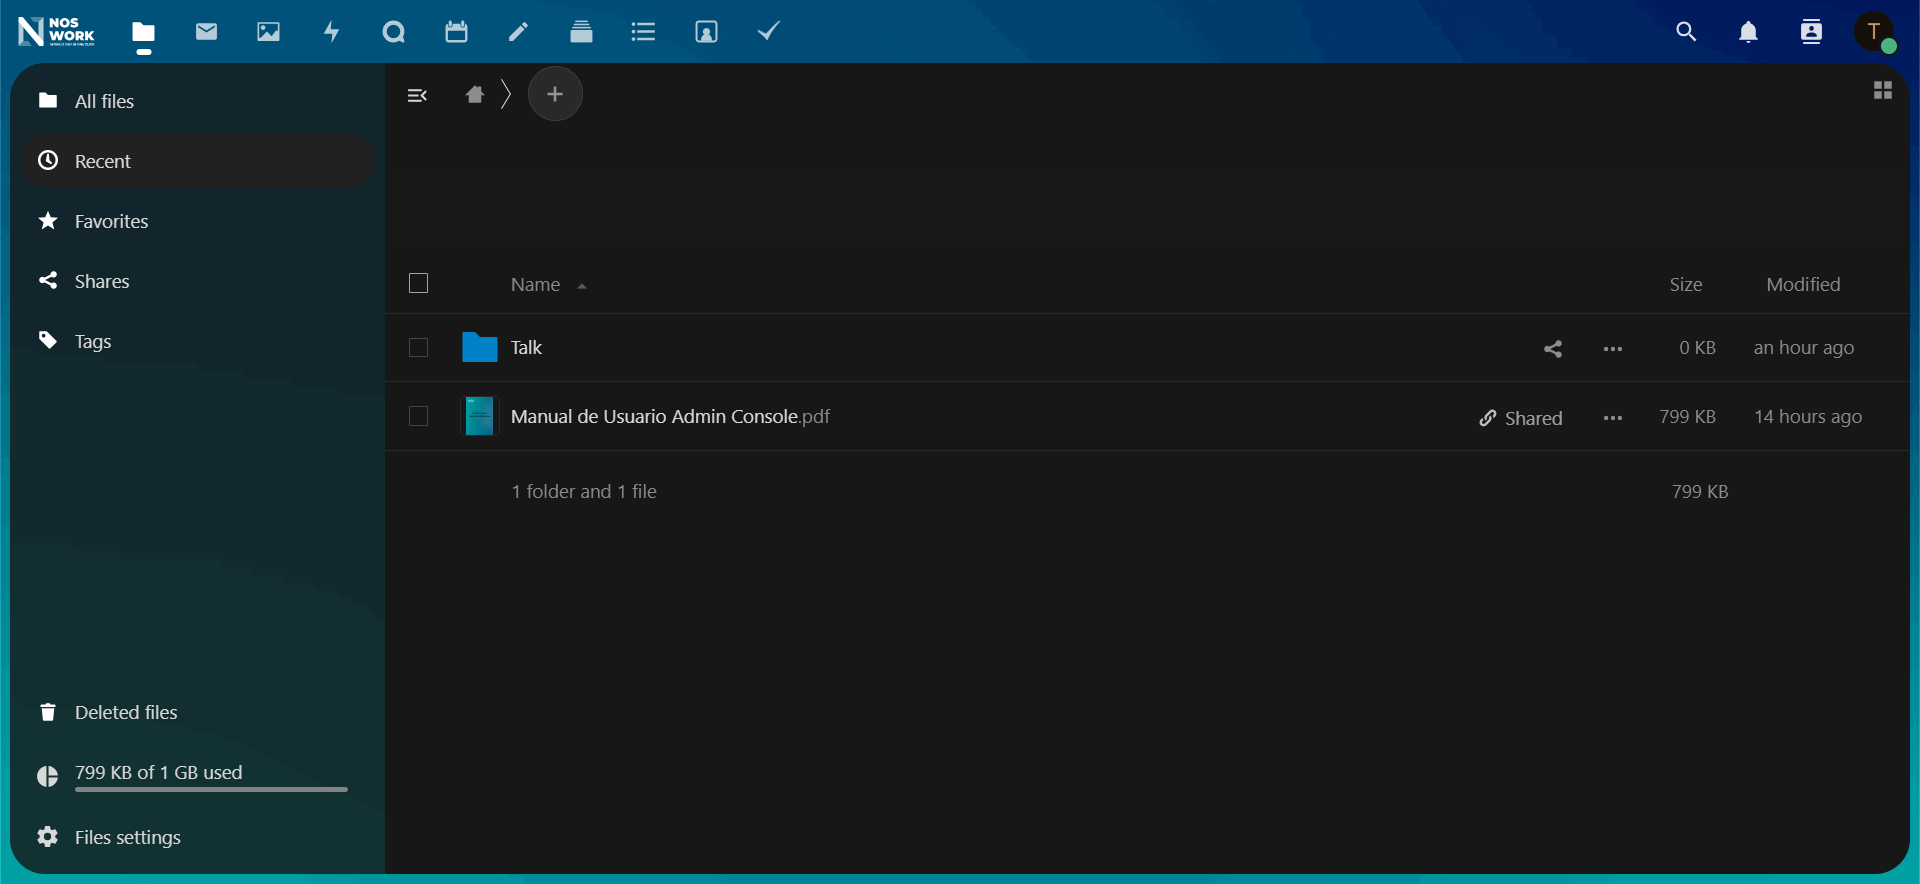 Figure 3 Files
1.2.1 Tag files
You can assign tags to files. To create labels, open a file in Details view (See Figure 4). Then write your labels. To enter more than one tag, press the return key after creating each tag. All tags are system tags and are shared by all users on your Nextcloud server.
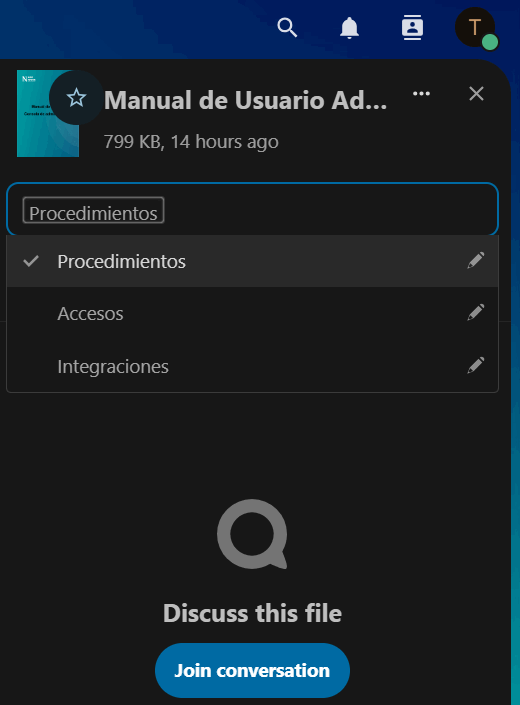
Figure 4 Label files
Then use the Tags filter in the left sidebar to filter files by tags (View Figure 5)
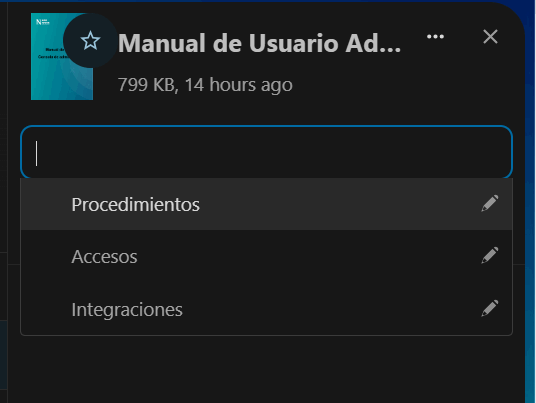
Figure 5 Filter by tags
1.2.2 Comments
Use Details view to add and read comments to any file or folder (Chat). Comments are visible to everyone who has access to the file (See Figure 6)
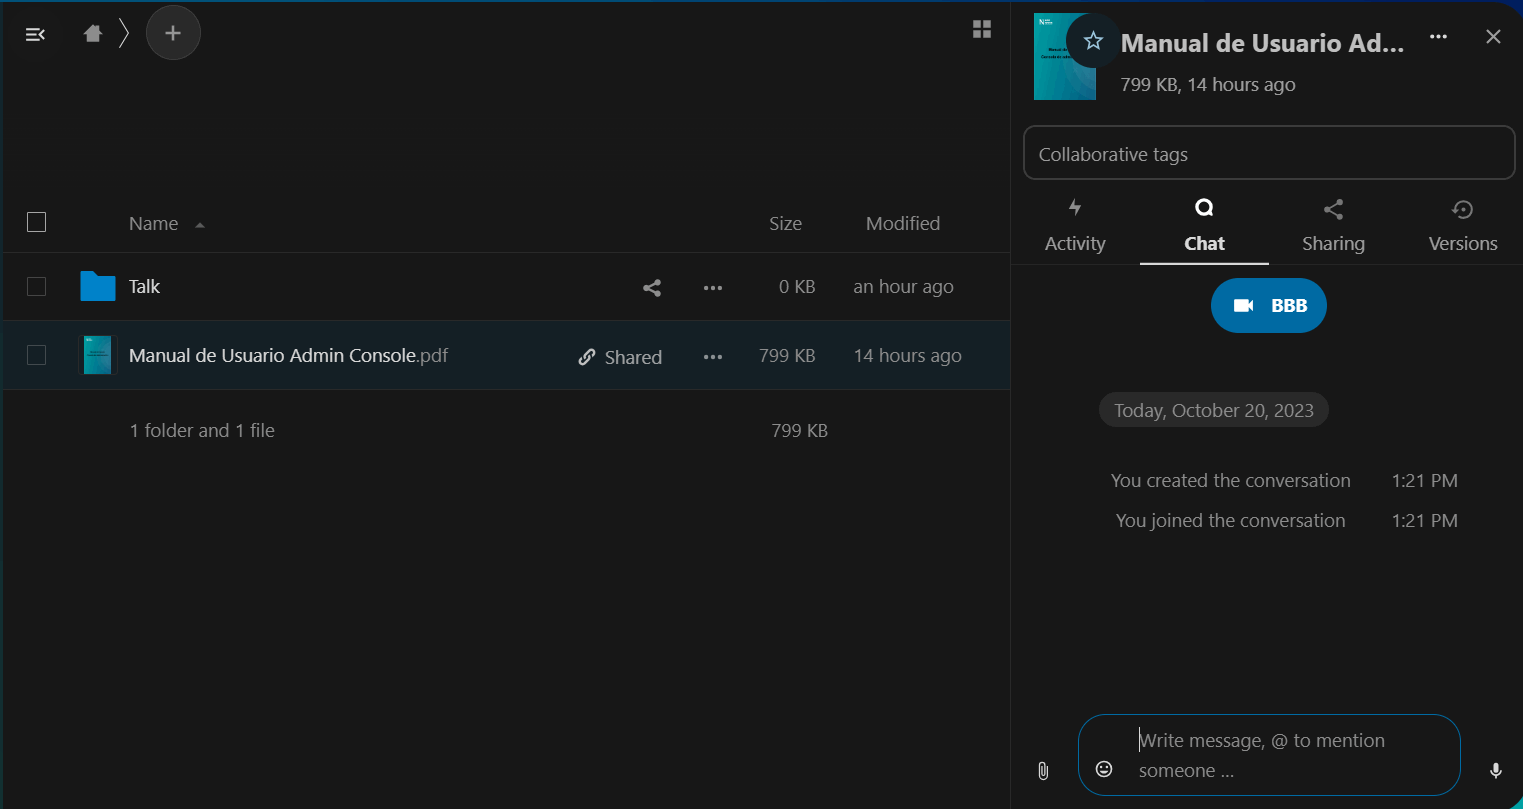 Figura 6 Comments
1.2.3 Share files
Los usuarios de Nextcloud pueden compartir archivos y carpetas. Los posibles objetivos son * public links * users * groups * circles * conversations * users or groups on Nextcloud federated servers
1.2.4 Share public links
You can share files and folders through public links. There are several options available for public folder shares (See Figure 7)
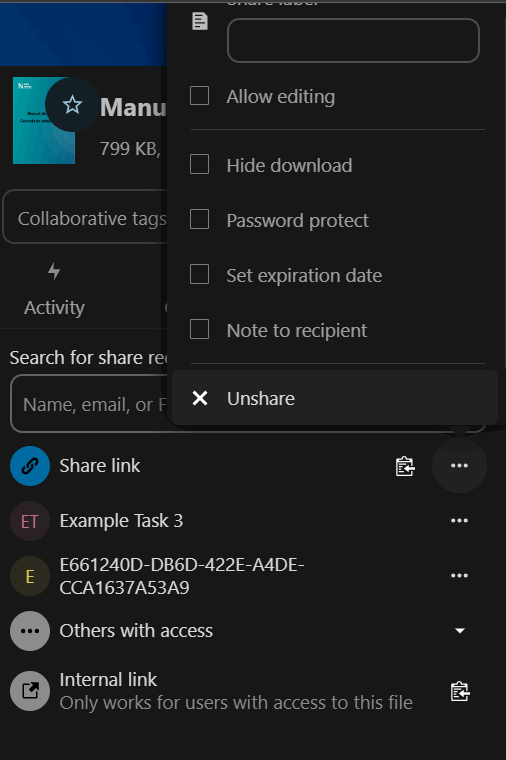
Figure 7 Public links
-
Read only to allow viewing and downloading
-
Allow upload and editing
-
With File Drop, the sharer can only upload files to a folder without seeing the files already in that folder.
-
Hide download prevents shared user from downloading
-
Password protect
-
Setting the expiration date will automatically disable the action
-
Note to recipient
-
Stop sharing to revert sharing
-
Add another link to create multiple public links with different rights
For public shared files, you can enable editing of the file with one of Nextcloud's collaborative editing solutions.
1.2.5 Internal shared resources with users and groups.
When sharing with users, groups, circles, or members of a Talk conversation, the rights to files or folder contents are adjustable (See Figure 8)

Figure 8 Internal sharing
As a share user, you can configure whether you want to automatically accept all incoming shares and add them to your root folder, or whether you want to be asked each time whether you want to accept or reject the share (See Figure 9).
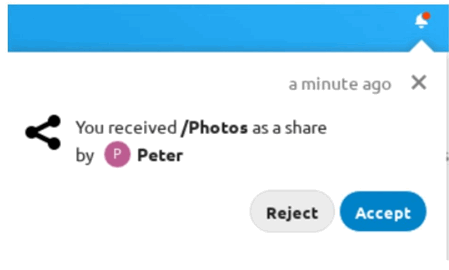
Figure 9 File Share Notification
To adjust your opt-in settings, go to Settings > Personal > Sharing (View Figure 10)
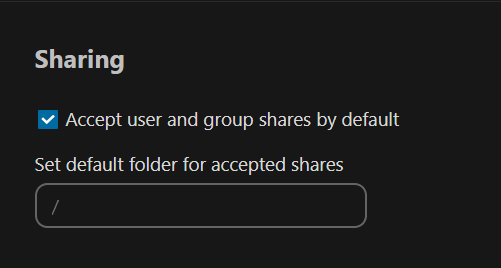
Figure 10 Acceptance Settings
1.2.6 Others whit access
To find out if others can access a file or folder by sharing it at a higher hierarchical level of folders, click Others with access on the sharing tab (See Figure 11).
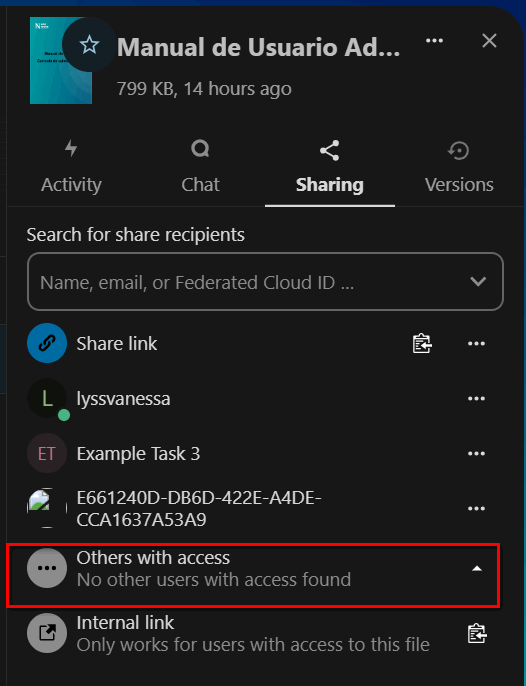
Figure 11 Others whit access
The list shows all users, groups, chats, etc. who have been given access to the current object by sharing a higher folder in the hierarchy (See Figure 12).
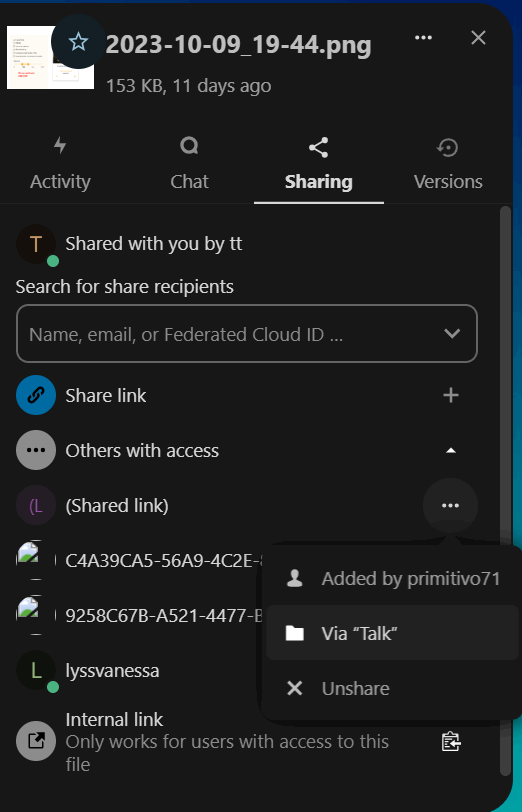
Figure 12 Shared with / Via
Click on the three dots to
-
see who started the action
-
see where the share started (click to navigate to the folder, as far as you have access there)
-
stop sharing the initial action (only accessible to the owner of the action)
Note: This information is only visible to the owner of a file/ folder or sharers with sharing rights.*
Any folder that has been shared is marked with the Shared overlay icon. Shared public links are marked with a chain link. Non-shared folders are not checked (See Figure 13).
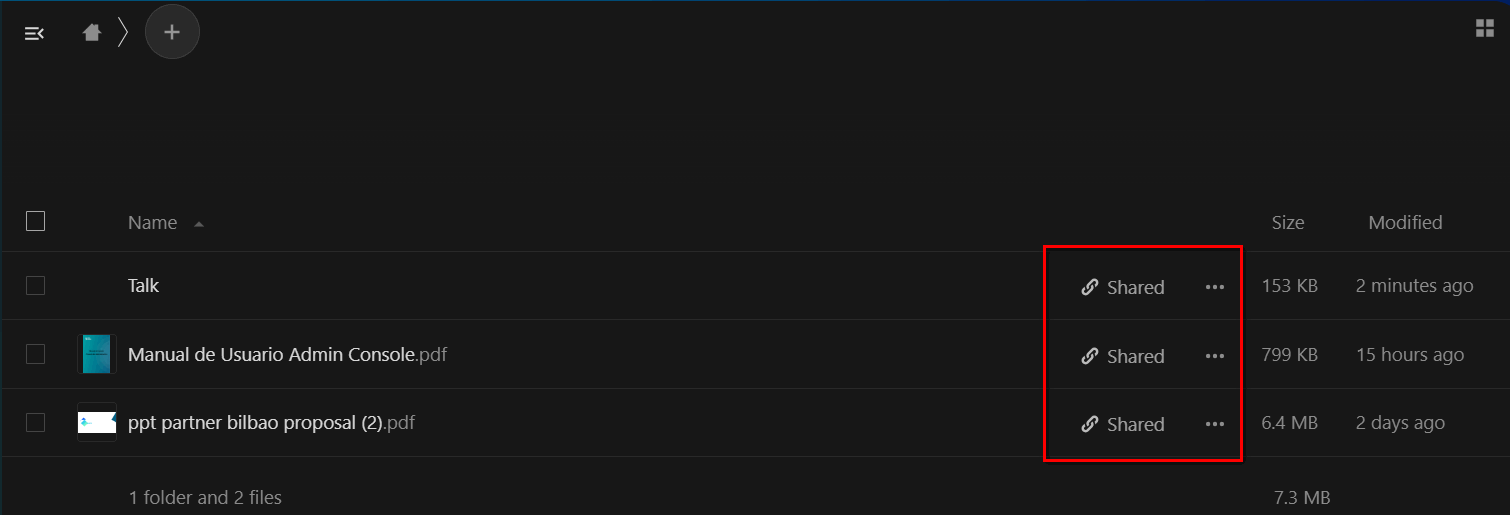 Figure 13 Share/ Status Icons
1.3 Create or upload files and directories
Upload or create new files or folders directly to a Nextcloud folder by clicking the New button in the Files app (See Figure 14)
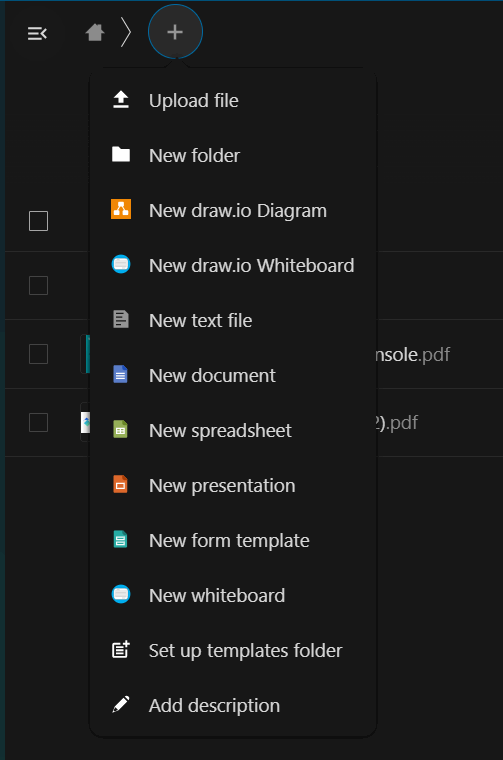
Figure 14 Create/ Upload file-folders
The New button provides the following options: Up arrow: Upload files from your computer to Nextcloud. You can also upload files by dragging and dropping them from your file manager. Folder: Create a new folder in the current folder. Text file: Create a new text file and add the file to your current folder. Office file: Create a new blank document from the selected option:: * Word * Excel * Power point * Form templates
1.4 Select files or folders
You can select one or more files or folders by clicking their check boxes. To select all files in the current directory, click the checkbox located at the top of the file list (See Figure 15).
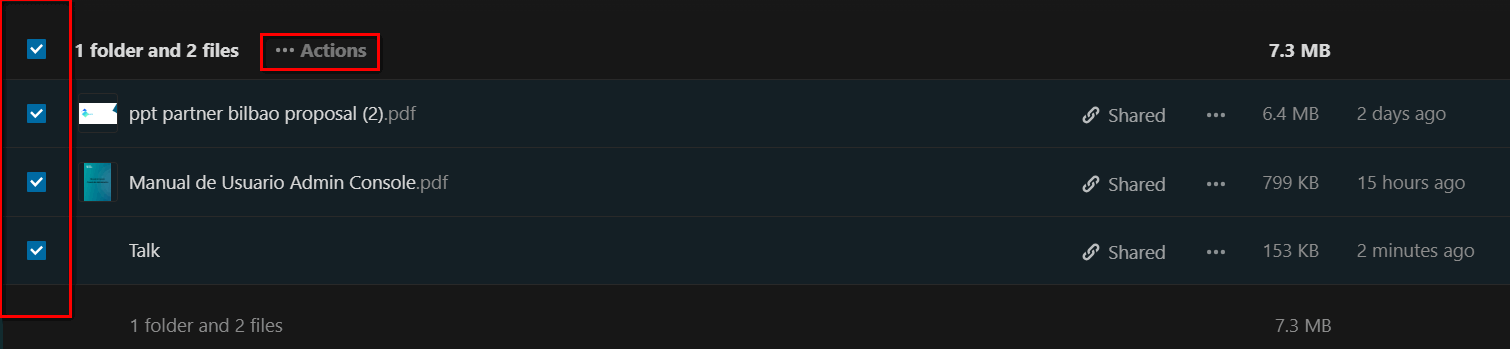 Figure 15 Files and folders
When you select multiple files, you can delete them all or download them as a ZIP file using the Delete or Download buttons at the top.
1.5 Filter file view
The left sidebar of the Files page contains several filters to quickly sort and manage your files. All the files - The default view; shows all the files you have access to. Favorites - Files or folders marked with the yellow star. Shared with you - Shows all files shared with you by another user or group. Shared with others - Shows all the files you have shared with other users or groups. Shared by link - Shows all the files that you share through a public link. External storage (optional) - Files that you have access to on external storage devices and services such as Amazon S3, SMB/CIFS, ftp…
1.5.1 Move files
You can move files and folders by dragging and dropping them to any directory. You can also perform this action by selecting the file and clicking on…Actions, and clicking on the Move or copy option (See Figure 16).

Figure 16 Move or copy files
Once this option is selected, you can choose which directory you want to move or copy the file to. selected file.
1.6 Manage deleted files
When you delete a file in Nextcloud, it is not permanently deleted. Instead, it goes into the trash. It is not permanently deleted until you delete it manually or when the Deleted Files app deletes it to make room for new files. Find your deleted files by clicking the Deleted Files button on the page Nextcloud web interface files. You will have options to restore or delete files permanently (See Figure 17).
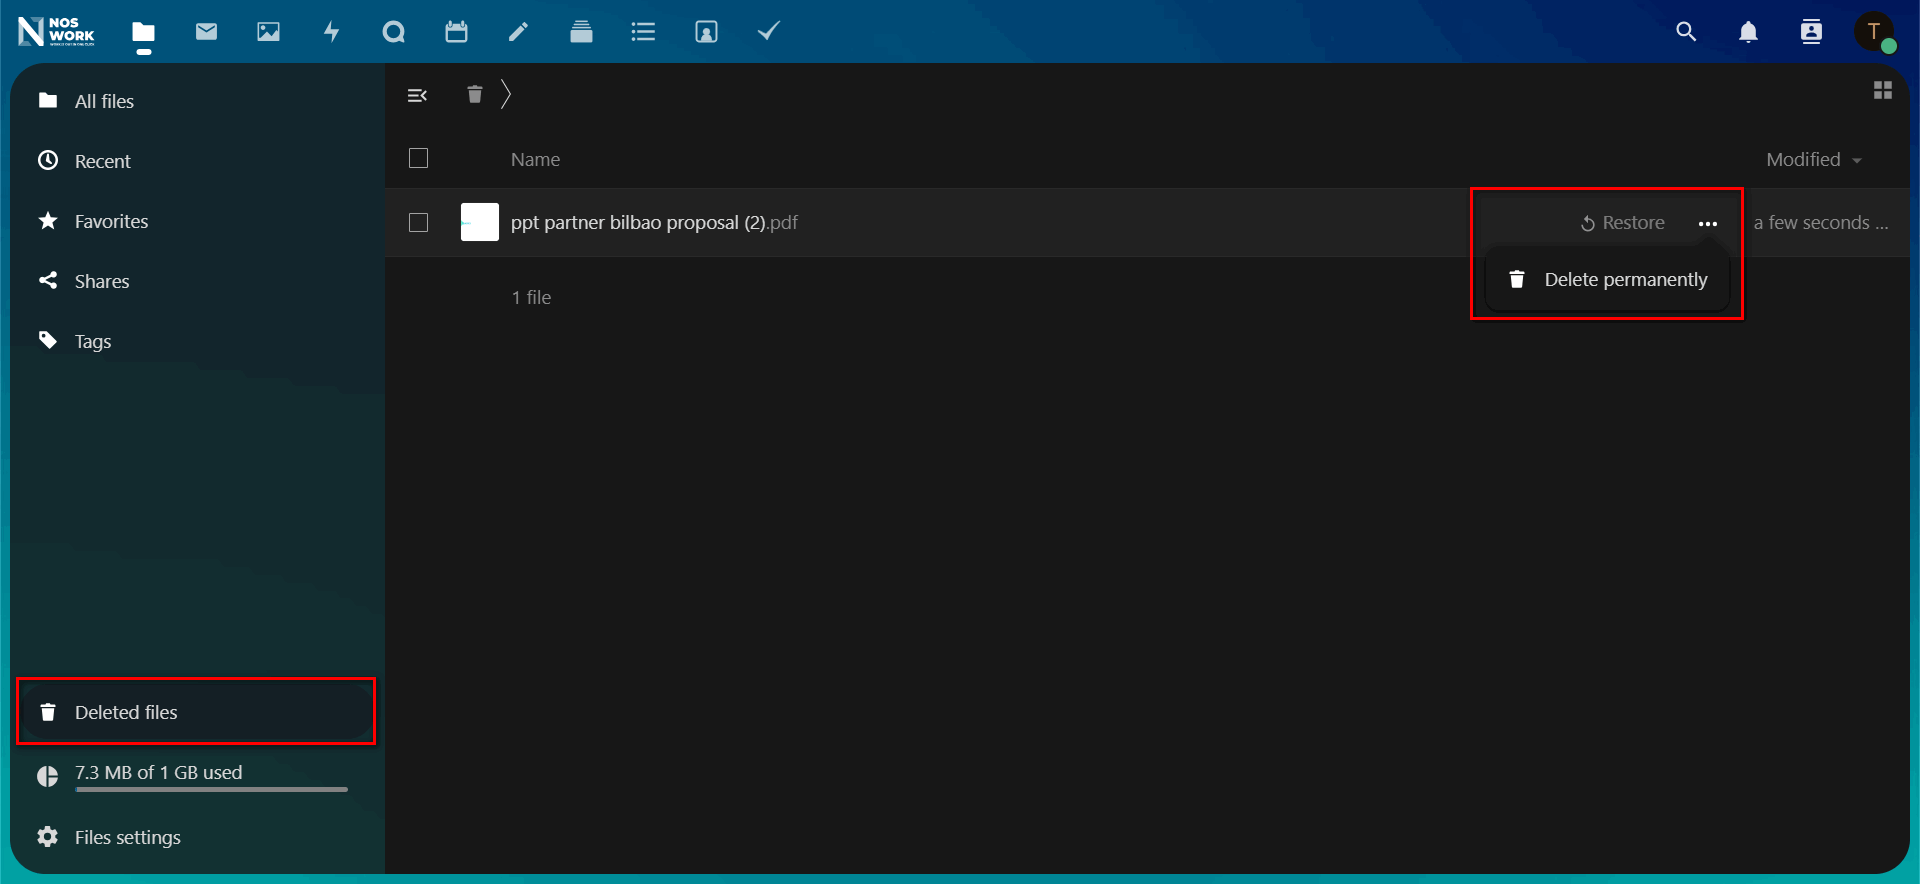 Figure 17 Deleted Files/ Options
Clicking on any of the options (Recover / Permanently Delete) immediately executes the action.
1.6.1 Quotas
Deleted files are not counted against your storage quota. Just your files Personal files count toward your quota, not the files that were shared with you. (See Storage Quota for more information about quotas.)
1.6.2 What happens when shared files are deleted?
Deleting files becomes a bit complicated when they are shared files, as this scenario illustrates:
- User1 shares a "test" folder with user2 and user3
- User2 (the recipient) deletes a "sub" file/folder within "test"
- The "sub" folder will be moved to the trash of both User1 (owner) and User2 (recipient).
- But User3 will not have a copy of "sub" in his trash. When User1 deletes "sub", it is moved to User1's trash. It is removed from User2 and User3, but is not placed in their trash containers.
1.6.3 How the deleted files app manages storage space
To ensure that users do not exceed their storage quotas, the Deleted Files app allocates a maximum of 50% of your currently available free space to deleted files. If your deleted files exceed this limit, Nextcloud deletes the oldest files (files with the oldest timestamps when they were deleted) until you reach the memory usage limit again.
Nextcloud checks the age of deleted files every time new files are added to deleted files. By default, deleted files remain in the trash for 30 days. The Nextcloud server administrator can adjust this value in the config.php file by setting the trashbin_retention_obligation value.
Files older than the trashbin_retention_obligation value will be permanently deleted. Additionally, Nextcloud calculates the maximum available space each time a new file is added. If the deleted files exceed the new maximum allowed space, Nextcloud will expire the old deleted files until the limit is reached again.
1.7 Version control
Nextcloud supports a simple version control system for files. Version control creates backup copies of files that can be accessed through the Versions tab in the Details sidebar. This tab contains file history where you can revert a file to any previous version. Changes made at intervals greater than two minutes are saved in data/[user]/version_files (See Figure 18).
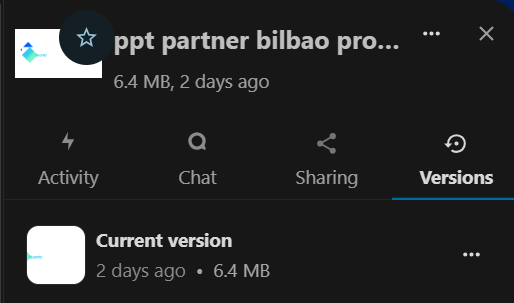
Figure 18 Version control
To restore a specific version of a file, click the circular arrow on the left. Click on the timestamp to download it.
The version control application expires old versions automatically to ensure that the user does not run out of space. This pattern is used to remove old versions: * For the first second we keep one version. * During the first 10 seconds, Nextcloud maintains a version every 2 seconds. * During the first minute, Nextcloud maintains a version every 10 seconds. * During the first hour Nextcloud maintains a version every minute. * During the first 24 hours, Nextcloud maintains a version every hour. * For the first 30 days, Nextcloud maintains one version each day. * After the first 30 days, Nextcloud retains one version each week.
Versions are adjusted according to this pattern each time a new version is created. The application version never uses more than 50% of the user's currently available free space. If the stored versions exceed this limit, Nextcloud deletes the older versions until it reaches the disk space limit again.
2 Setting your preferences
As a user, you can manage your personal settings
2.1 Personal settings menu
Click on your profile photo in the top right corner of your Nextcloud instance. The personal configuration menu opens (See Figure 19).
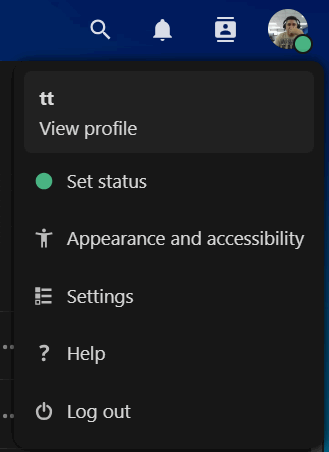
Figure 19 Menu / Personal Settings
Choose Settings from the drop-down menu (See Figure 20).
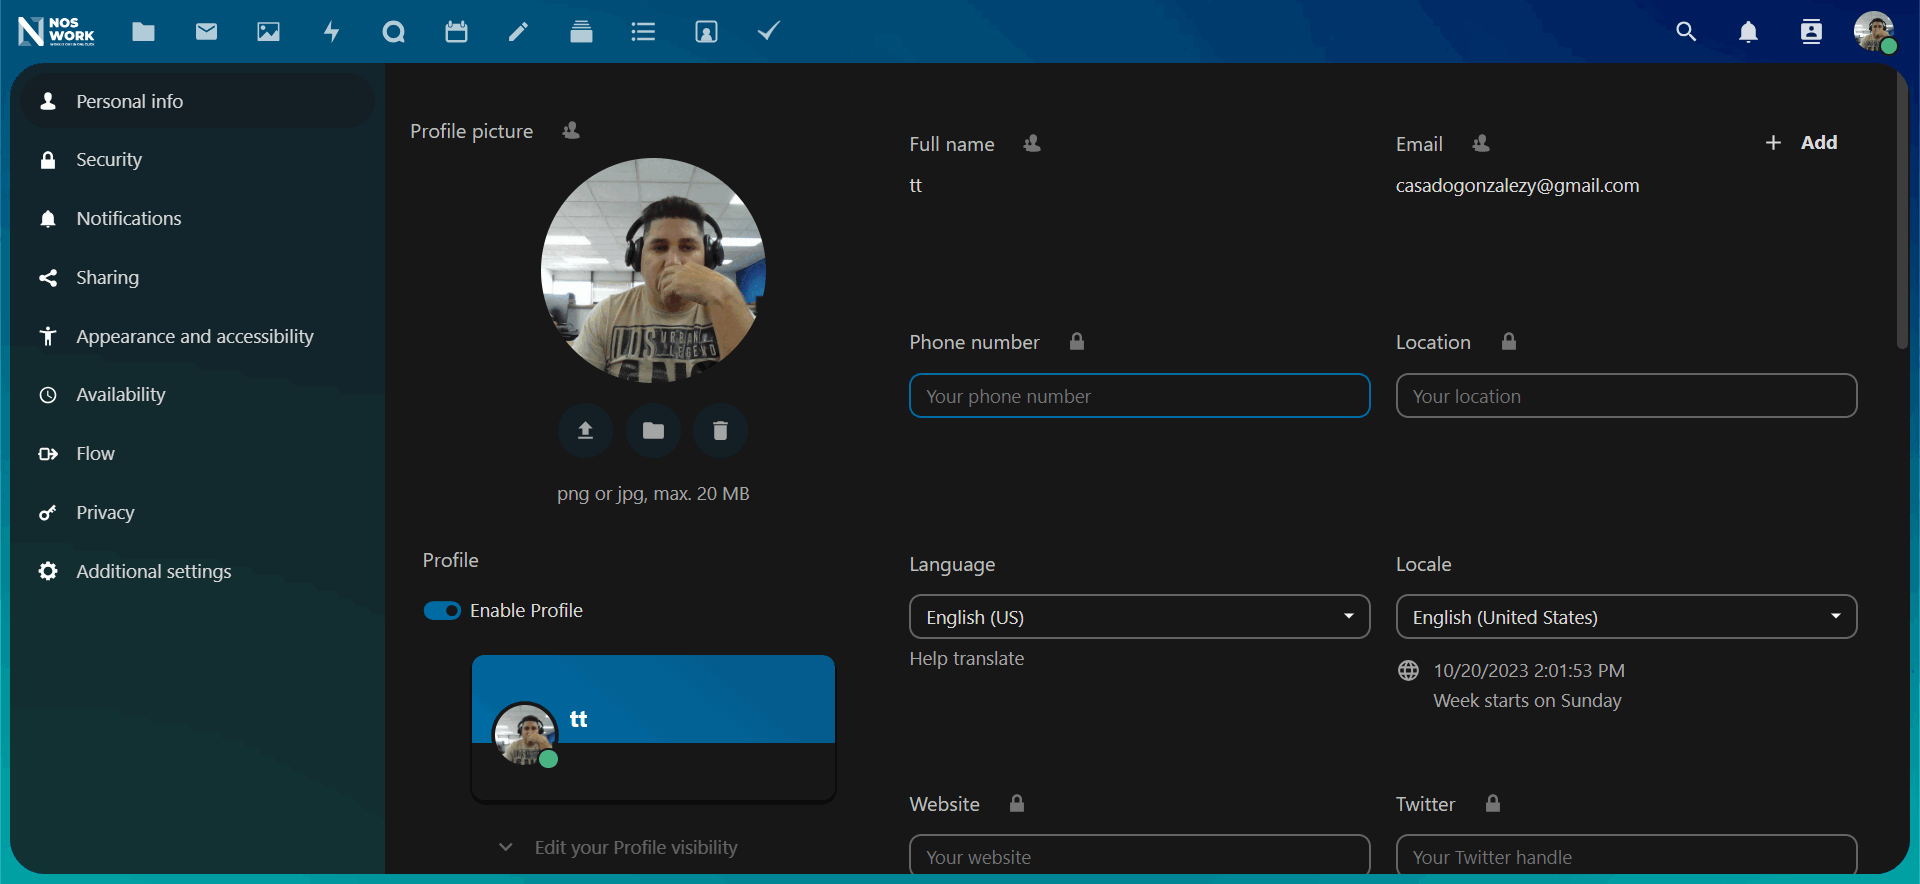 Figure 20 Personal settings
The options listed on the personal settings page depend on the applications enabled by the administrator. Some of the features you will see include the following: * Usage and available quota * Manage your profile photo * Full name (you can do this however you want, as it is separate from your Nextcloud login name, which is unique and cannot be changed) * Email address * List of your group memberships * Change your password * Use two-factor authentication * Setting your preferences * Choose the language for your Nextcloud interface * Links to mobile and desktop apps * Manage your activity stream and notifications * Default folder to save new documents * Your Federated Sharing ID * Links to share on social networks * NextCloud version
Note: Options and settings available as configured by your administrators. But You can change the password or display name in your personal settings, please contact your administrator for help.
2.1.1 Storage quota
Your Nextcloud administrator has the option to set a storage quota for users. Look at the top of your personal page to see what your quota is and how much you have used (See Figure 21)
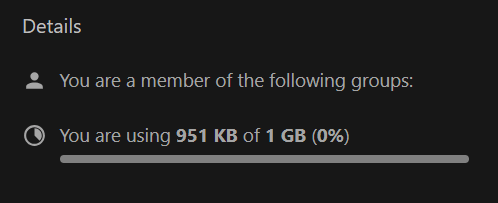
Figure 21 Storage quota
It may be helpful to understand how your fee is calculated.
Metadata (thumbnails, temporary files, cache, and encryption keys) take up approximately 10% of disk space, but are not counted in user quotas. Some apps store information in the database, such as the Calendar and Contacts apps. This data is excluded from your quota.
When other users share files with you, the shared files count toward the share's original owner's quota. When you share a folder and allow other users or groups to upload files to it, all uploaded and edited files count toward your quota. When you reshare shared files with yourself, the reshare still counts toward the share's original owner's quota.
Encrypted files are slightly larger than unencrypted files; The unencrypted size is calculated based on your quota. Deleted files that are still in the trash do not count towards quotas. The trash is set at 50% of the quota. The age of deleted files is set to 30 days. When deleted files exceed 50% of the quota, the oldest files are deleted until the total is below 50%.
2.2 Use two-factor authentication
Two-factor authentication (2FA) is a way to protect your Nextcloud account from unauthorized access. It works by requiring two different "proofs" of your identity.
For example, something you know (like a password) and something you have like a physical key. Typically, the first factor is a password you already have and the second can be a text message you receive or a code you generate on your phone or other device (something you have). Nextcloud supports a variety of second factors and more can be added.
Once your administrator has enabled a two-factor authentication app, you can enable and configure it in Settings in your preferences. Below you can see how.
2.2.1 Set up two-factor authentication
In your Personal Settings, look for the Second Factor Authentication setting. In this example, it is TOTP, a time-based code compatible with Google Authenticator (See Figure 22).
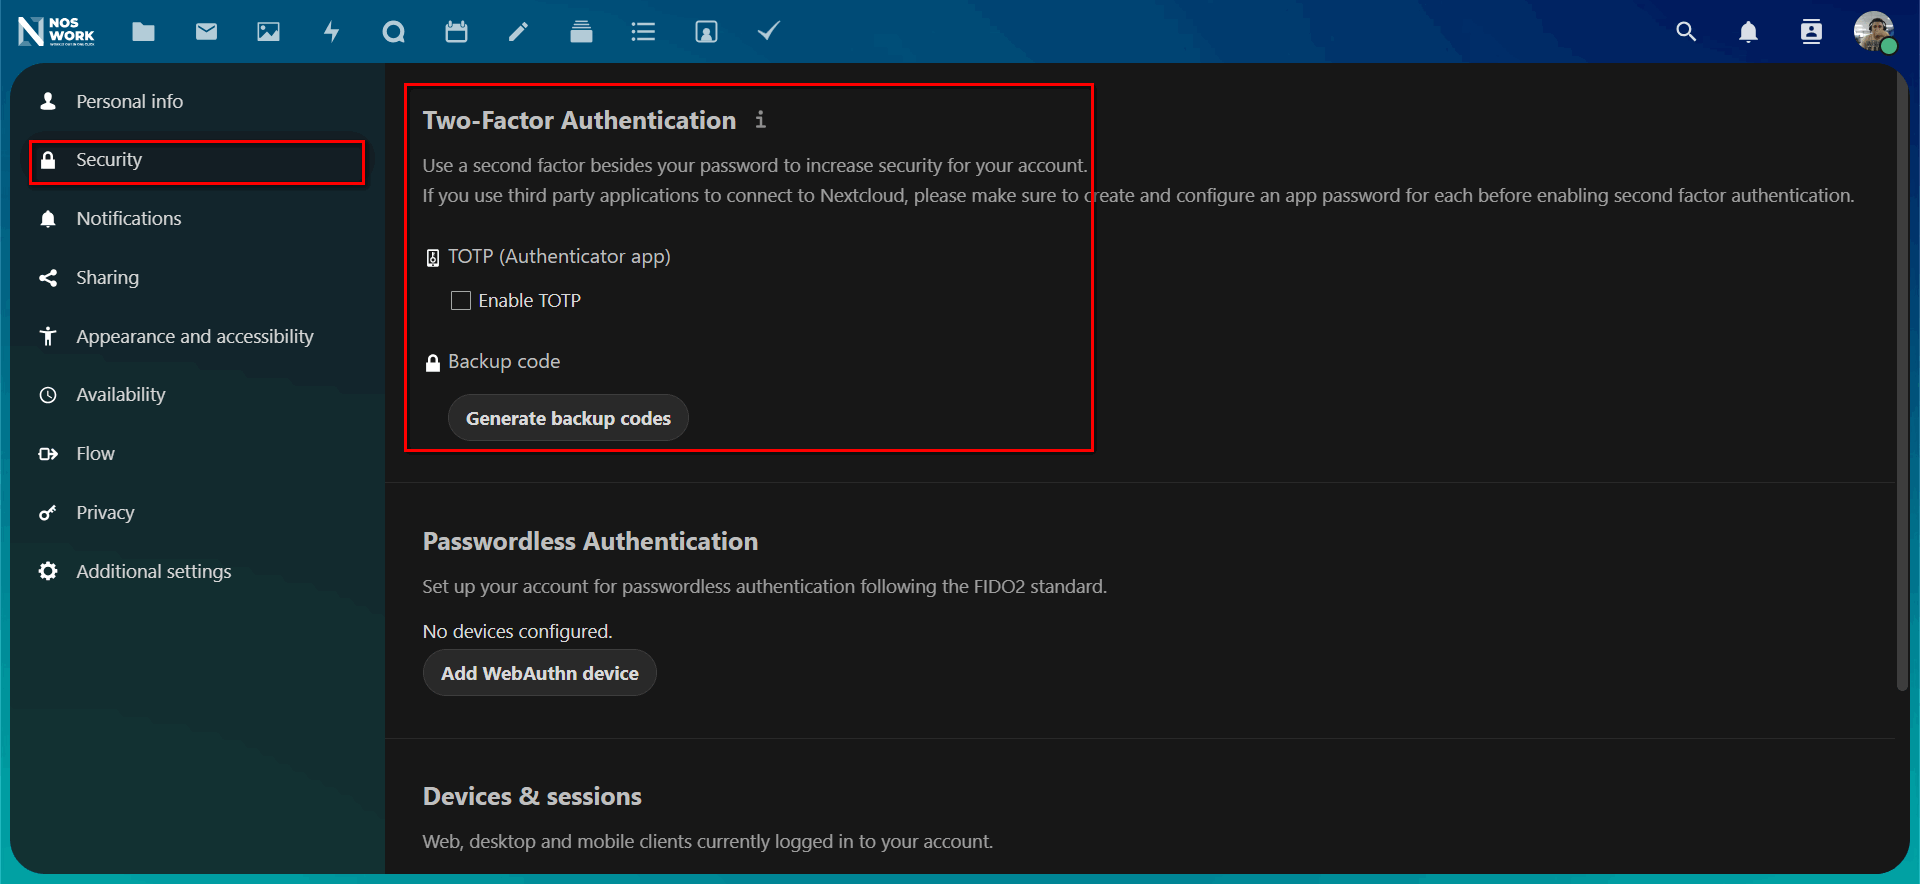 Figure 22 Two-factor authentication configuration
You'll see your secret and a QR code that the TOTP app can scan on your phone (or other device). Depending on the app or tool, type the code or scan the QR and your device will display a login code that changes every 30 seconds.
2.2.2 Recovery codes in case you have lost your second factor
You should always generate backup codes for 2FA. If your second factor device is stolen or does not work, you will be able to use one of these codes to unlock your account. Works effectively as a second supporting factor. To get backup codes, go to your Personal Settings and look under Second Factor Authentication Settings. Choose Generate Backup Codes (See Figure 23).
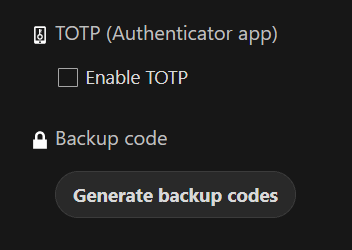
Figure 23 Backup/ 2FA Codes
You will then be presented with a list of single-use backup codes (See Figure 24).
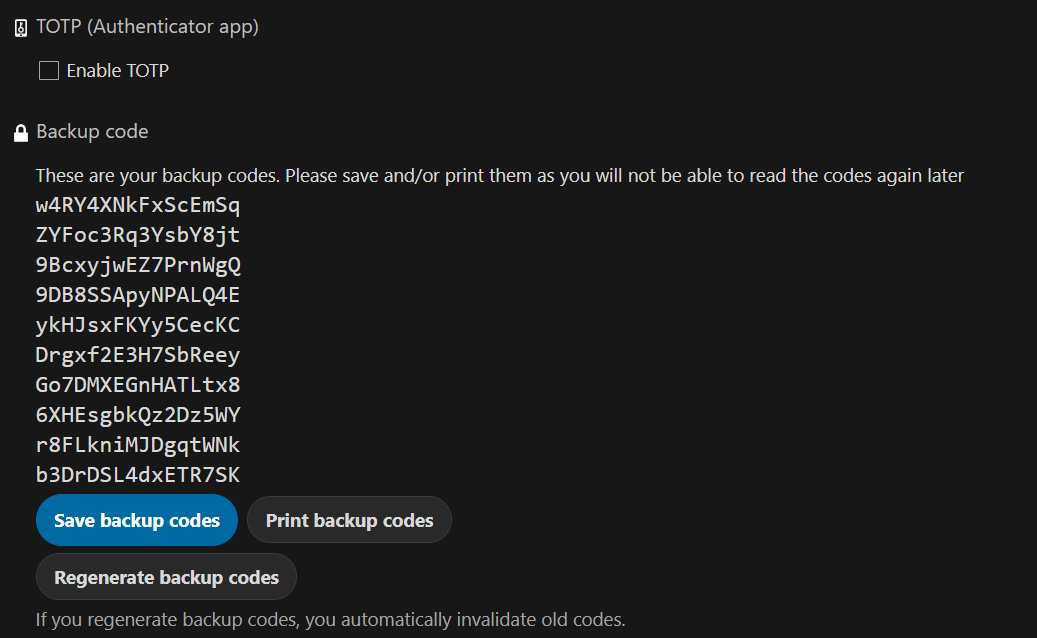 Figure 24 List of backup codes
You should keep these codes in a safe place, somewhere where you can find them. Don't bundle them with your second factor, like your mobile phone, but make sure that if you lose one, you still have the other. Keeping them at home is probably the best thing to do. do.
2.2.3 Sign in with two-factor authentication
After you log out and need to log in again, you will see a request to enter the TOTP code in your browser. If you enable not only the TOTP factor but another, you will see a selection screen where you can choose the two-factor method for this login. Select TOTP (See Figure 25).
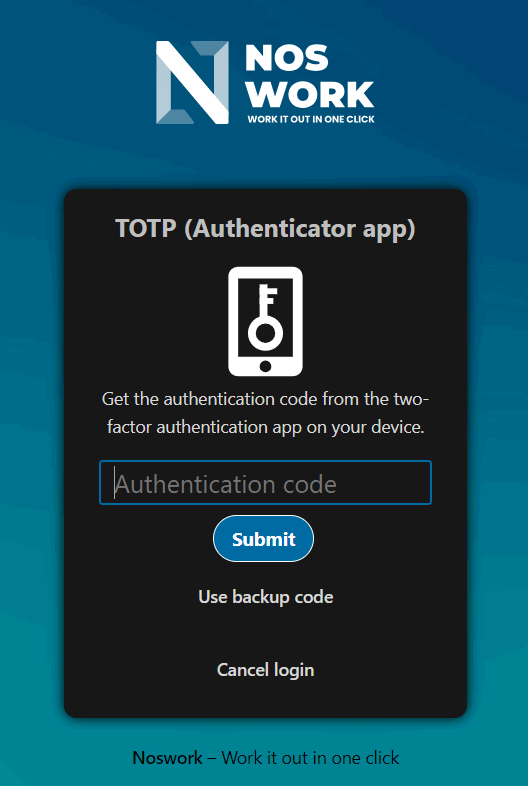
Figure 25 Login with 2FA verification
If the code was correct, you will be redirected to your Nextcloud account.
3 Group work software
Nextcloud groupware is a collection of applications that contains a Mail client (IMAP/POP3) and a Calendar and Contacts server (CalDAV/CardDAV), with their respective web interfaces. (see Figure 26). We complement these productivity tools with Deck, a management tool project manager that allows you to create Kanban-style task boards and share them with your team.
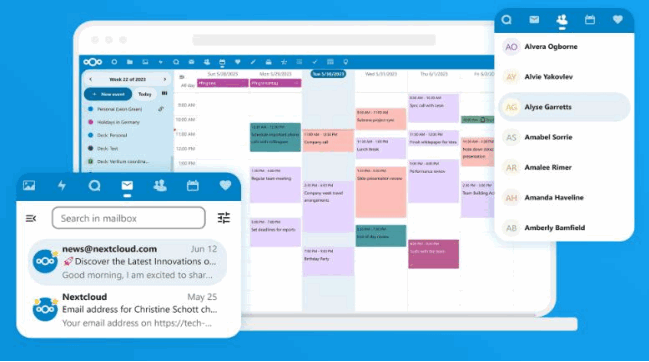
Figure 26 Groupware
Nextcloud Groupware offers easy-to-use webmail, calendars and contacts that help your team get things done faster and easier, integrated with Nextcloud Files. * Easy access, anywhere * Maximum security * Deep integration
3.1 Using the Calendar app
The Nextcloud Calendar app works with other calendar apps so you can sync your Nextcloud calendars and events. When you first access the Calendar app, a first default calendar will be created for you.
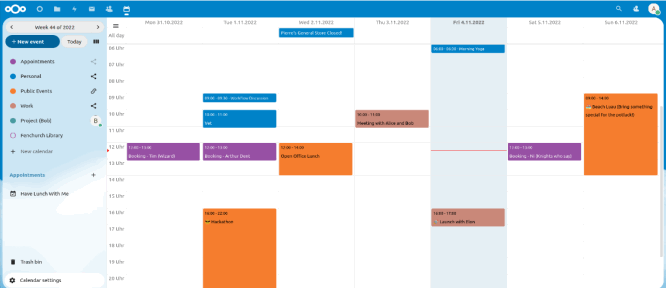
Figure 27 Calendar
3.1.1 Manage your calendars
3.1.1.1 Create a new calendar
If you plan to create a new calendar without first transferring data from your old calendar, you should create a new calendar (See Figure 28).
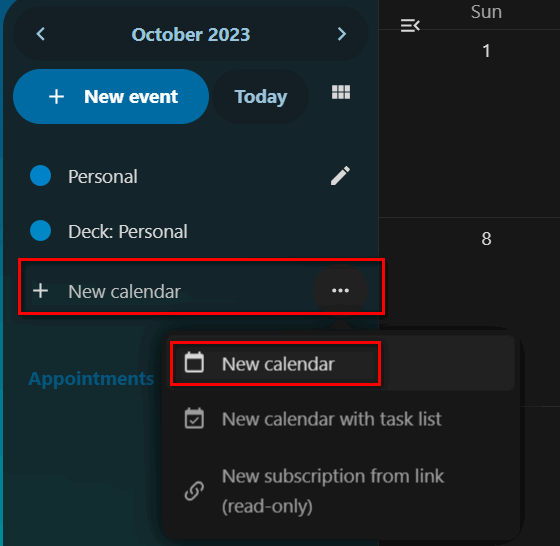
Figure 28 New calendar
- Tap + New Calendar in the left sidebar.
- Enter the name for your new calendar, for example "Work," "Home," or "Marketing Planning."
- After pressing the button, your new calendar is created and you can sync between your devices, add new events and share with your friends and colleagues.
3.1.1.2 Import a calendar
If you want to transfer your calendar and its respective events to your Nextcloud instance, importing it is the best way to do it (See Figure 29).
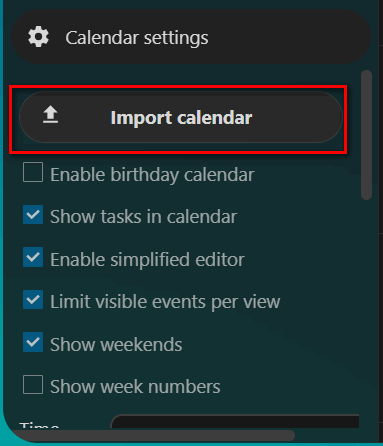
Figure 29 Import calendar
- Tap the gear icon called Settings & import in the bottom left corner.
- After clicking + Import Calendar, you can select one or more calendar files on your device to upload.
- The upload may take a while, and it depends on how big the schedule is to matter.
Note: The Nextcloud Calendar application only supports files compatible with iCalendar .ics, defined in RFC 5545.
3.1.1.3 Edit, Export or Delete a Calendar
Sometimes you may want to change the color or name of an imported or previously created calendar. You may also want to export it to your local hard drive or delete it forever (See Figure 30).
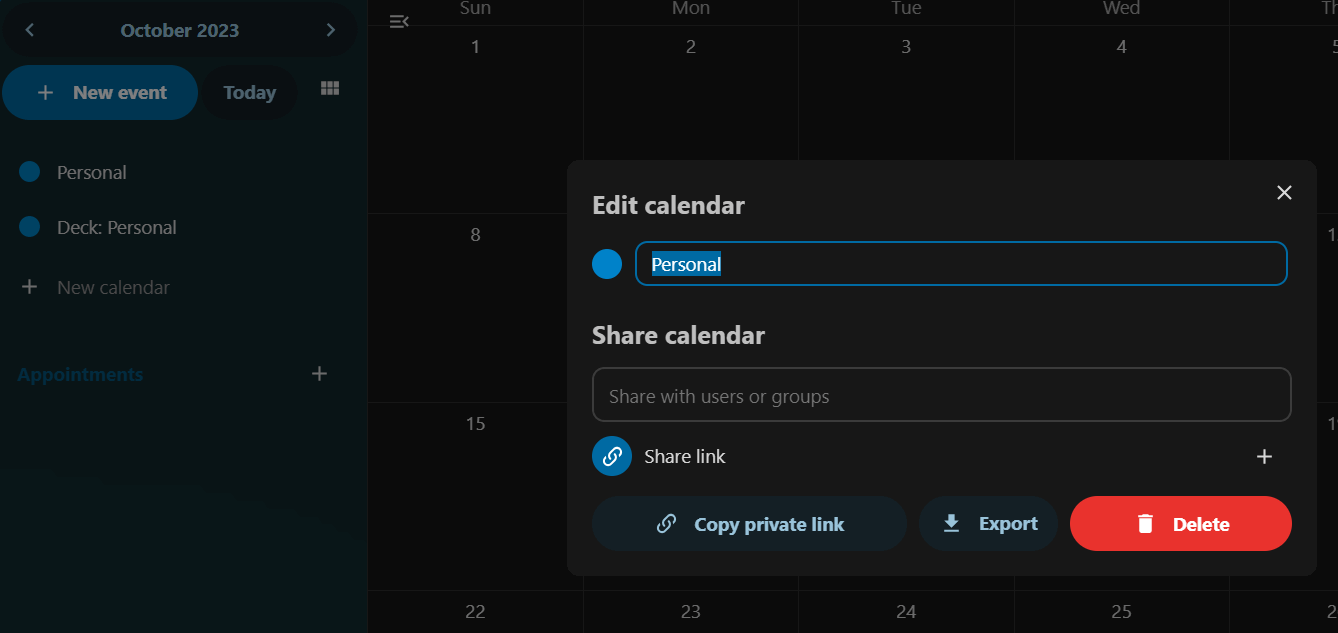 Figure 30 Edit/ Export/ Delete calendar
- Press the three-dot menu of the corresponding calendar.
- Click Edit Name, Copy Private Link, Export, or Delete.
3.1.1.4 Share calendar
You may want to share your calendar with other users or groups. Calendars can be shared with write or read-only permissions. When you share a calendar with write permission, the users you share it with will be able to create new events on the calendar, as well as edit and delete existing events.
Note: Shared calendars cannot be accepted or rejected. If you want to stop having a calendar that someone has shared with you, you can tap the 3 dot menu next to the calendar in the calendar list and tap “Stop sharing with me.” Calendars shared with a group cannot be unshared by each individual.
3.1.1.5 Publish a calendar
Calendars can be published using a public link to make them visible (in read-only mode) to external users. You can create a public link by using the share menu for a calendar and clicking "+" next to "Share link." Once you've created it, you can copy the public link to your clipboard or send it by mail. There is also an "embed code" that generates an HTML iframe to embed your calendar on public pages. Multiple calendars can be shared together by adding their unique identifier to the end of an embed link. Individual identifiers can be found at the end of each public link to a calendar. The full address will look like https://cloud.example.com/index.php/apps/calendar/embed/token1
3.1.1.6 Subscribe to a calendar
You can subscribe to iCal calendars directly from your Nextcloud. By supporting the interoperable standard (RFC 5545) we have made Nextcloud Calendar compatible with Google Calendar, Apple iCloud and many other calendar servers with which you can exchange calendars, including subscription links to calendars published on other Nextcloud instances, as described previously.
- Click + New Calendar in the left sidebar
- Click + New subscription from link (read only)
- Type or paste the link of the shared calendar you want to subscribe to.
- Filled. The calendars you subscribe to will be updated regularly.
Note: Subscriptions are refreshed every week by default. Your administrator may have changed this setting.
3.1.2 Manage events
3.2.2.1 Create a new event
Events can be created with a click in the area where it is scheduled. In the day and week view of the calendar you can click and drag on the time area in which the event will take place (See Figure 31).

Figure 31 Create event
The monthly view requires just one click in the corresponding day area.
You can then type the name of the event (for example, Meeting with Lucas), choose the calendar it corresponds to (Personal, Work), check and modify the time slot, or mark the event as lasting all day. Optionally, you can specify a location and/or description.
If you want to edit advanced aspects such as Attendees or Reminders, or set the event to repeat, press the More button to open the advanced editor on the side.
Note: If you prefer to have the advanced editor open directly in the sidebar instead of the pop- up window with the simple editor, you can uncheck the Enable simplified editor setting in the Settings & import section of the application.
Clicking the blue Save button will create the event.
3.2.1.4 Edit, duplicate or delete an event
If you want to edit, duplicate, or delete a specific event, you must first click on the event. After this, you can reset all the event details and open the advanced editor in the sidebar by clicking More (See Figure 32).
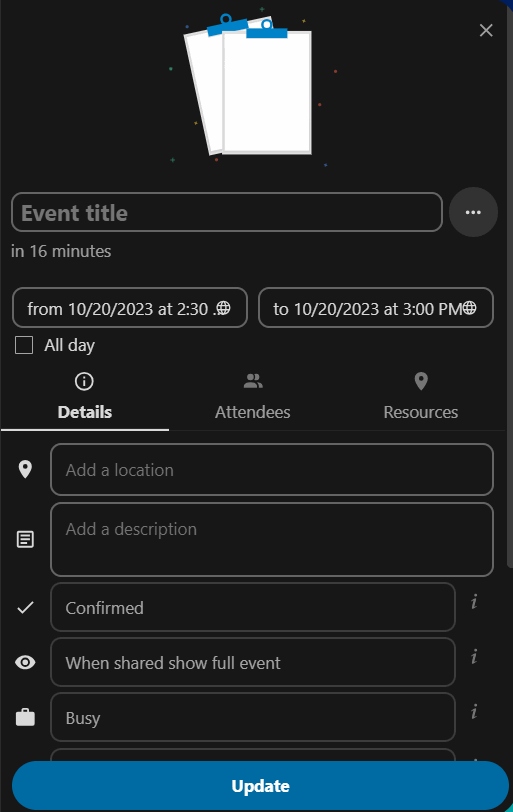
Figure 32 Advanced Edit
Clicking the Update button will save the changes made to the event. To cancel these changes, press the close button in the upper right corner of the pop-up window or sidebar.
If you open the sidebar view and tap the three dot menu next to the event name, you will see options to export the event to an .ics file or delete the event from your calendar (See Figure 33).
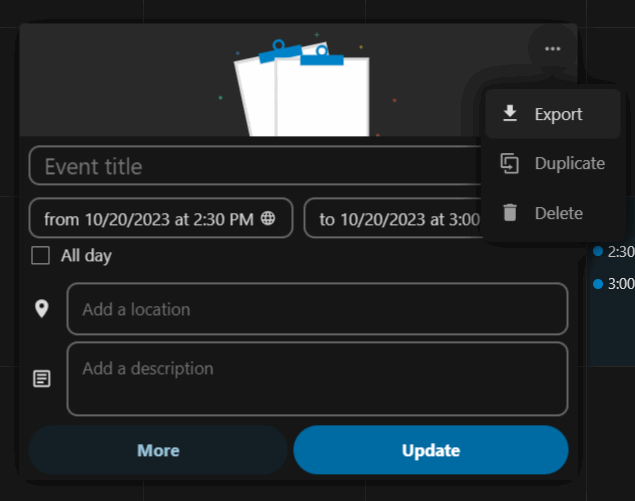
Figure 33 Delete/ Export event
Trick If you delete events, they will go to your trash. From there you can restore accidentally deleted events.
You can also export, duplicate or delete an event from the basic editor.
3.2.1.5 Invite attendees to an event
It is possible to add attendees to an event and notify them directly. They will receive an email invitation in which they can confirm or cancel their invitation to the event. Attendees can be other users in your Nextcloud instance (See Figure 34), contacts in your calendar, and email addresses. You can also manually adjust the participation level for each attendee, or disable email onfirmation for individual attendees.
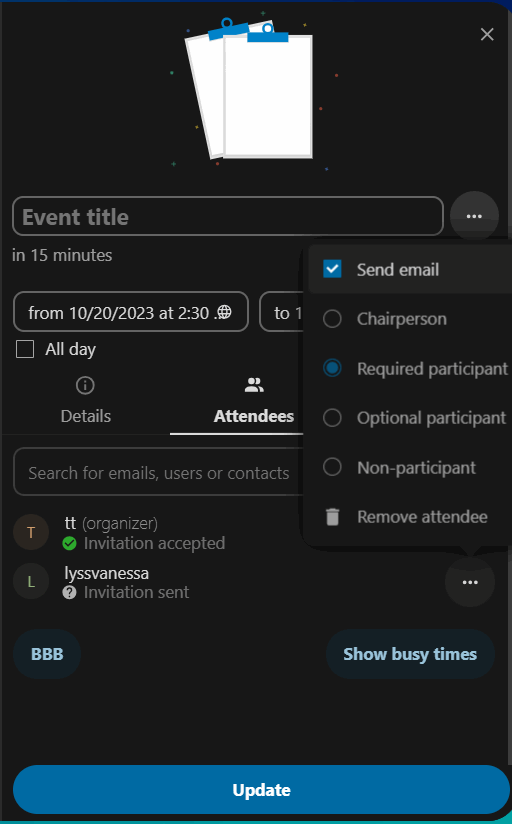
Figure 34 Invite attendees
Trick
By adding other Nextcloud users as attendees to an event, you can see if they are available or busy, helping you determine the best time to attend your event. To let others know when you are available, you can adjust your work hours. Only users of your Nextcloud instance will be able to check if it is free or busy.
Attention
Only the calendar owner can send invitations. Users with whom it has been shared cannot do so, even if they can modify the calendar on which it is shared there is the event.
Attention
The server administrator must configure the email server in the Basic Settings tab, since this email will be used to send invitations.*
3.2.1.6 Assign rooms and resources to a event
Similar to attendees, you can add rooms and resources to your events. The system will ensure that each room and resource is reserved without conflict. The first time a user adds a room or resource to an event, it will show as accepted. Any other overlapping events will show the room or event as rejected.
Note Rooms and resources are not managed by Nextcloud and the Calendar app will not allow you to add or modify a resource. Your administrator must install and possibly configure resource managers before you can use them as a user.
3.2.1.7 Add attachments to events
You can import attachments to your events either by uploading them or adding them from files (See Figure 35).
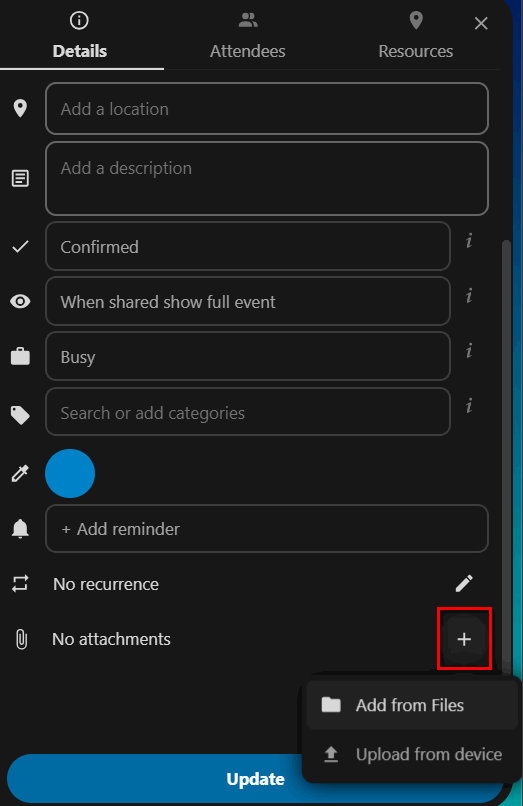
Figure 35 Add attachments
Note: Attachments can be added while creating new events or editing existing ones. New files that are uploaded will be saved to default files in the calendar folder of the root folder.
You can change the attachment folder by navigating to Calendar Settings in the lower left corner and changing default attachment location (See Figure 36).
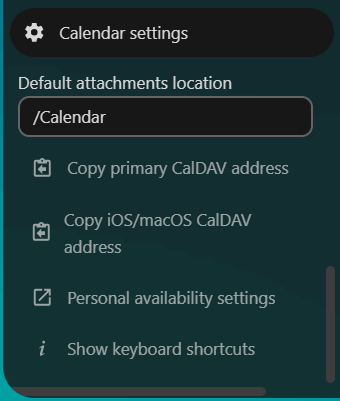
Figure 36 Attachment Location
3.2.1.8 Set reminders
You can set reminders to receive a notification before an event starts. The following notification methods are currently available: - Email notification - Notification via Nextcloud
Reminders can be set with a time interval relative to the event or on a Figure 37).

Figure 37 Reminders
Note: Only the calendar owner and users with whom the calendar has been shared with write permissions will receive notifications. If you are not receiving notifications but think you should, your administrator may have disabled this feature on your device server.
Note: If you sync your calendar with mobile devices or other third-party clients, you may see notifications there as well.
3.2.1.9 Add recurring events
An event can be marked as “recurring,” so it can repeat every day, week, month, or year. There are configurable rules to mark the day of the week on which the event occurs and more complex rules, such as "the fourth Wednesday of each month" (See Figure 38).
You can also set a deadline for event replays.
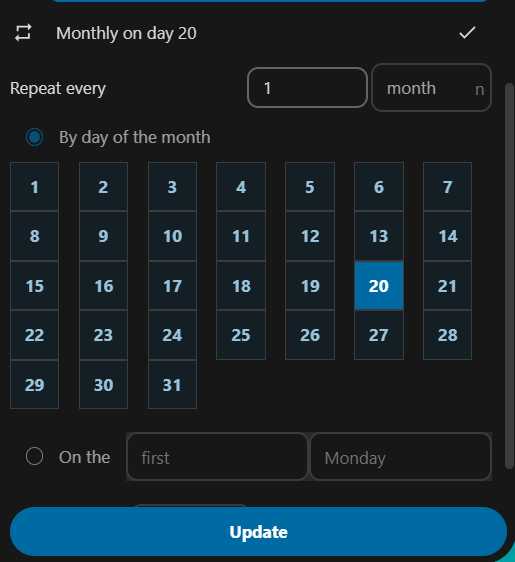
Figure 38 Recurring events
3.2.1.10 Trash
If you delete events, tasks, or a calendar in Calendar, your data is not lost forever. These elements are accumulated in a trash can (See Figure 39). This gives you an opportunity to undo the deletion. After a period of time that defaults to 30 days (your administrator may have changed this setting), these items will be permanently deleted. You can also delete items permanently at any time, if you wish.
 Figura 39 Trash
The Empty Trash button will delete all the contents of the trash in one step.
Trick: The Trash is only available in the Calendar app. Any connected application, for example desktop or mobile, will not be able to see the contents of the trash. However, events, tasks, and calendars that you delete from other connected apps will also end up in the trash.*
3.1.3 Respond to invitations
You can respond directly to invitations from the app. Tap an event and select your participation status. You can respond to an invitation by accepting it, rejecting it, or tentatively accepting it (see Figure 40).
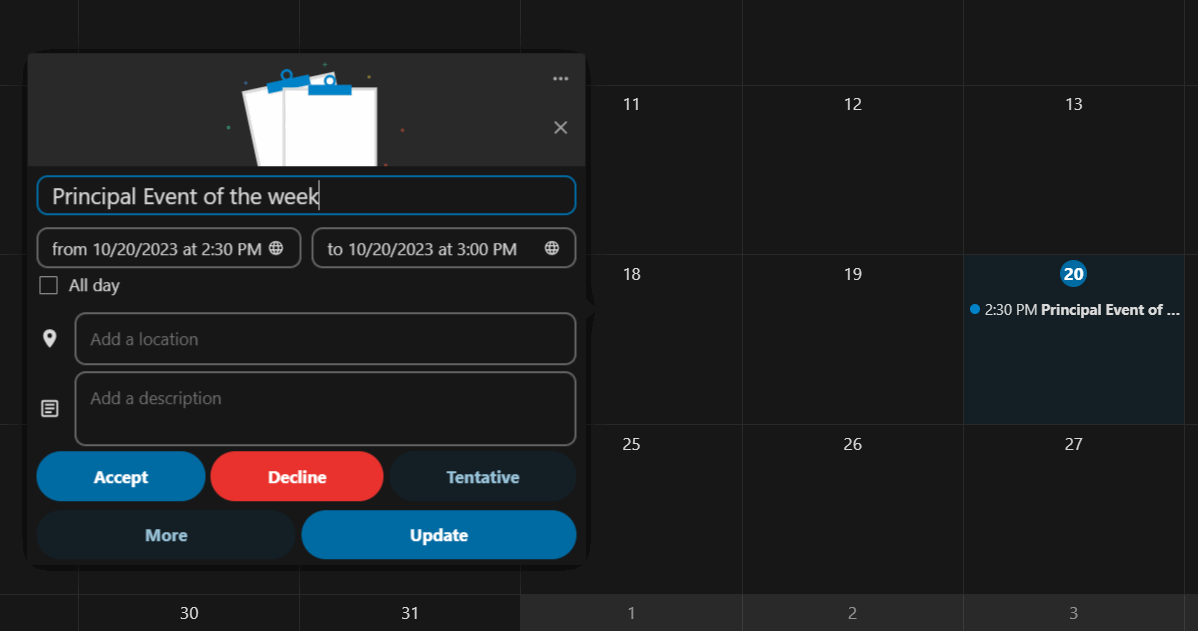 Figure 40 Respond to invitations
You can also respond to an invitation from the sidebar (See Figure 41).
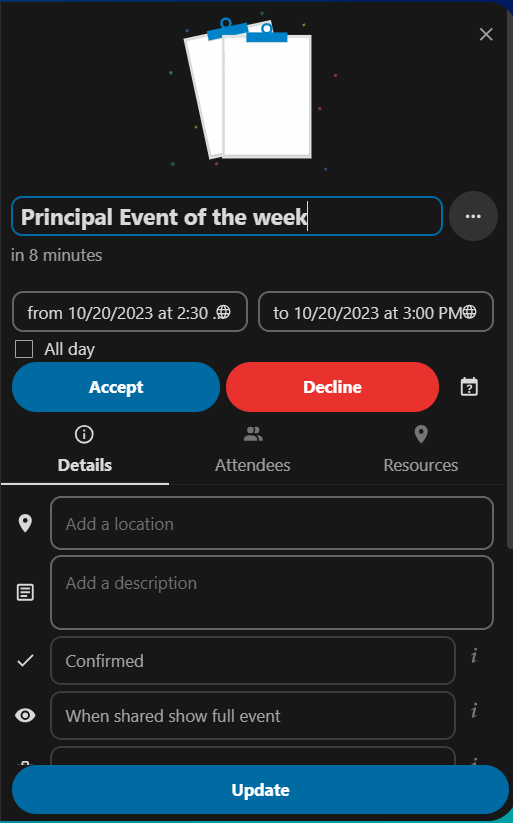
Figure 41 Reply Invitation/ Side Panel
3.1.4 Availability (Working hours)
Your general availability, regardless of the events you have scheduled, can be configured in the Nextcloud groupware settings . These settings will be reflected in the available-busy view when you schedule a meeting with other people in Calendar. Some connected clients such as Thunderbird will also display this data (see Figure 42).
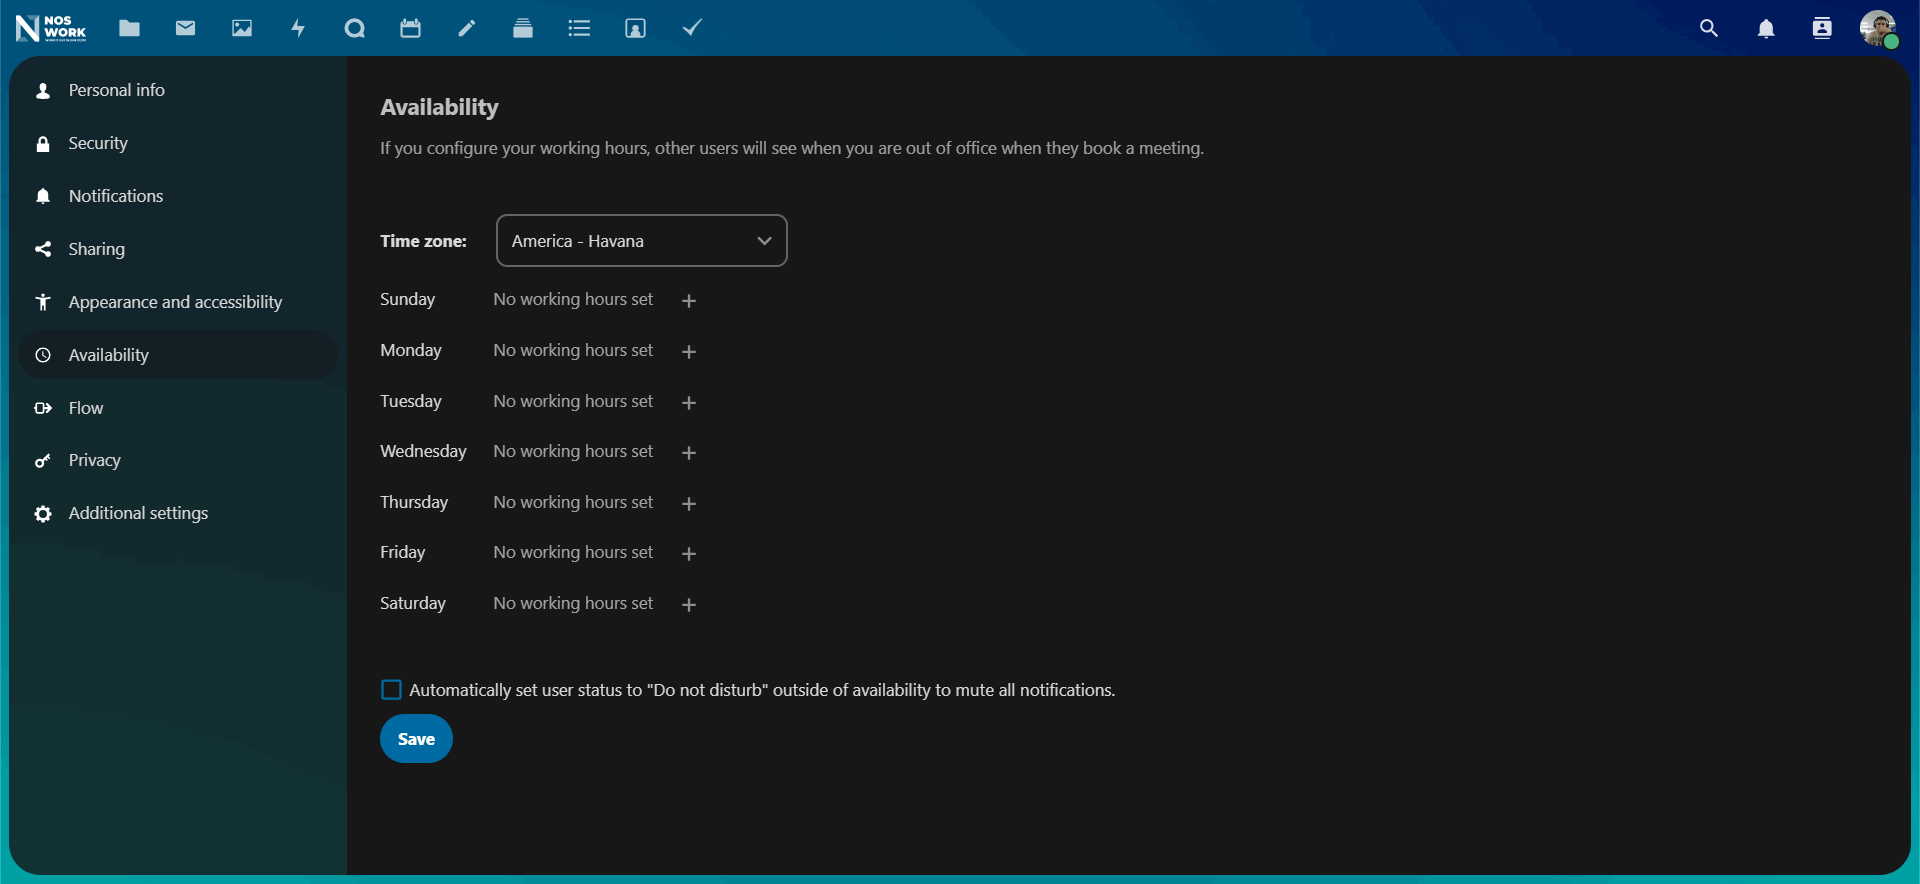 Figure 42 Availability
3.1.5 Birthday calendar
The birthday calendar is an automatically generated calendar, which compiles the birthdays of the contacts in your address book. The only way to edit this calendar is to indicate the birthday of your contacts. It is not possible to make changes to this calendar from the calendar application.
Note If you don't see the birthday calendar, your administrator may have disabled it for your server.
3.1.6 Appointments
Starting with version 3 of Calendar, the application can generate appointment slots, which other users can reserve, even if they do not have a Nextcloud account. Appointments offer granular control over when you'll be available to meet. This can eliminate the need to exchange emails to agree on a day and time.
In this section we will use the term organizer for the person who owns the calendar who onfigures the appointment slots. The assistant is the person who reserves one of these slots.
3.1.6.1 Create an appointment configuration
As an appointment organizer, log in through the Calendar web interface. In the left sidebar you will find an appointments section (See Figure 43), where you can open a dialog to create a new one.
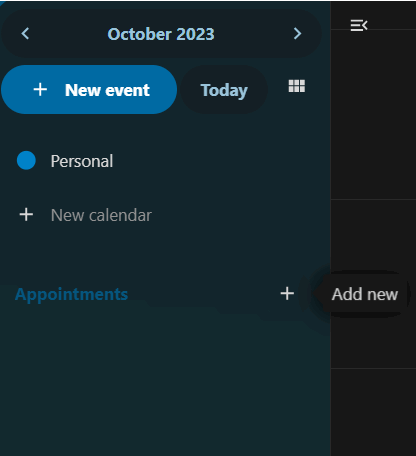
Figure 43 New appointment
One of the basic information of any appointment is a title describing what the appointment is about (e.g. "Personal call with...", when an organizer wants to offer colleagues a personal call), where the appointment will take place and a more detailed description of what it will be about (See Figure 44).
3.1.6.2 Edit appointment
The duration of an appointment can be chosen from a predefined list. You can then select the desired increment. The increment is the rate at which different spaces will become available. For example, you can have one-hour slots, but you provide them in 30-minute increments so that an assistant can schedule at 9:00 am, but also at 9:30 am. Optional location and description information give attendees a little more context. Each scheduled appointment will be written on one of your calendars, so you can choose which one it should be on. Appointments can be "public" or "private." Public appointments can be discovered through a user's public profile page.
Nextcloud. Private appointments will only be accessible by people who receive the URL secret of it.
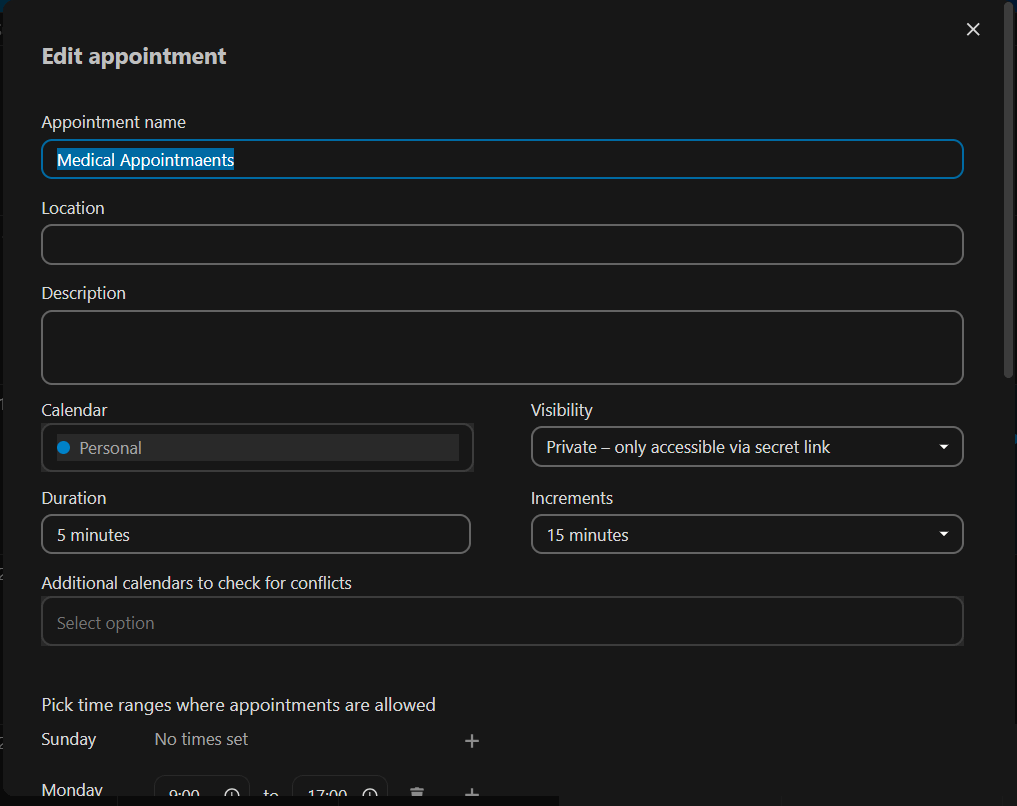 Figure 44 Edit an appointment
Note Only spaces that do not conflict with existing events on your calendar will be shown to attendees.
The organizer of an appointment can specify the days and times of the week in which it is possible to reserve a slot (See Figure 45). You can mark working hours as available, but also any other custom schedule.
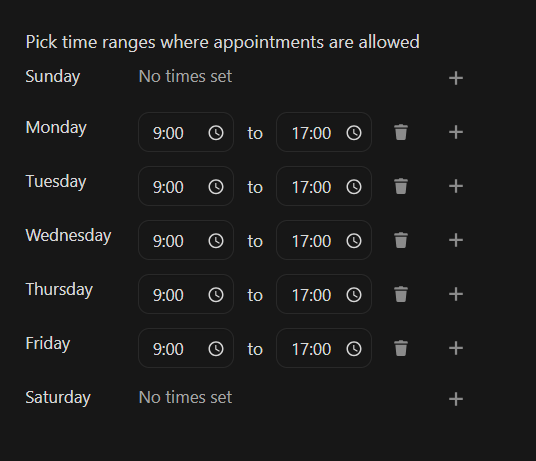
Figure 45 Time ranges
Some appointments require time to prepare. p. e.g. when you have to be at an event and need to make the time to drive to it. The organizer can decide whether to select a duration of time that must be free. Only spaces that do not conflict with other events will be available during the preparation time. Additionally, there is the option to select a time after each appointment that you must be free. To prevent an assistant from scheduling in a very short window of time before the appointment, it is possible to configure how soon the next appointment can be scheduled. Setting a maximum number of spaces per day can limit how many appointments attendees can schedule (See Figure 46).
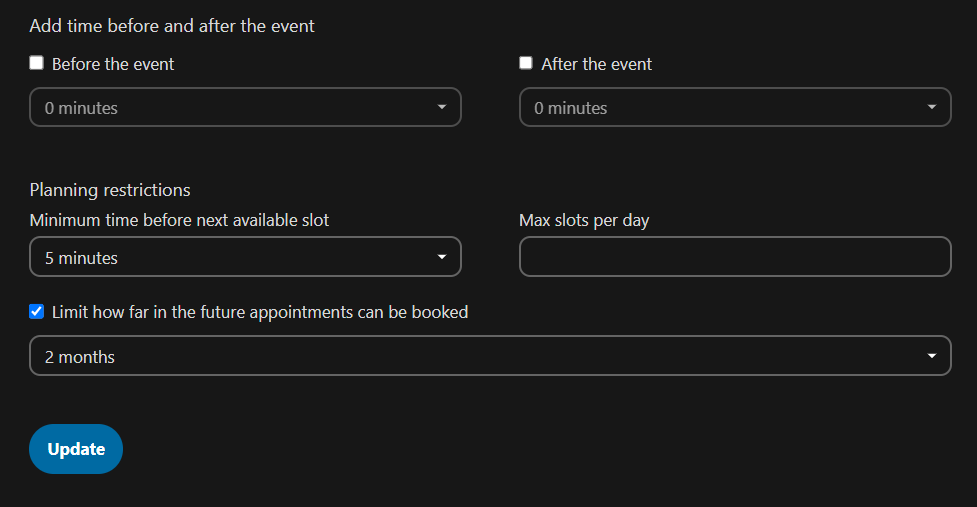 Figure 46 Times Before/ After
The set appointment will then be listed in the left sidebar. Using the three dot menu, you can see a preview of the appointment. You can copy the link to the appointment and share it with your target attendees, or allow them to discover your public appointment by navigating to the profile page. You can also edit or delete the appointment settings (See Figure 47).
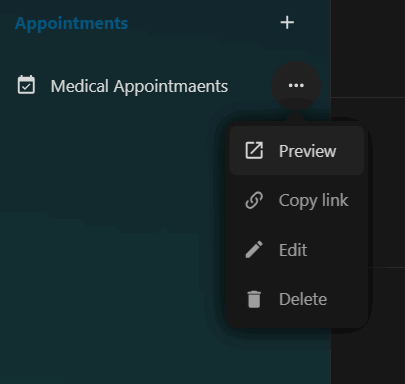
Figure 47 Appointment Options
3.1.6.3 Book an appointment
The booking page shows attendees the title, location, description and duration of an appointment (See Figure 48). Selecting a specific day will display a list of possible start times. If days are elected where there are no spaces available or when the reservation limit has been reached, the list may be empty.
 Figure 48 Appointment preview
To schedule an appointment, Users must enter a name and email address. They can also optionally enter a comment (See Figure 49).
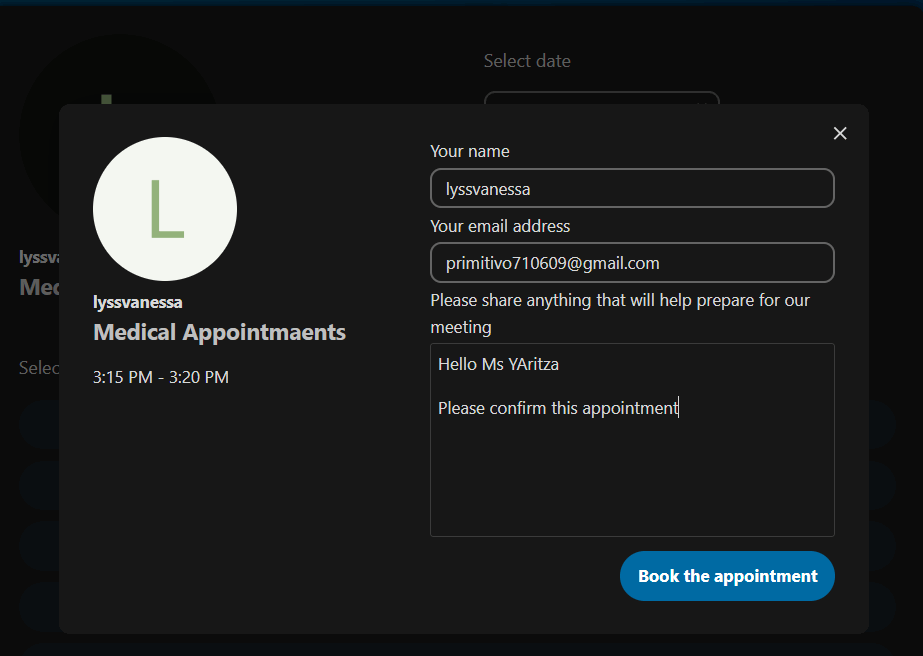 Figure 49 Schedule an appointment
When scheduling is successful, a confirmation dialog will be shown to the attendee (See Figure 50).
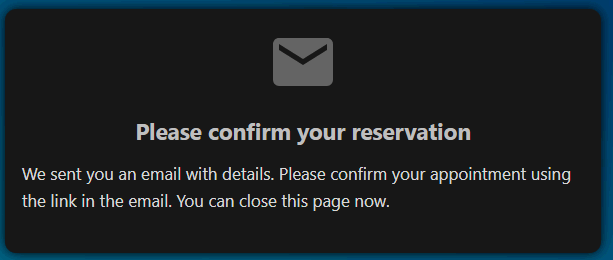
Figure 50 Confirmation message
To verify that an attendee's email address is valid, a confirmation email will be sent to them (See Figure 51).
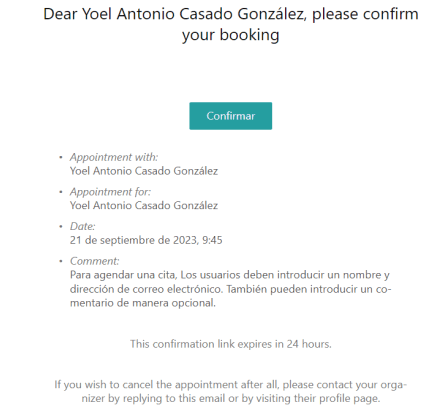
Figure 51 Confirmation email
The appointment schedule will only be accepted after the attendee clicks on the confirmation link received via email and this confirmation will be forwarded to the organizer.
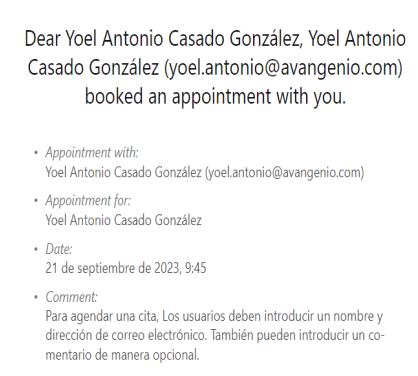
Figure 52 Appointment confirmation notification
The attendee will then receive another email confirming their appointment details.

Figure 53 Acceptance Confirmation Email
Note If a space has not been confirmed, it will be shown as available. Until then, the time slot could be scheduled by another user who confirms their schedule beforehand. The system will detect the conflict and offer you to choose a different time slot.
3.1.6.4 Manage the booked appointment
Once scheduling is completed, the organizer will find an event on their calendar with the details of the appointment and the attendee (See Figure 54).
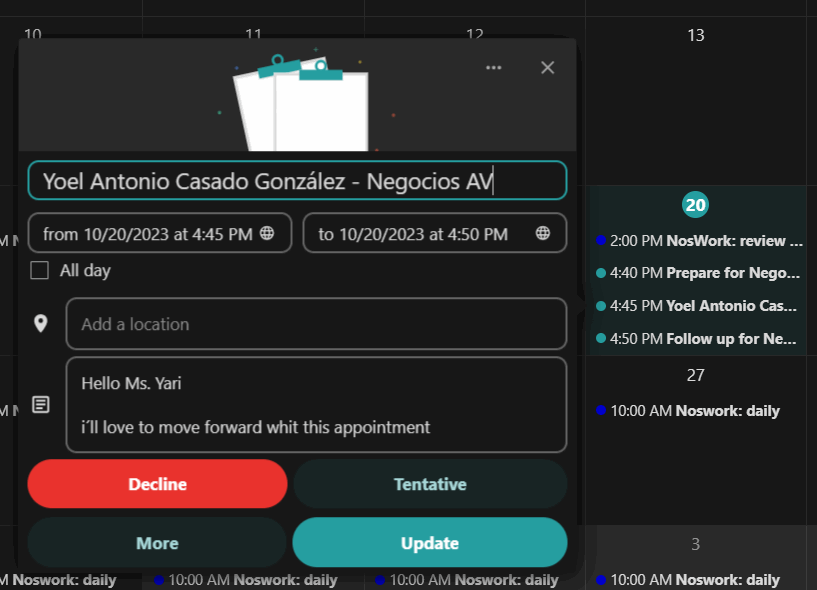
Figure 54 Manage appointment
If the appointment has the “Add time before event” or “Add time after event” settings enabled, they will appear as separate events on the calendar for the organizer (See Figure 55).
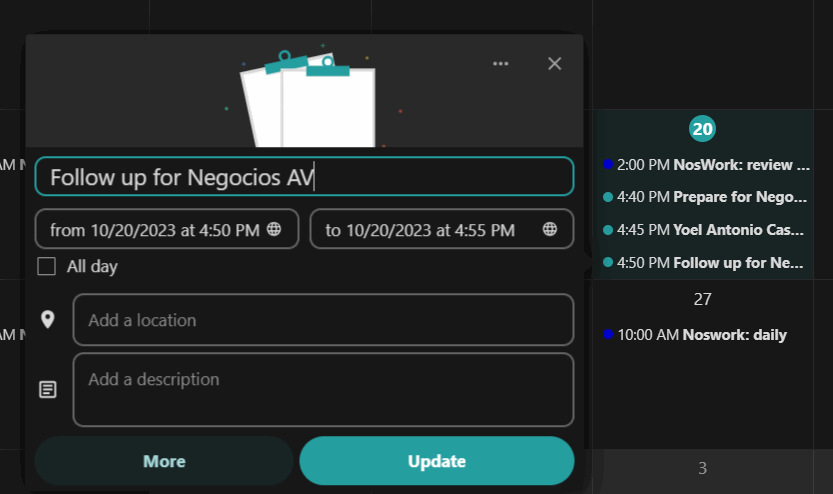
Figure 55 Time settings
As with any other event with attendees, changes and cancellations will cause a notification email to be sent to them.
If attendees want to cancel the appointment, they have to contact the organizer, so that the organizer can cancel or even delete the event.
3.1.6.7 Create Talk room for booked appointments
You can create a Talk room directly from the Calendar app for a scheduled appointment. The option can be located in the “Create appointment” modal. A unique link will be generated for each scheduled appointment and sent via confirmation email when you check this option.
3.2 Using the Mail app
Note The Mail app comes installed with Nextcloud Hub by default, but can be disabled. Please ask your administrator about this option.
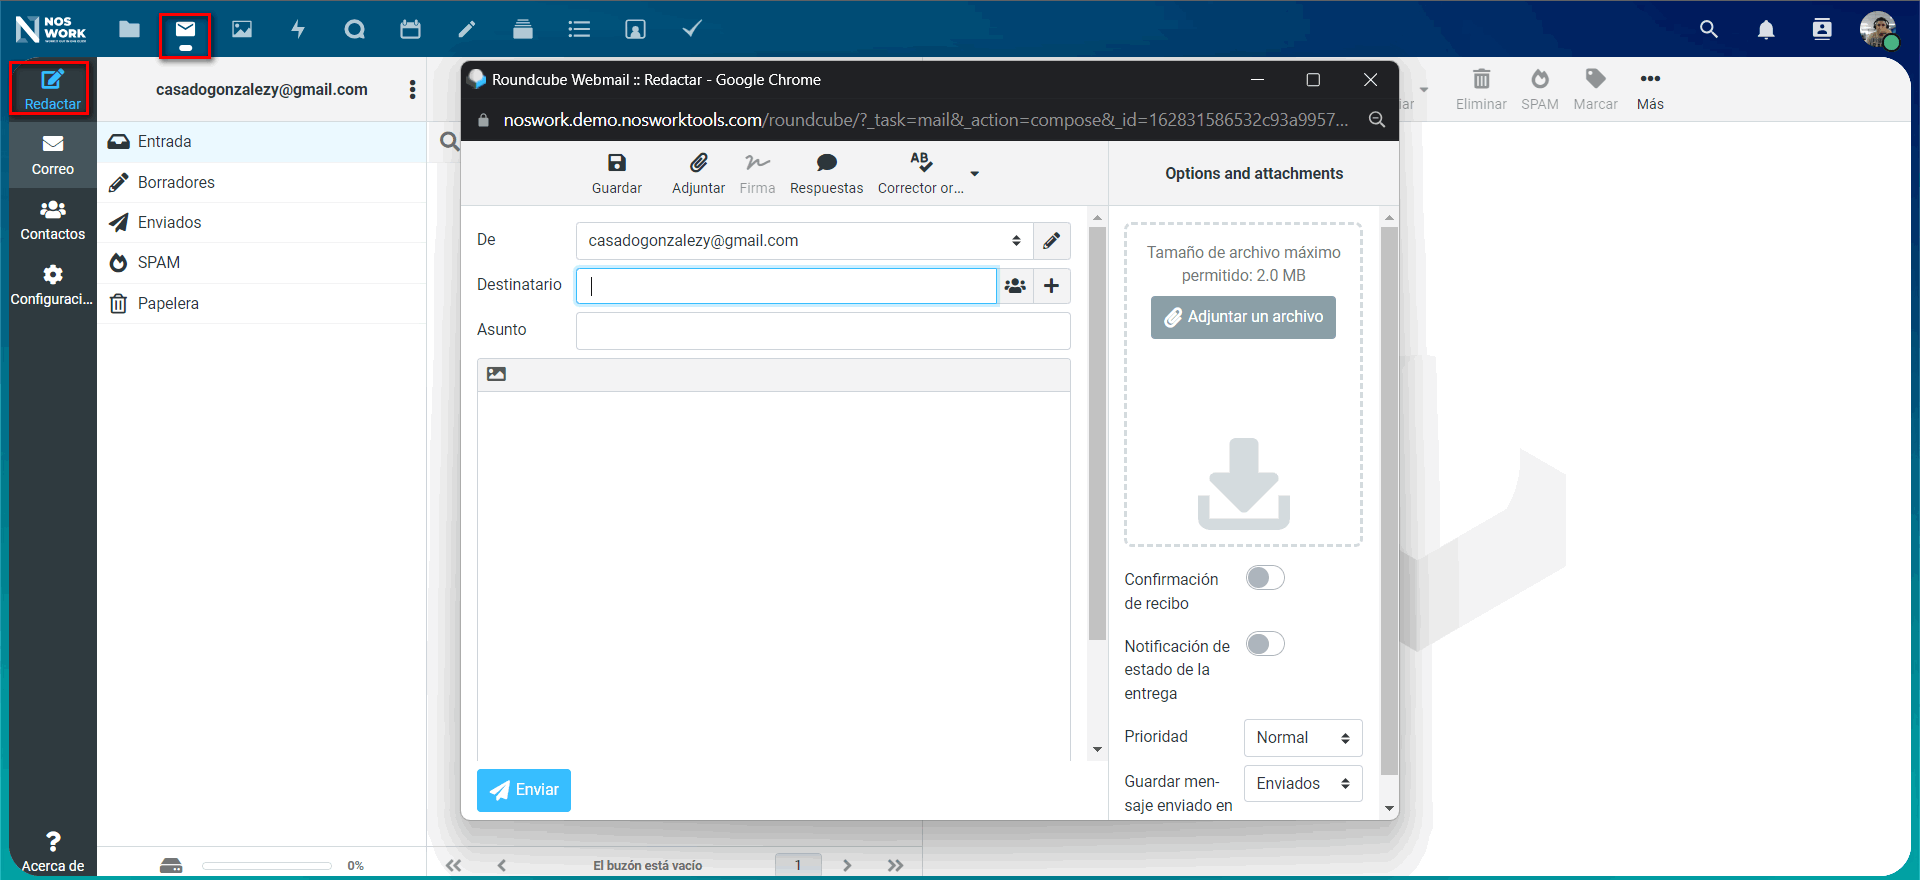 Figure 56 Mail
3.2.1 Managing your email account
3.2.1.1 Adding a new account
-
Click Account Settings
-
Click on the Identities icon
-
Click on the Create button
-
Fill out the new account setup form.
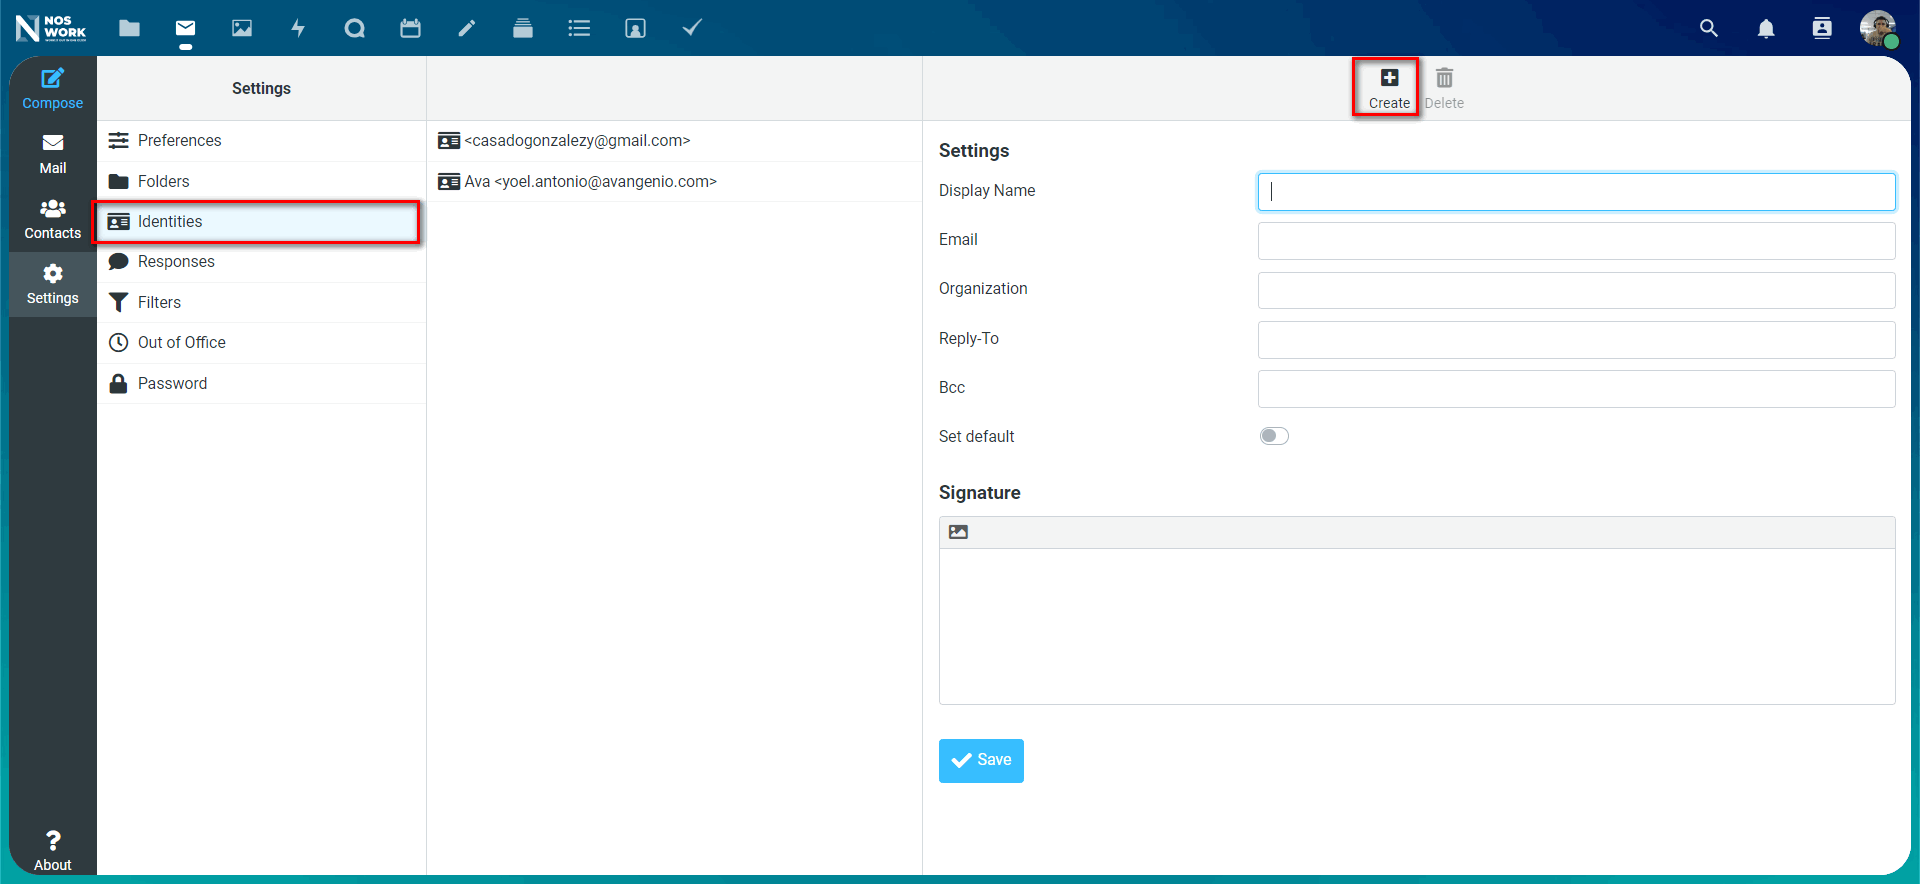 Figure 57 Configure new email
3.2.1.2 All mailboxes
All messages from accounts where you are logged in will be displayed chronologically.
3.2.1.3 Account settings
Your account settings such as:
-
Aliases
-
Signature
-
Default folders
-
Autoresponder
-
Trusted Senders
-
And more
It can be found in the actions menu of the email account. There you can edit, add or delete settings depending on your needs.
3.2.1.4 Move messages to the Junk folder
Mail can move a message to a different folder when it is marked as spam.
-
Visit account settings.
-
Go to default folders.
-
Verify that a folder is selected for spam.
-
Go to spam settings.
-
Click Move messages to spam folder
3.2.1.5 Delegation of accounts
The app allows the delegation of accounts so that one user can send emails on behalf of another.
-
Delegation must be configured on the mail server by an administrator
-
Add the other email address as an alias for your own account email
-
When sending an email, select the alias as the sender
Warning Sent email may not be visible to the original account if it is saved in your personal "Sent" mailbox.
3.2.1.6 Automatic Trash Deletion
The Mail app can automatically delete messages in the Trash folder after a certain number of days.
-
Visit account settings
-
Go to Automatic trash deletion
-
Enter the number of days after which messages should be deleted Disable garbage retention by leaving the field empty or setting it to 0.
Note Only emails deleted after enabling garbage retention will be processed.*
3.2.2 Compose messages
-
Click on new message at the top left of your screen.
-
Start typing your message.
3.2.2.1 Minimize the writing modal
The compose modal can be minimized while writing a new message, editing an existing draft, or editing a message from the outbox. Simply click the minimize button at the top right of the modal or click on any region outside the modal (See Figure 58).
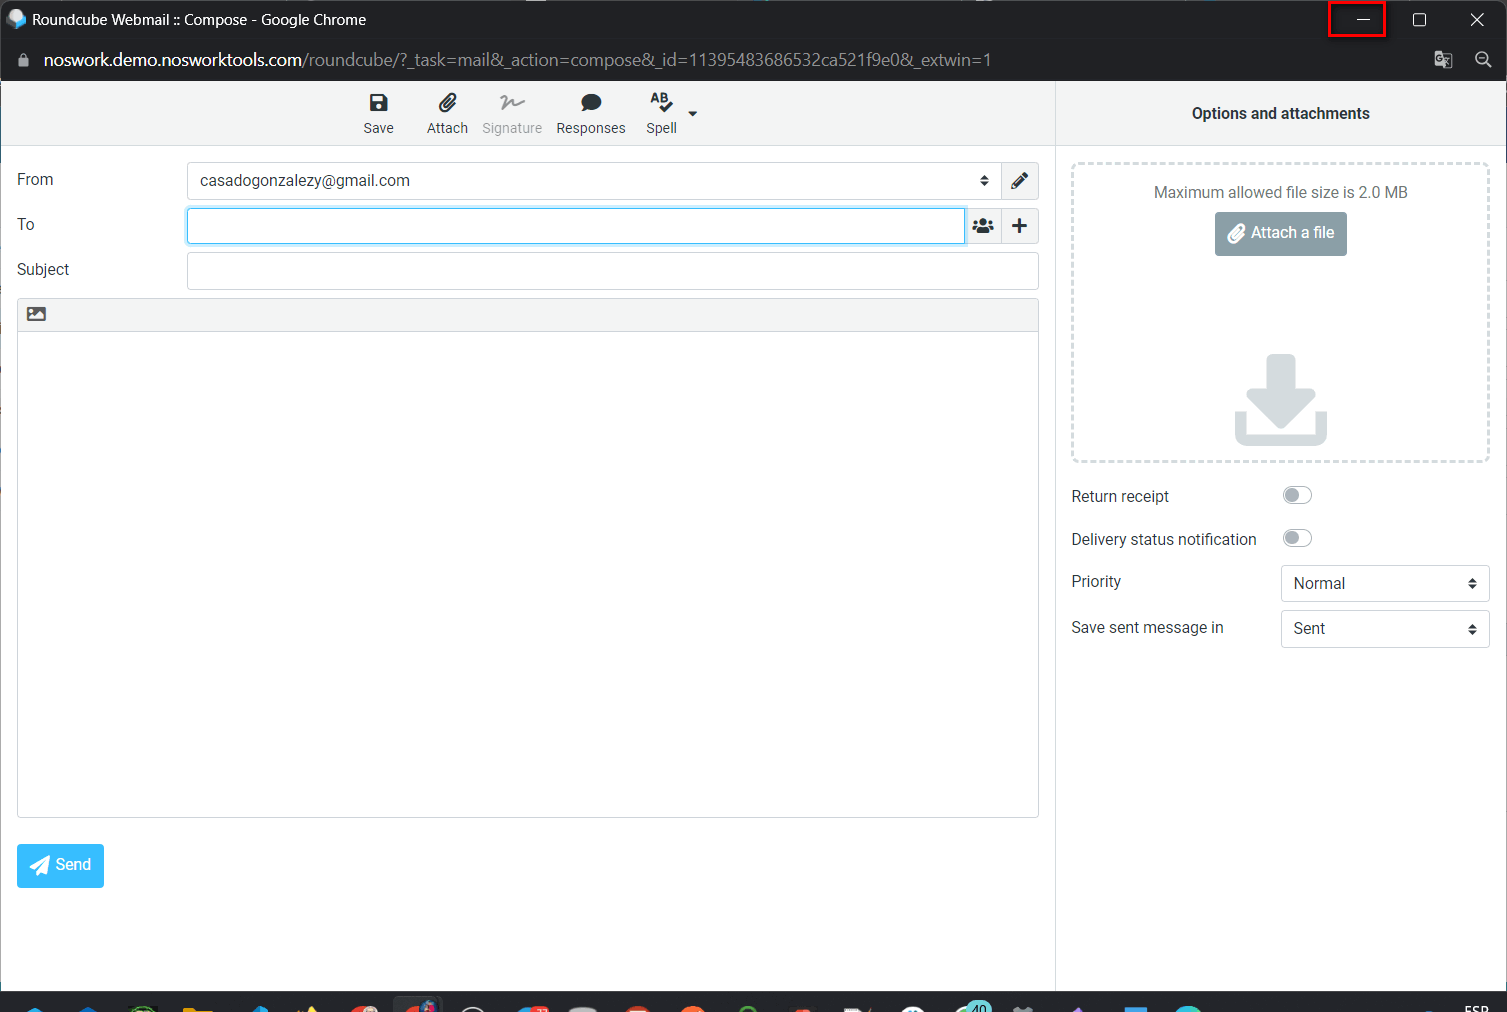 Figure 58 Minimize compose
Press the close button in the modal or the indicator in the top right corner to stop editing a message. A draft will be automatically saved to your drafts box.
3.2.3 Mailbox Actions
3.2.3.1 Add a mailbox
To add a new mailbox follow the following steps (See Figure 59):
-
Open the actions menu of an account.
-
Click add mailbox.
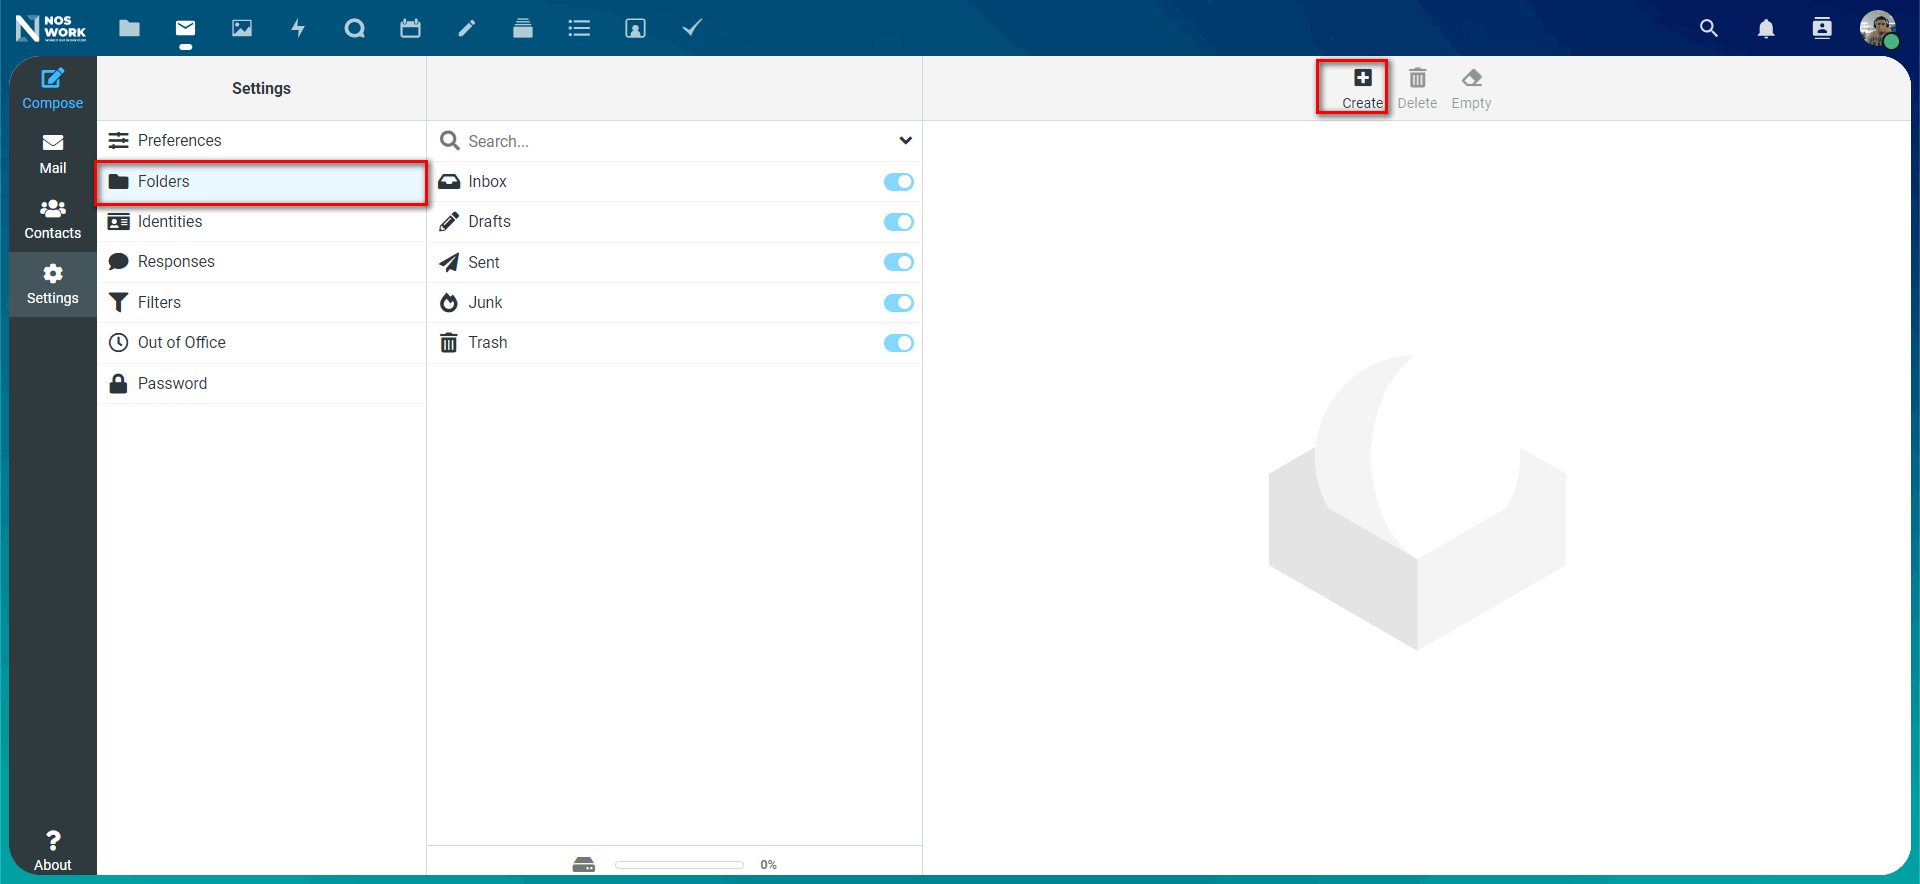 Figure 59 Add a mailbox
3.2.3.2 Add a child mailbox
Steps:
-
Open the actions menu of a mailbox
-
Click add a child mailbox
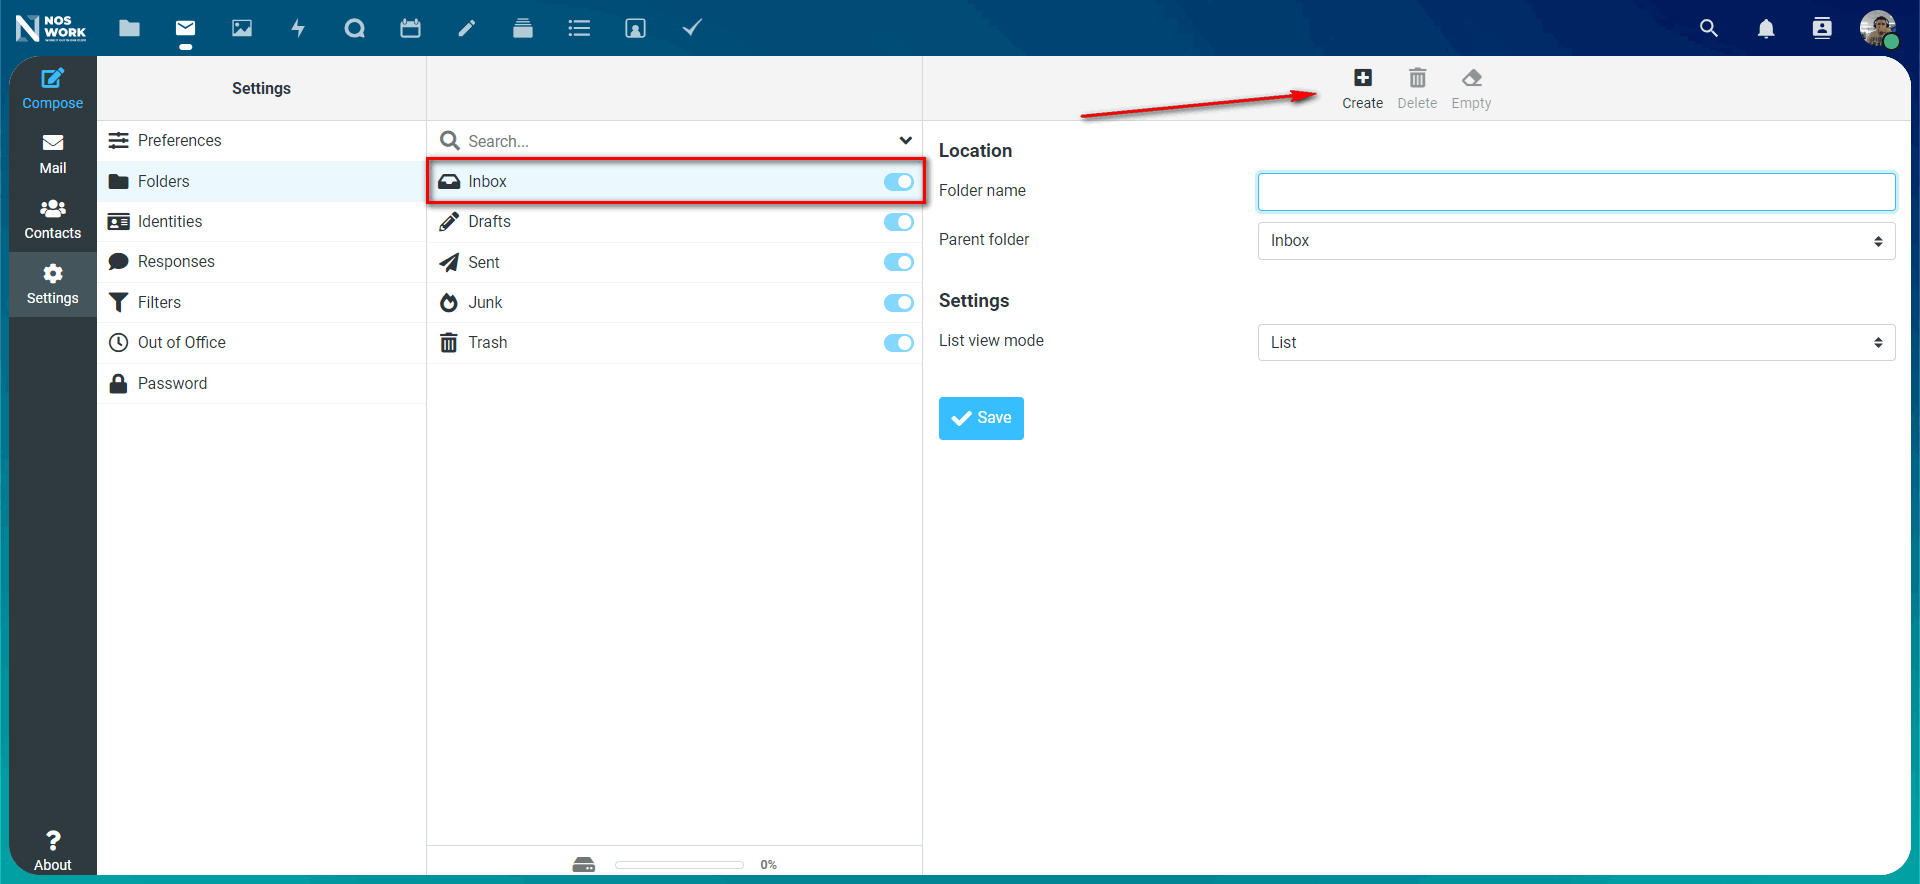 Figure 60 Add child mailbox
4 NextCloud Talk
Nextcloud Talk offers audio/video and text chat built into Nextcloud. It is available as a web interface and for mobile applications.
 Figure 61 Talk
4.1 Nextcloud Talk Basics
4.1.1 Creating a chat
You can create a direct, one-on-one chat by searching for the name of a user, group, or circle and clicking on it. For a single user, a conversation is immediately created and you can start your chat. For a group or circle, you can choose a name and settings before creating the conversation and adding participants.
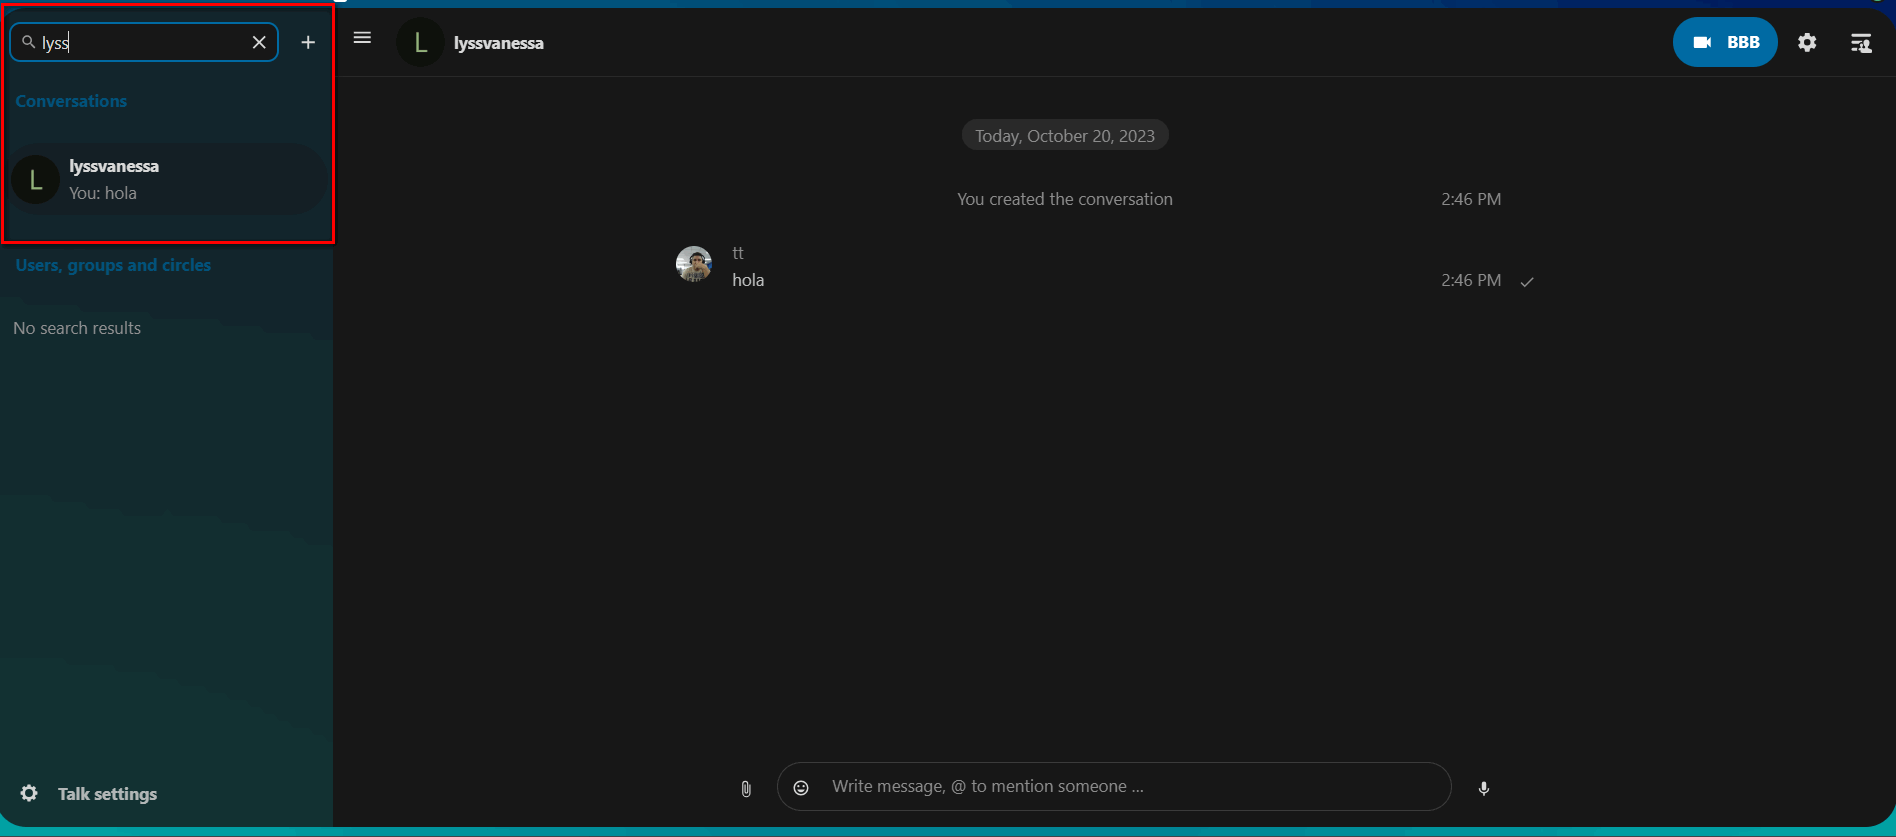 Figure 62 Search People
If you want to create a custom group conversation, click the + Create a new conversation button next to the filters button.
You can then choose a name for the conversation, put a description, and select whether the conversation should be open to external users and whether other users on the server can view it and join the conversation (See Figure 63).
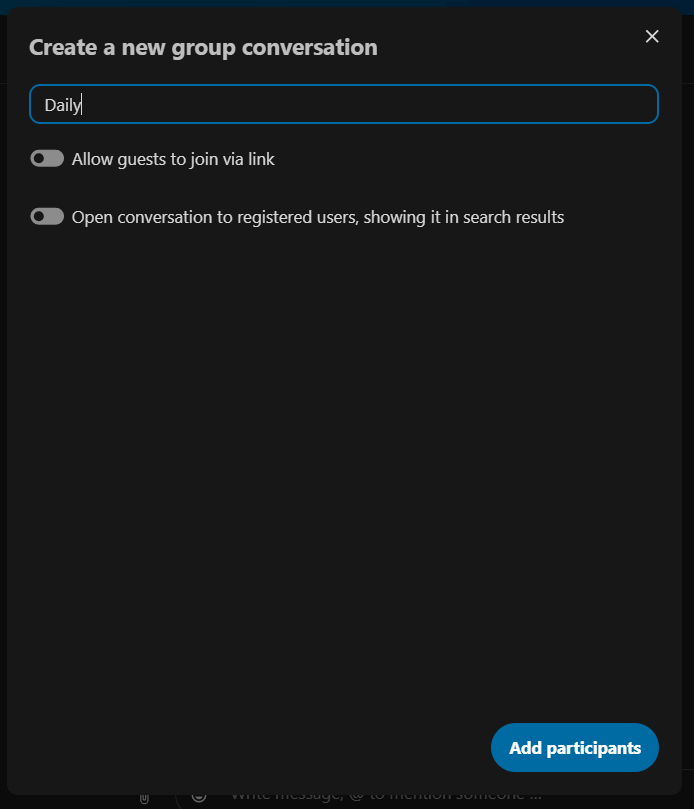
Figure 63 New group conversation
In the second step, you can add participants and finish creating the conversation (See Figure 64).

Figure 64 Add participants
You can cancel creating a conversation by clicking outside the white menu area whenever.
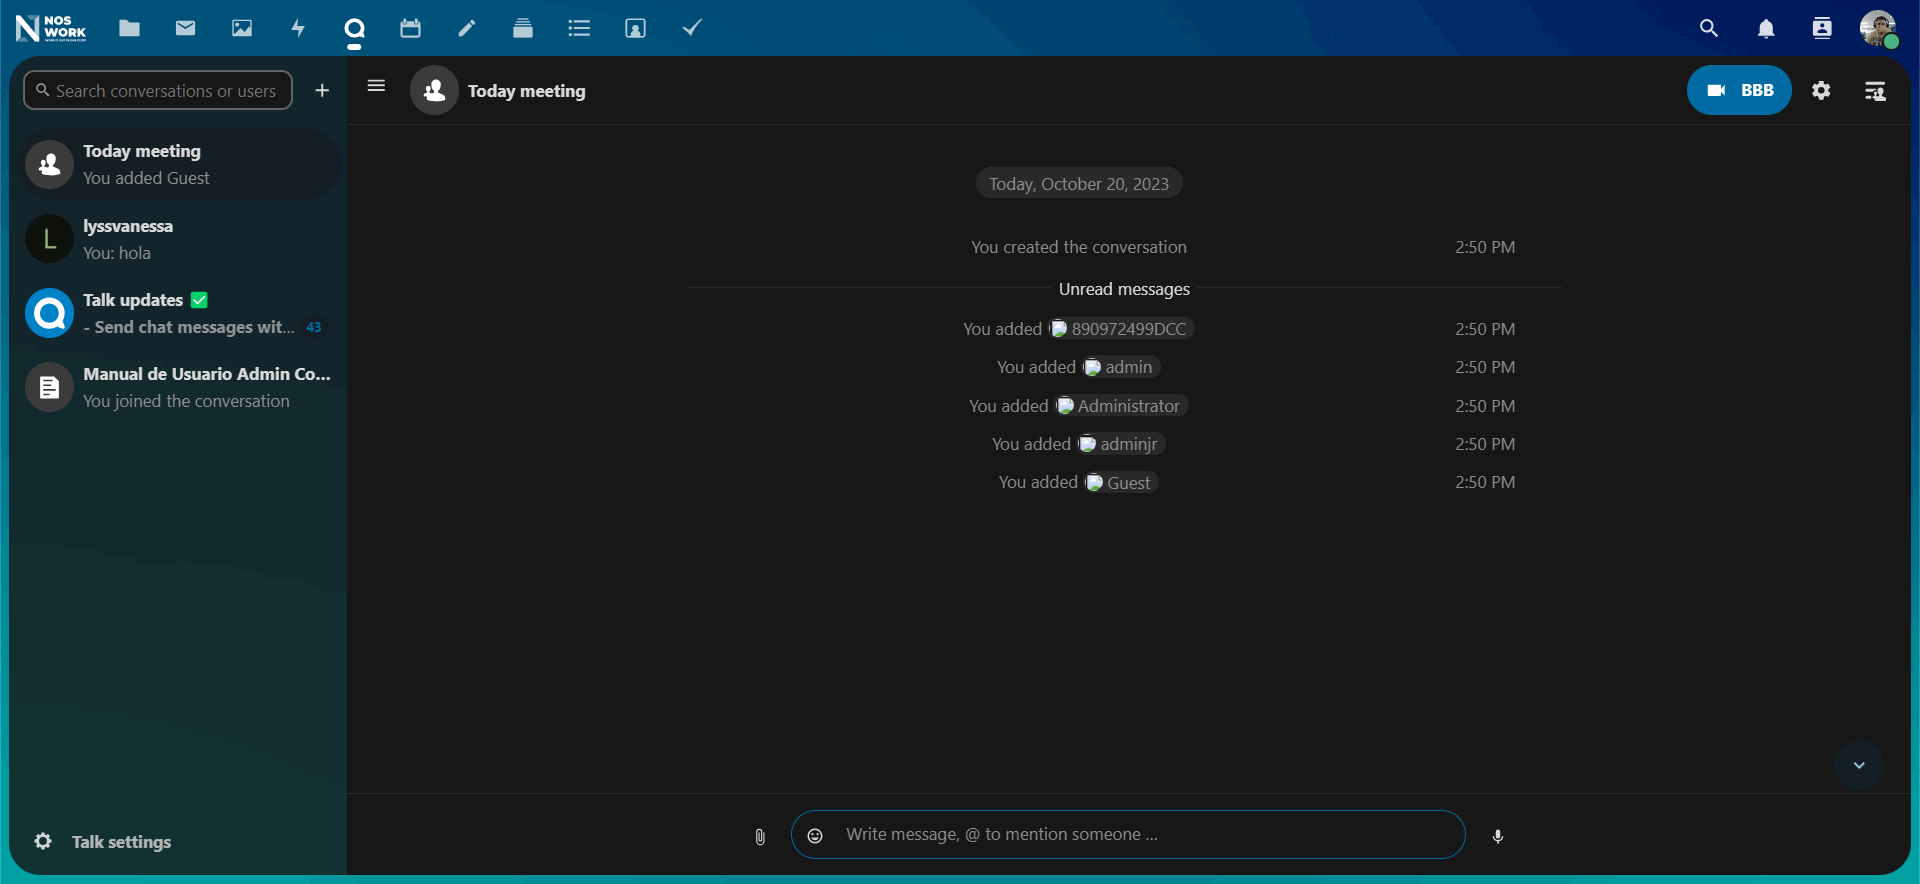 Figure 65 Conversation room
4.1.2 View all open conversations
You can see all the conversations you can join by accessing the list of conversations through the left side menu and clicking on one of the open conversations (See Figure 66).
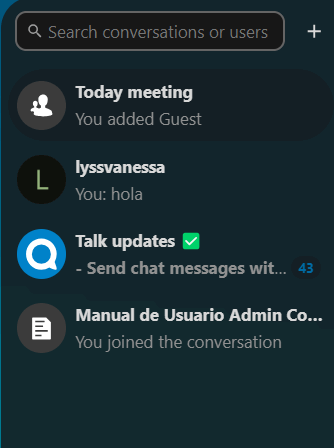
Figure 66 Join open conversations
4.1.3 hare files in a chat
You can share files in a chat in 3 ways. First, you can simply drag and drop them into the chat (See Figure 67).
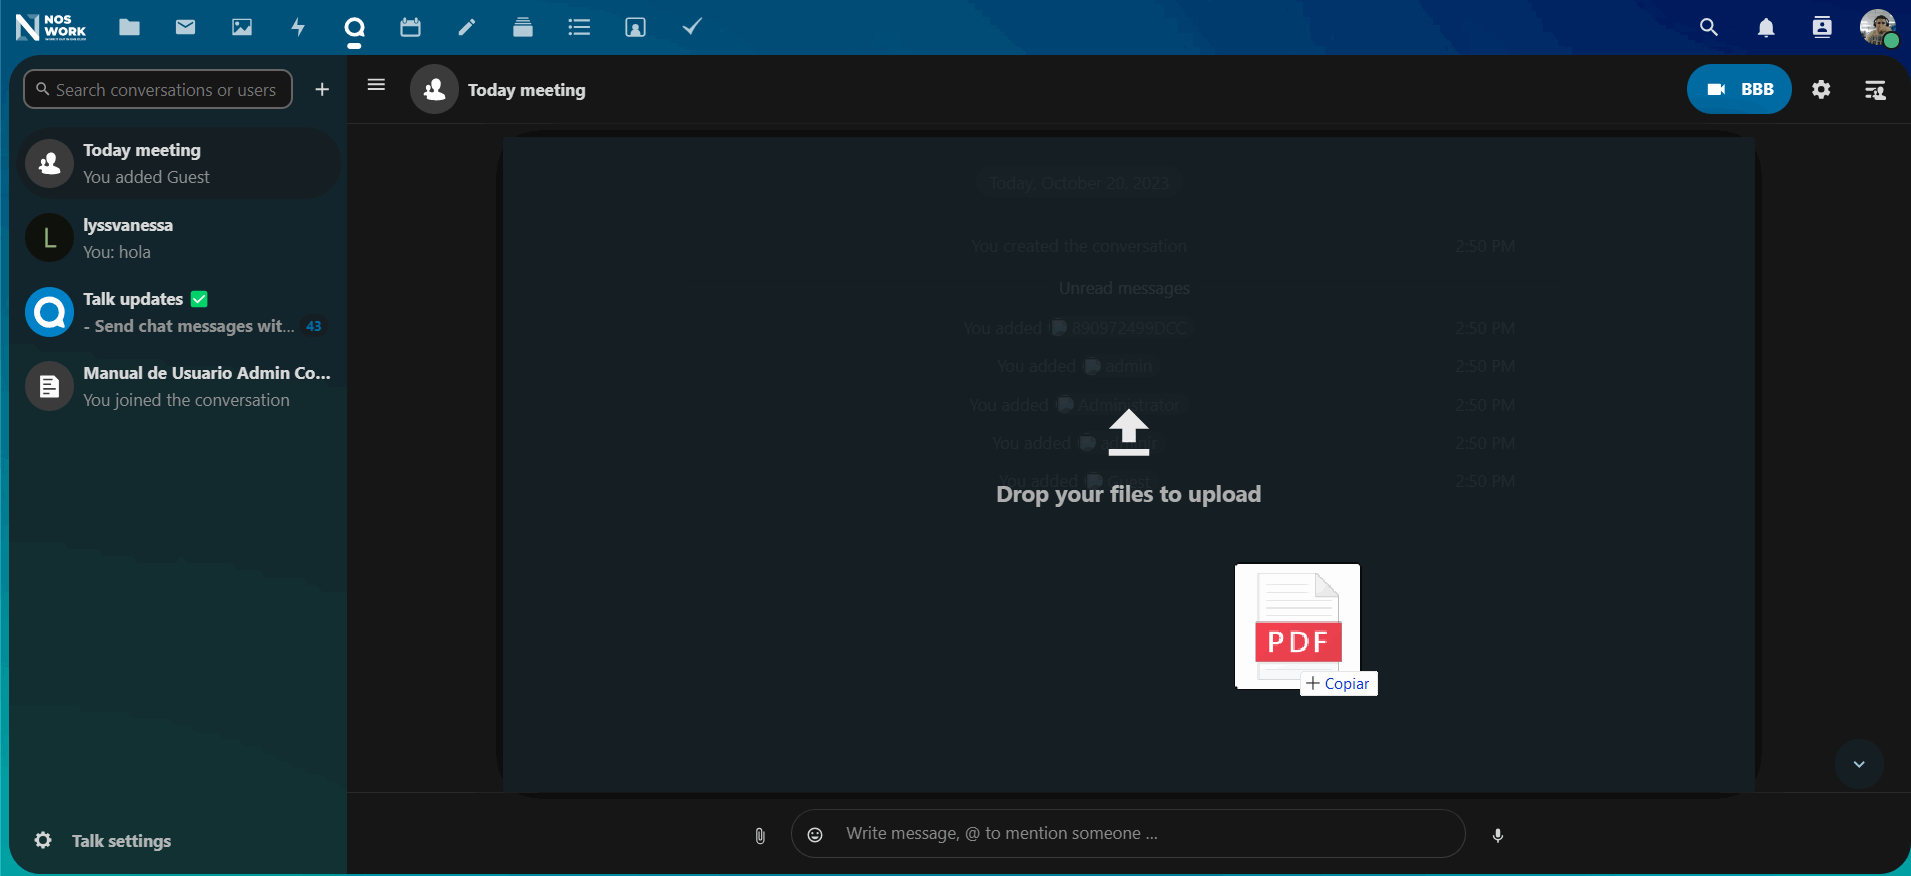 Figure 67 Drag files
Secondly, you can select a file from your Nextcloud files or a file manager by choosing the small clip and selecting where you would like to choose the file from.
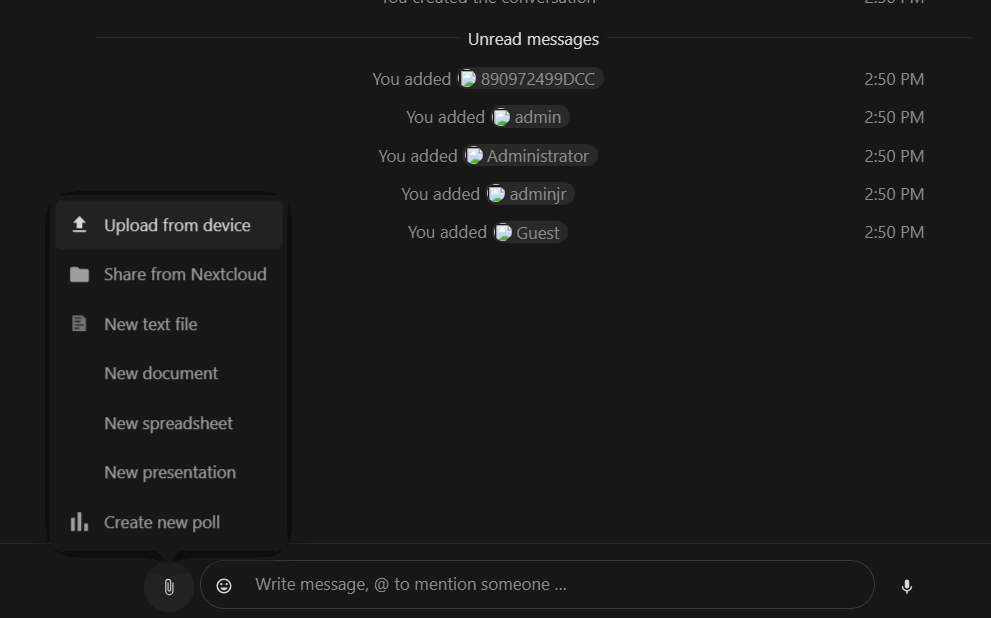 Figure 68 Upload File/ Select Source
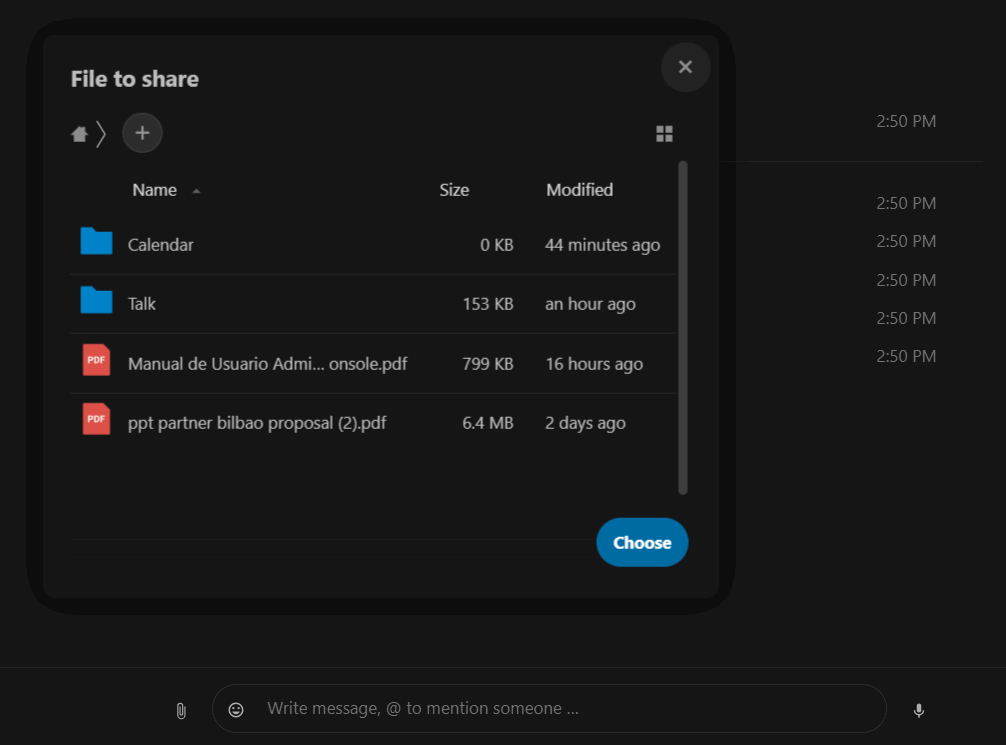 Figure 69 Select file
You can add more files until you are finished and decide to share the files (See Figure 70).
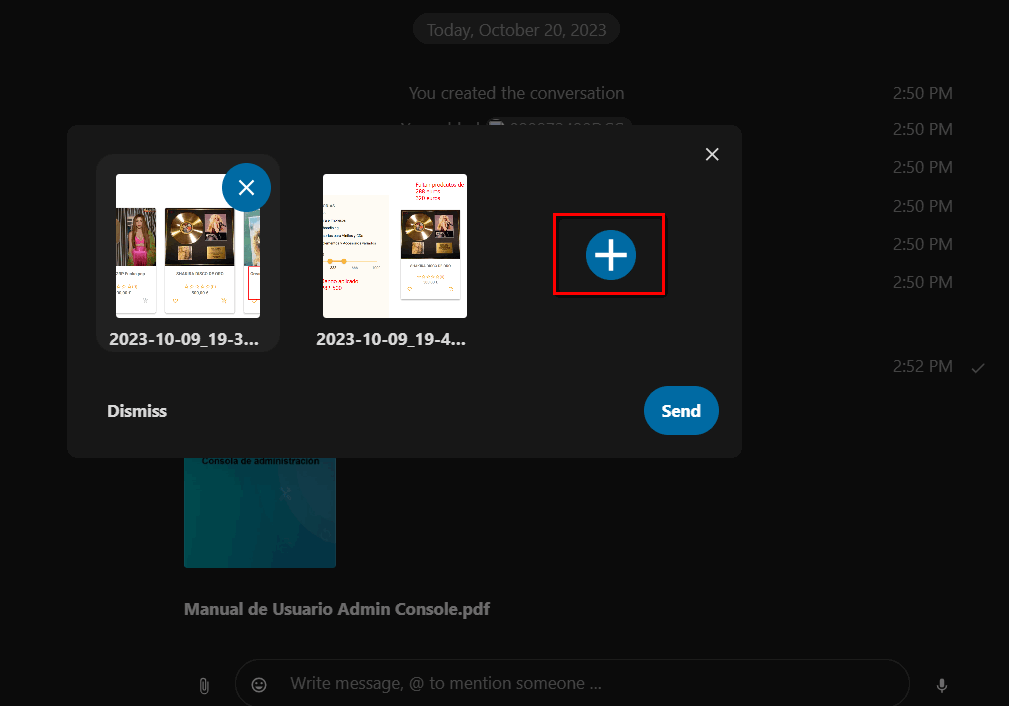 Figure 70 Select more than one file
All users will be able to click on files to view, edit or download them, regardless of whether they have a user account (See Figure 71). Users with an account will have the file automatically shared with them, while for external guest users it will be shared as a public link.
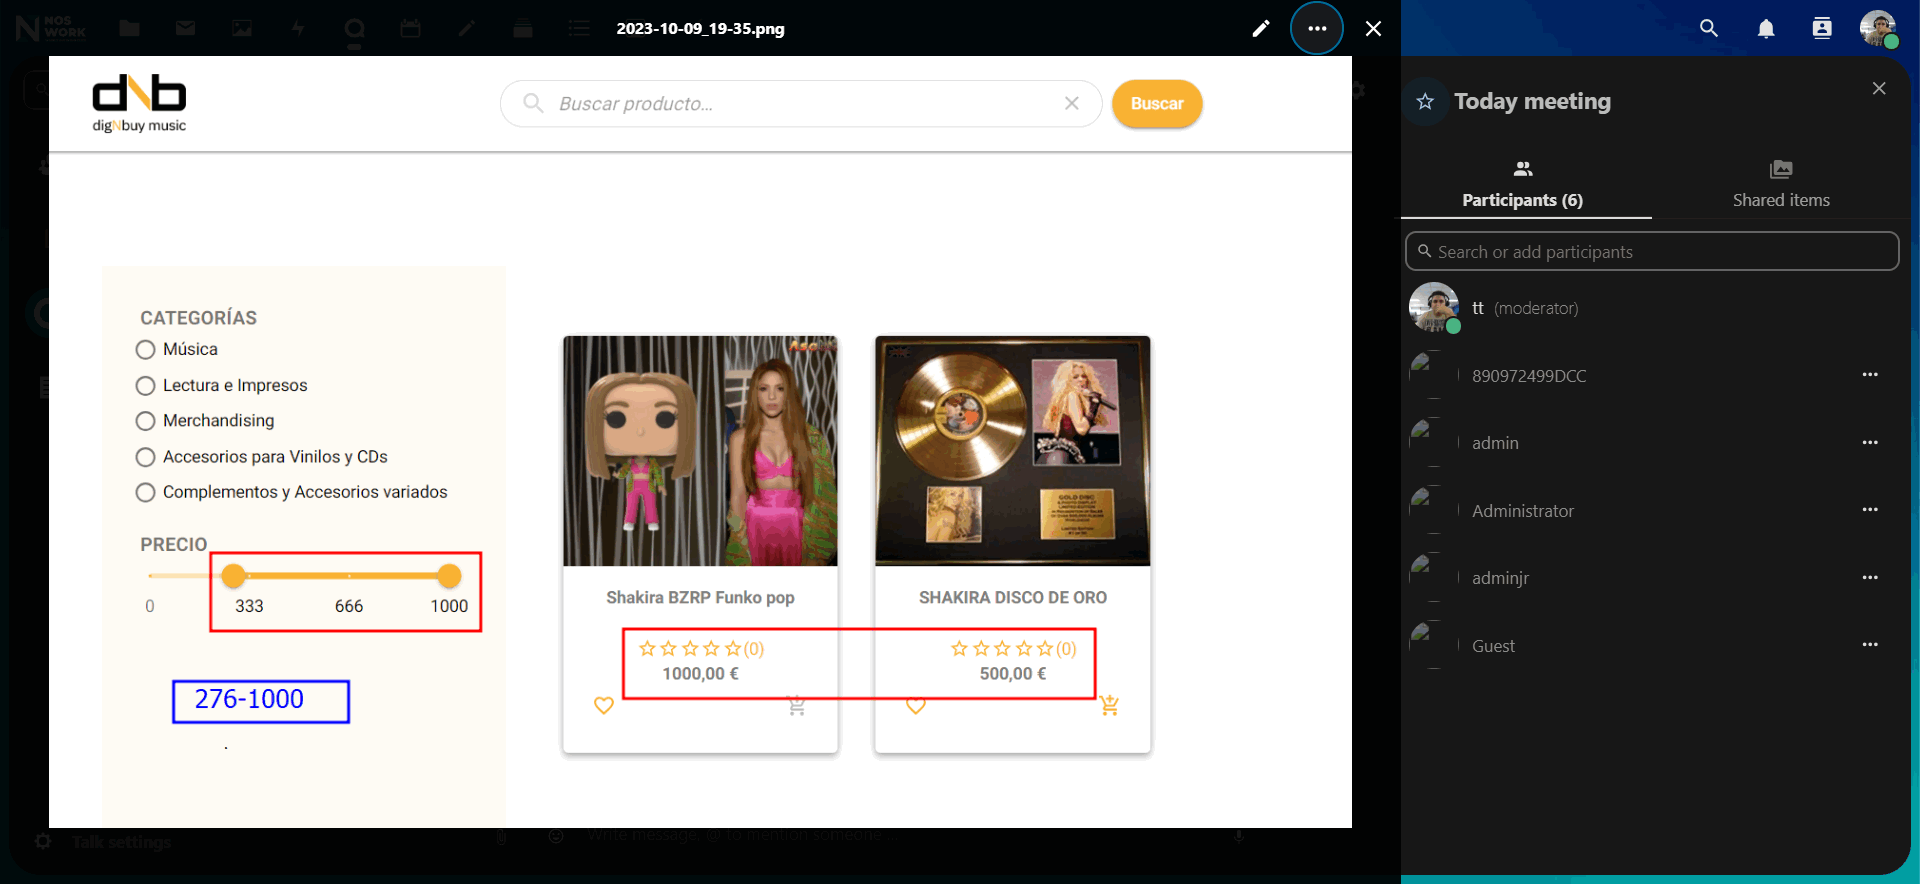 Figure 71 File preview
4.1.4 Insert emoji
You can add emojis using the selector to the left of the text entry field.
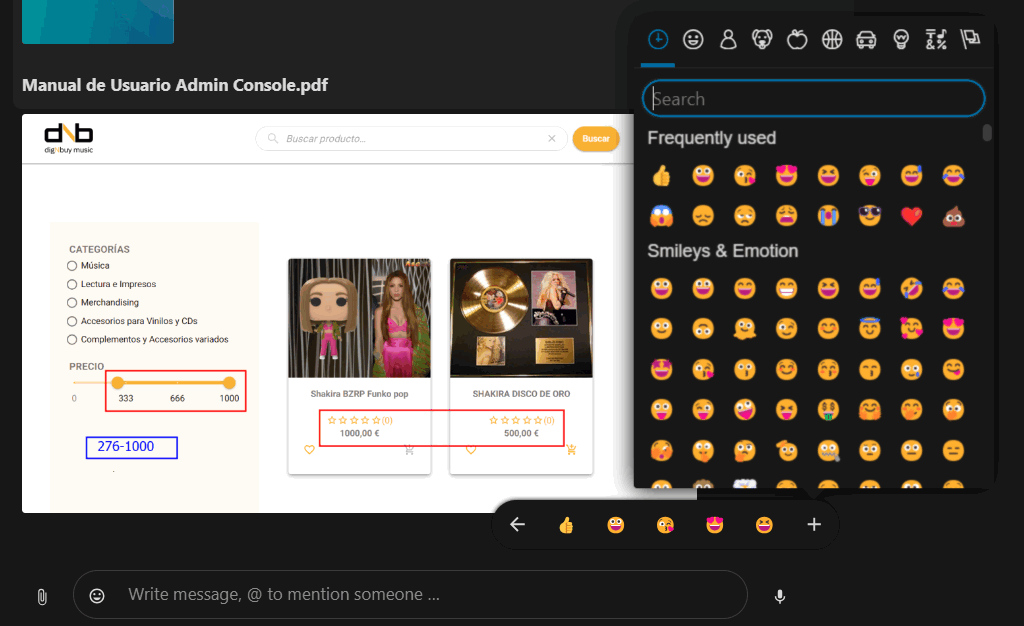 Figure 72 Insert emoji
4.1.5 Reply to messages and more
You can reply to a message using the arrow that appears when you hover over a message.
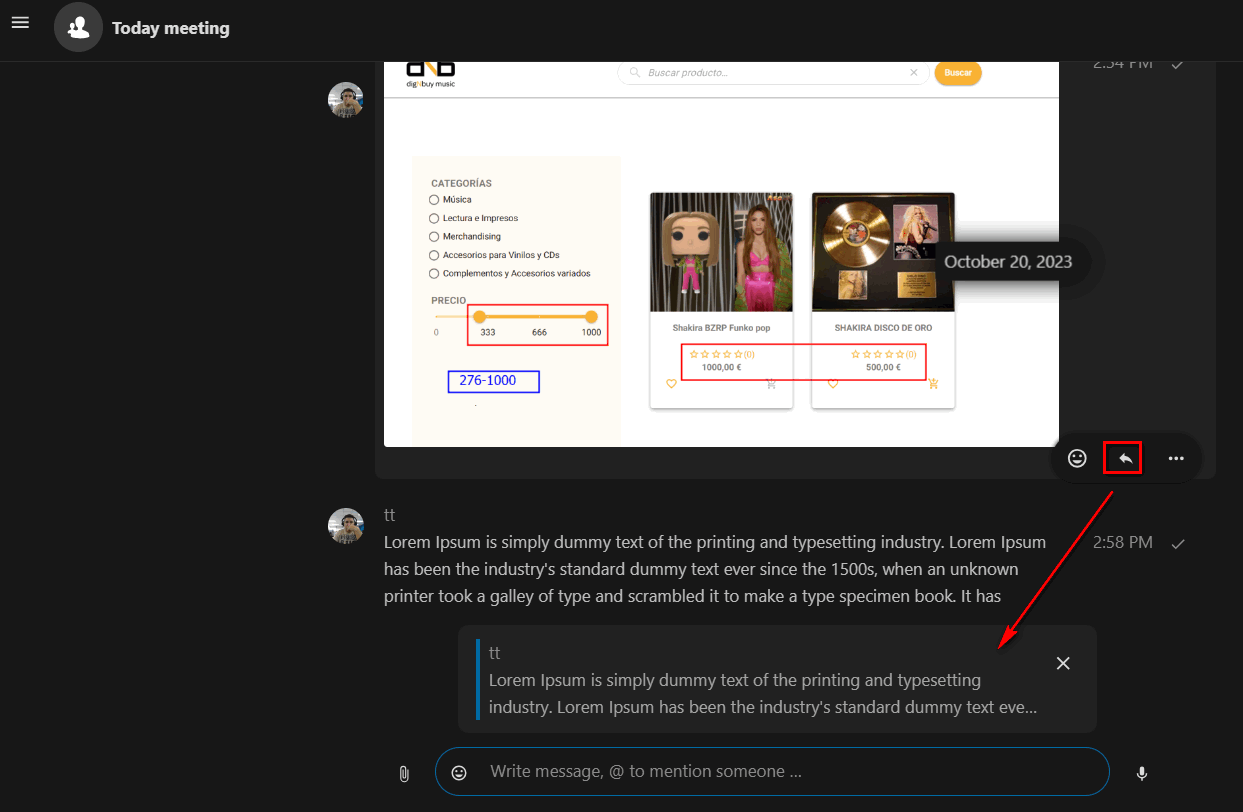 Figure 73 Reply to conversations
In the menu... you can also choose to reply privately. This will open a one on one chat one.
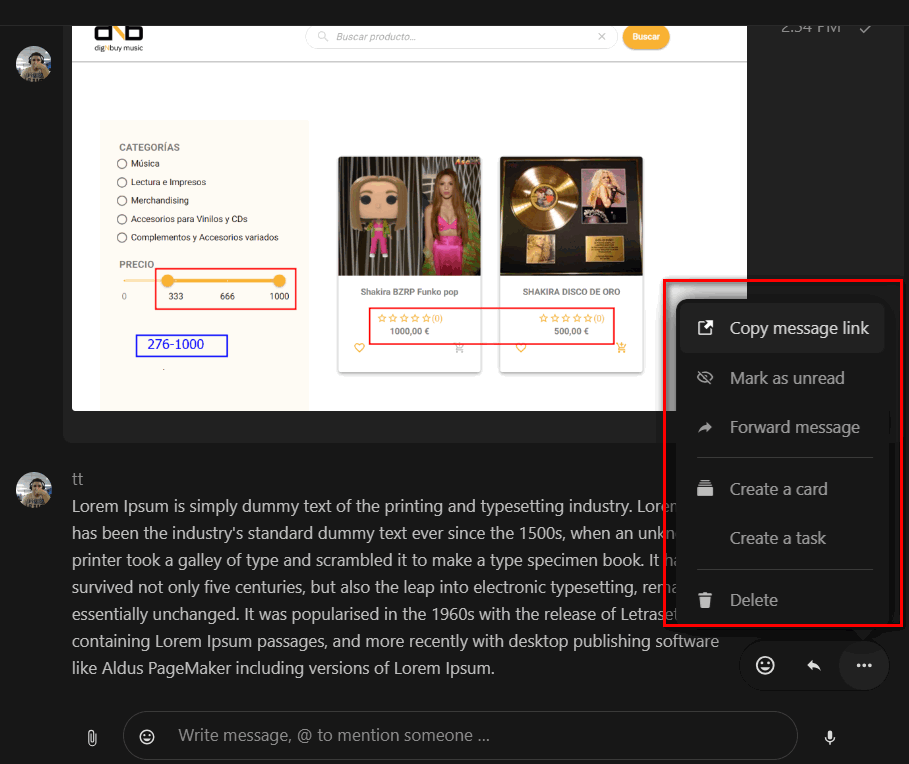 Figure 74 Conversation options
Here you can also create a direct link to the message or mark it as unread so you can scroll back the next time you enter the chat. When it is a file, you can see it in Files.
4.1.6 Manage a conversation
You are always a moderator in your new conversation. In the participant list on the right, you can elevate other participants to moderators using the... menu to the right of their username, or remove them from the conversation.
Changing the permissions of a user who joined a public conversation will cause them to permanently join the conversation.
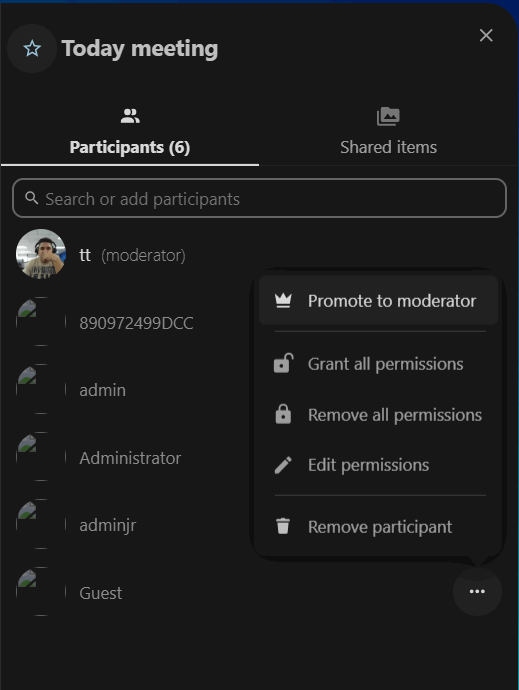
Figure 75 Manage conversation
Moderators can configure the conversation. Select Conversation Settings from the conversation menu at the top to access the settings (See Figure 76).
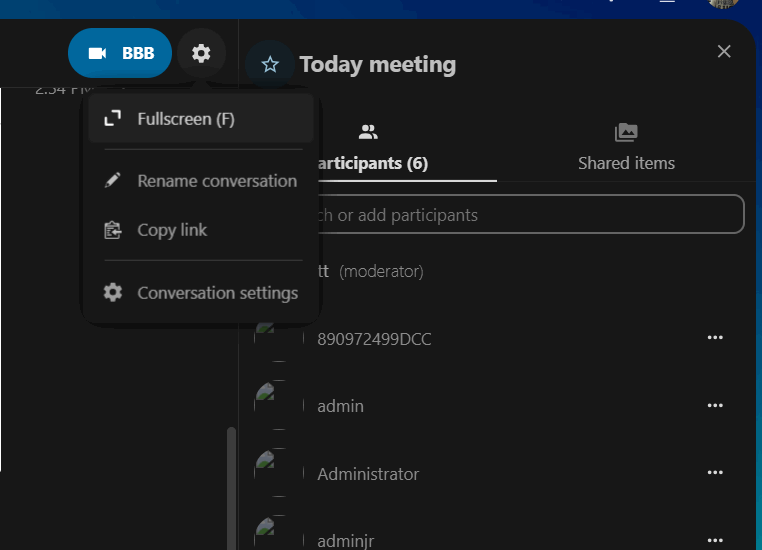
Figure 76 Conversation Settings
Here you can configure the name, guest access, whether the conversation is visible to others on the server, and more.
 Figure 77 Moderation Settings
4.1.7 Start a call
When you're in a conversation, you can start a call at any time with the BBB button. Pressing this button will open a new window to configure a new room and start the call or join one if another user has already created it. Other participants will be notified and can join the call.
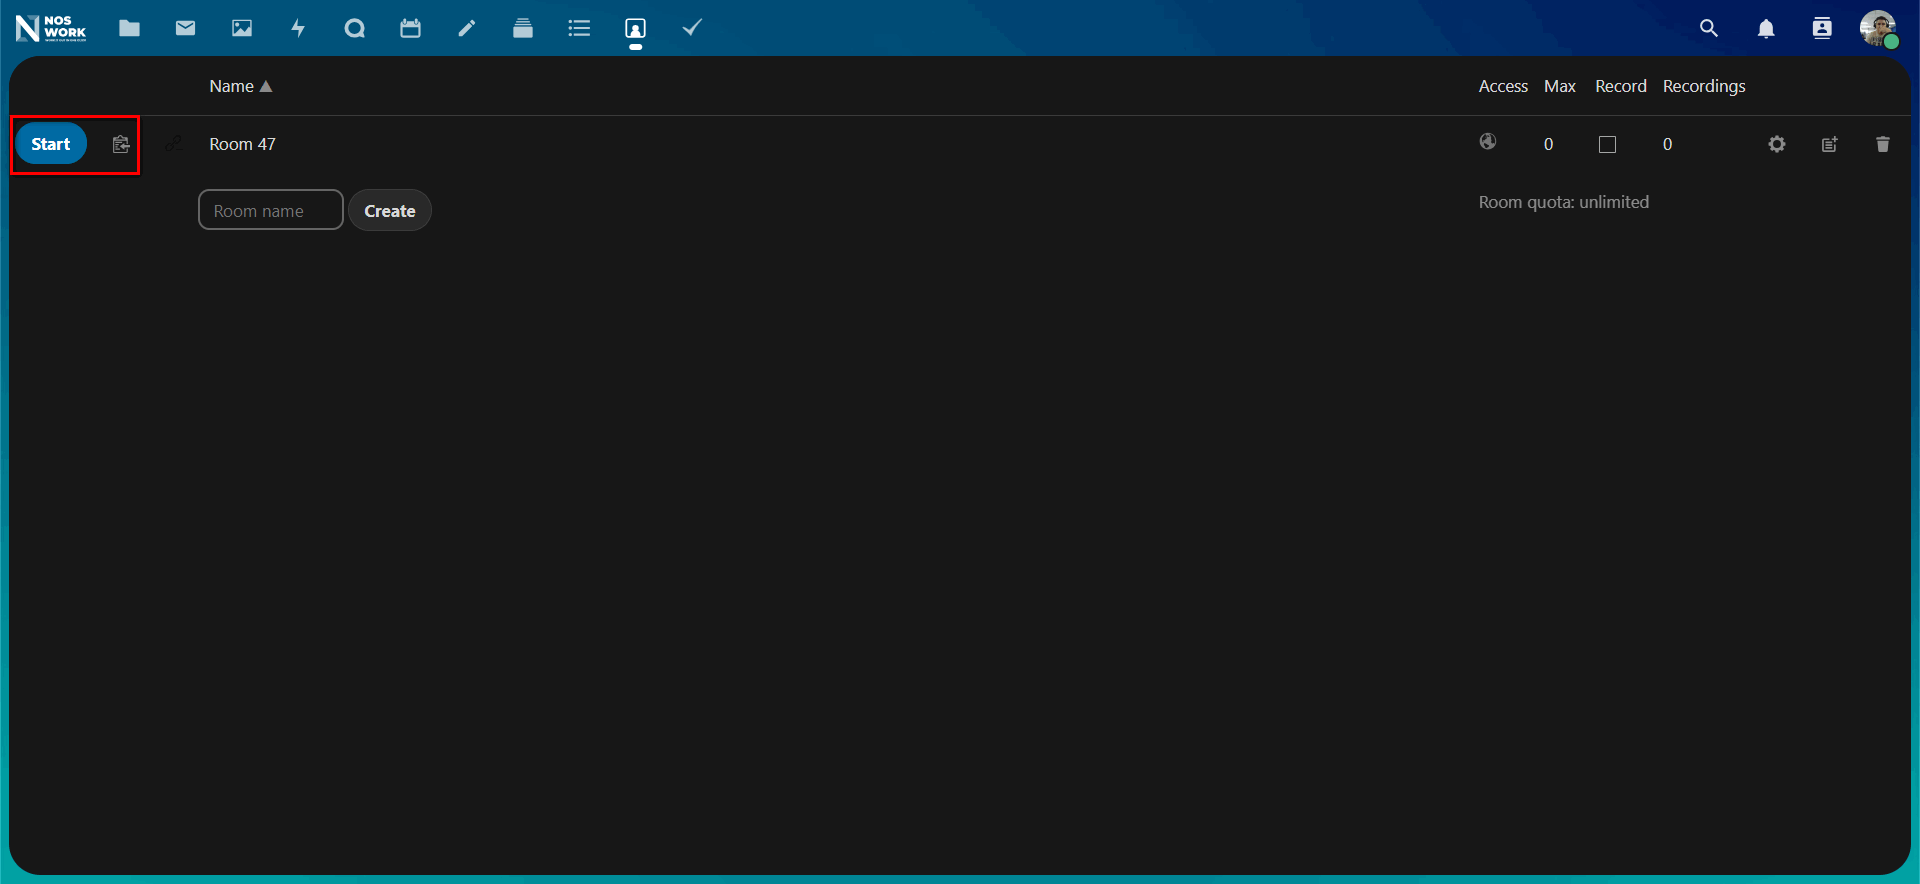 Figure 78 Start a call
To start the call you can create a room and press Start. If someone else has already started a call, the button will change to a green Join button.
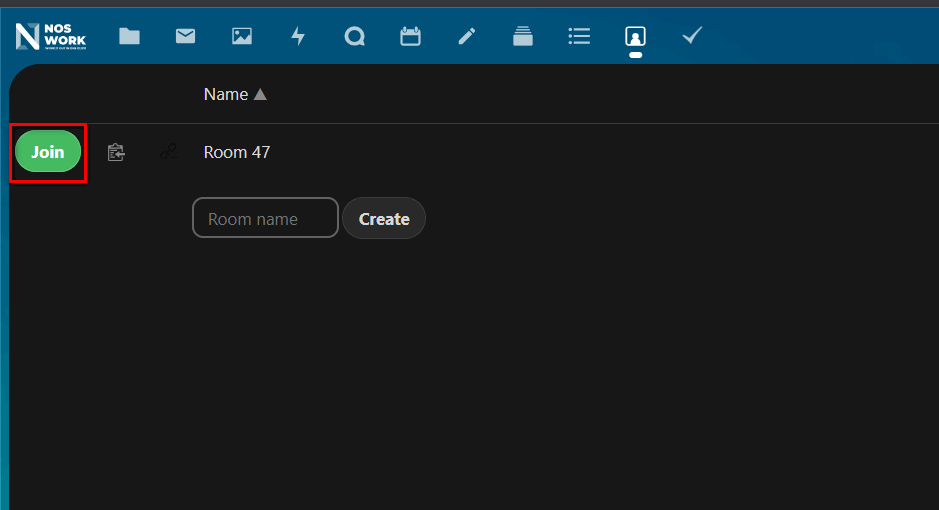
Figure 79 Join a call
When you press Start Join a room, another window with the call will open (see Figure 80).
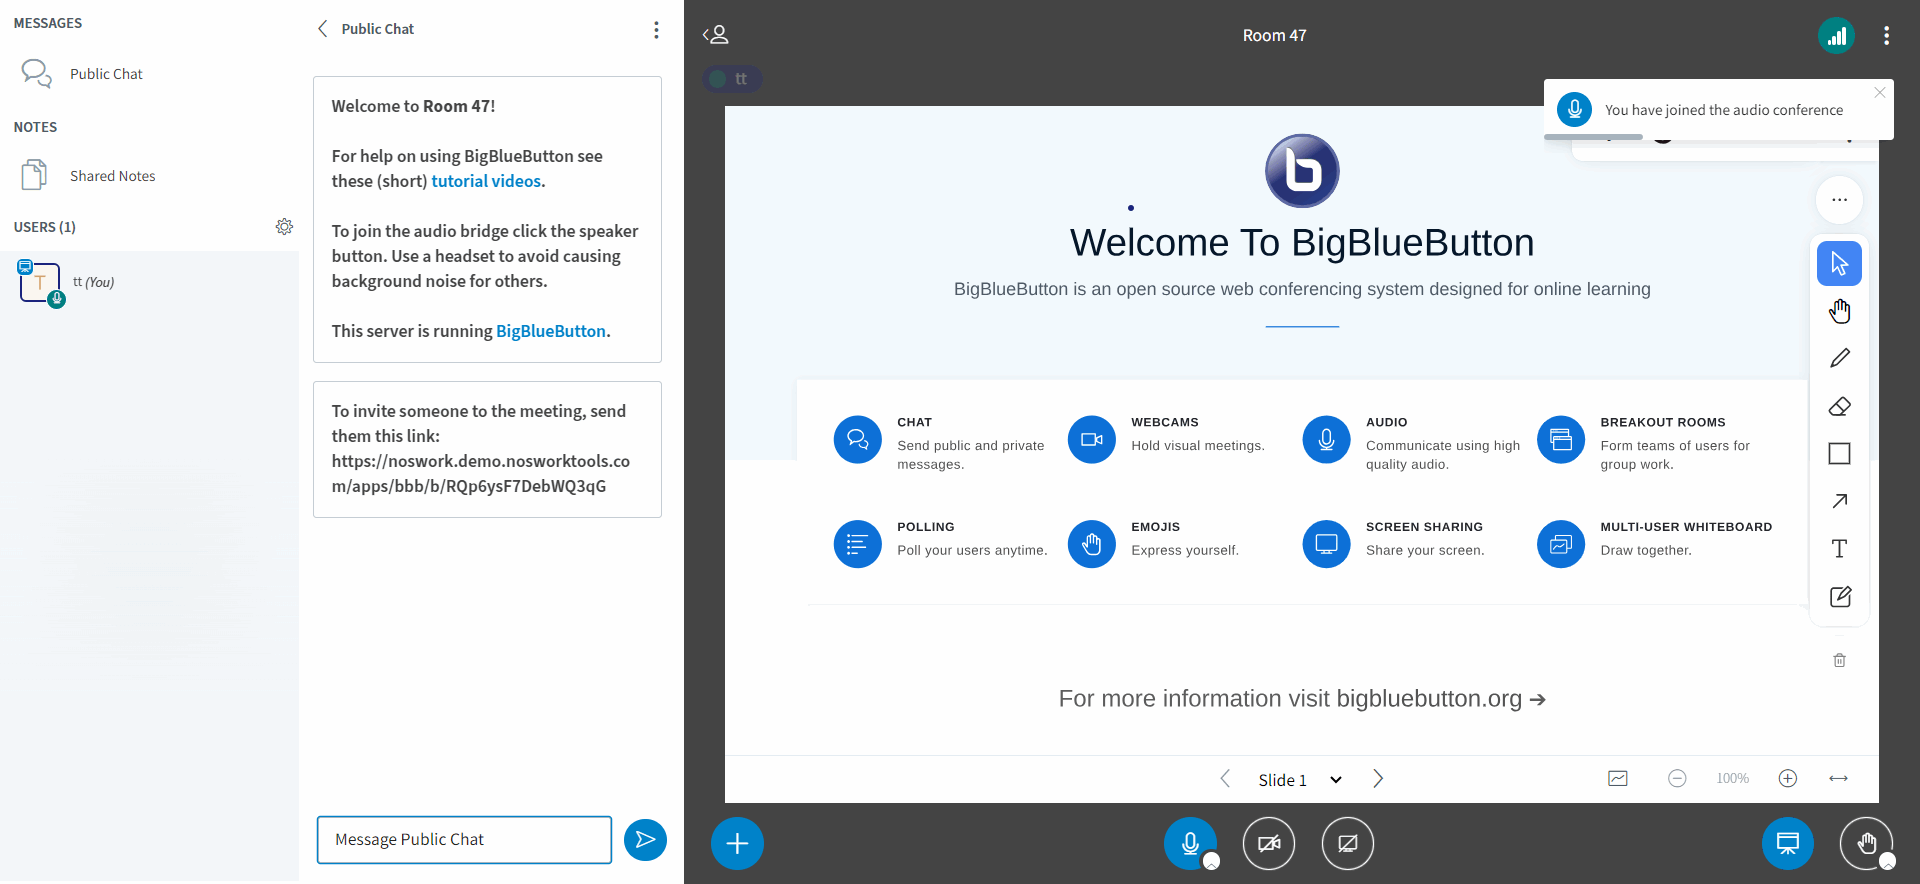 Figure 80 BBB Call Room
During a call, you can mute your microphone and disable your video with the video buttons at the bottom right, or by using the shortcuts to mute audio and to disable video (See Figure 79). You can also use the space bar to toggle mute.
You can access your settings and choose a webcam, microphone and other different settings in the menu... on the top bar.
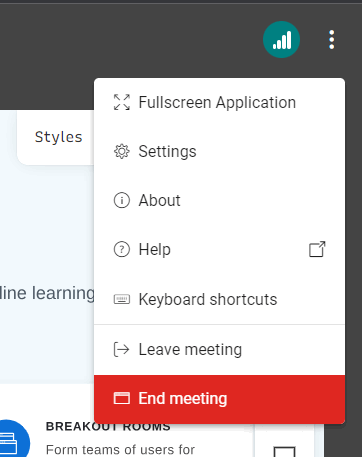
Figure 81 Call options
You can change other settings in the dialog box. Conversation settings. Conversation settings.

Figure 82 Conversation Settings
4.1.8 Share your screen
You can tap the monitor icon in your video stream to share your screen. Depending on your browser, you will have the option to share a monitor, an application window, or a single browser tab.
4.2 Advanced Talk Features
Nextcloud Talk has a number of advanced features that users may find useful.
4.2.1 Talk from files
In the Files app, you can chat about files in the sidebar and even make a call while you edit them. First you have to join the chat.
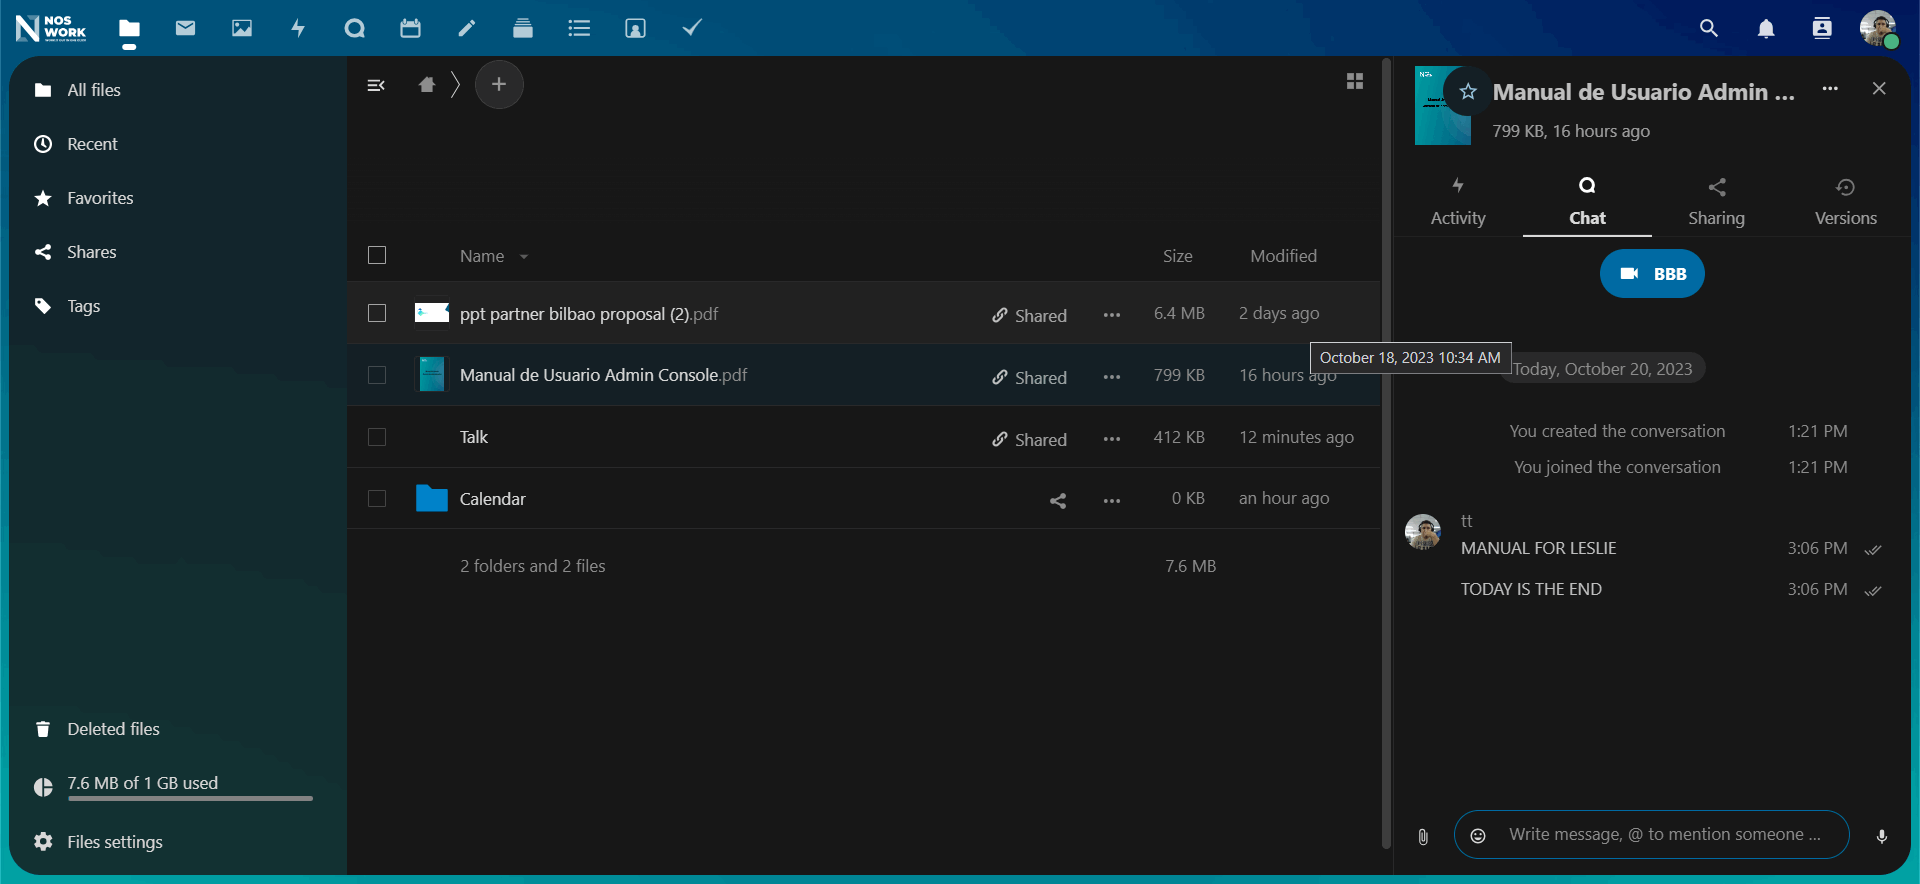 Figure 83 Talk from files
You can then chat or make a call with other participants, even when you start editing the file.
In Talk, a conversation will be created for the file. You can chat from there or return to the file using the ... menu at the top right (See Figure 84).
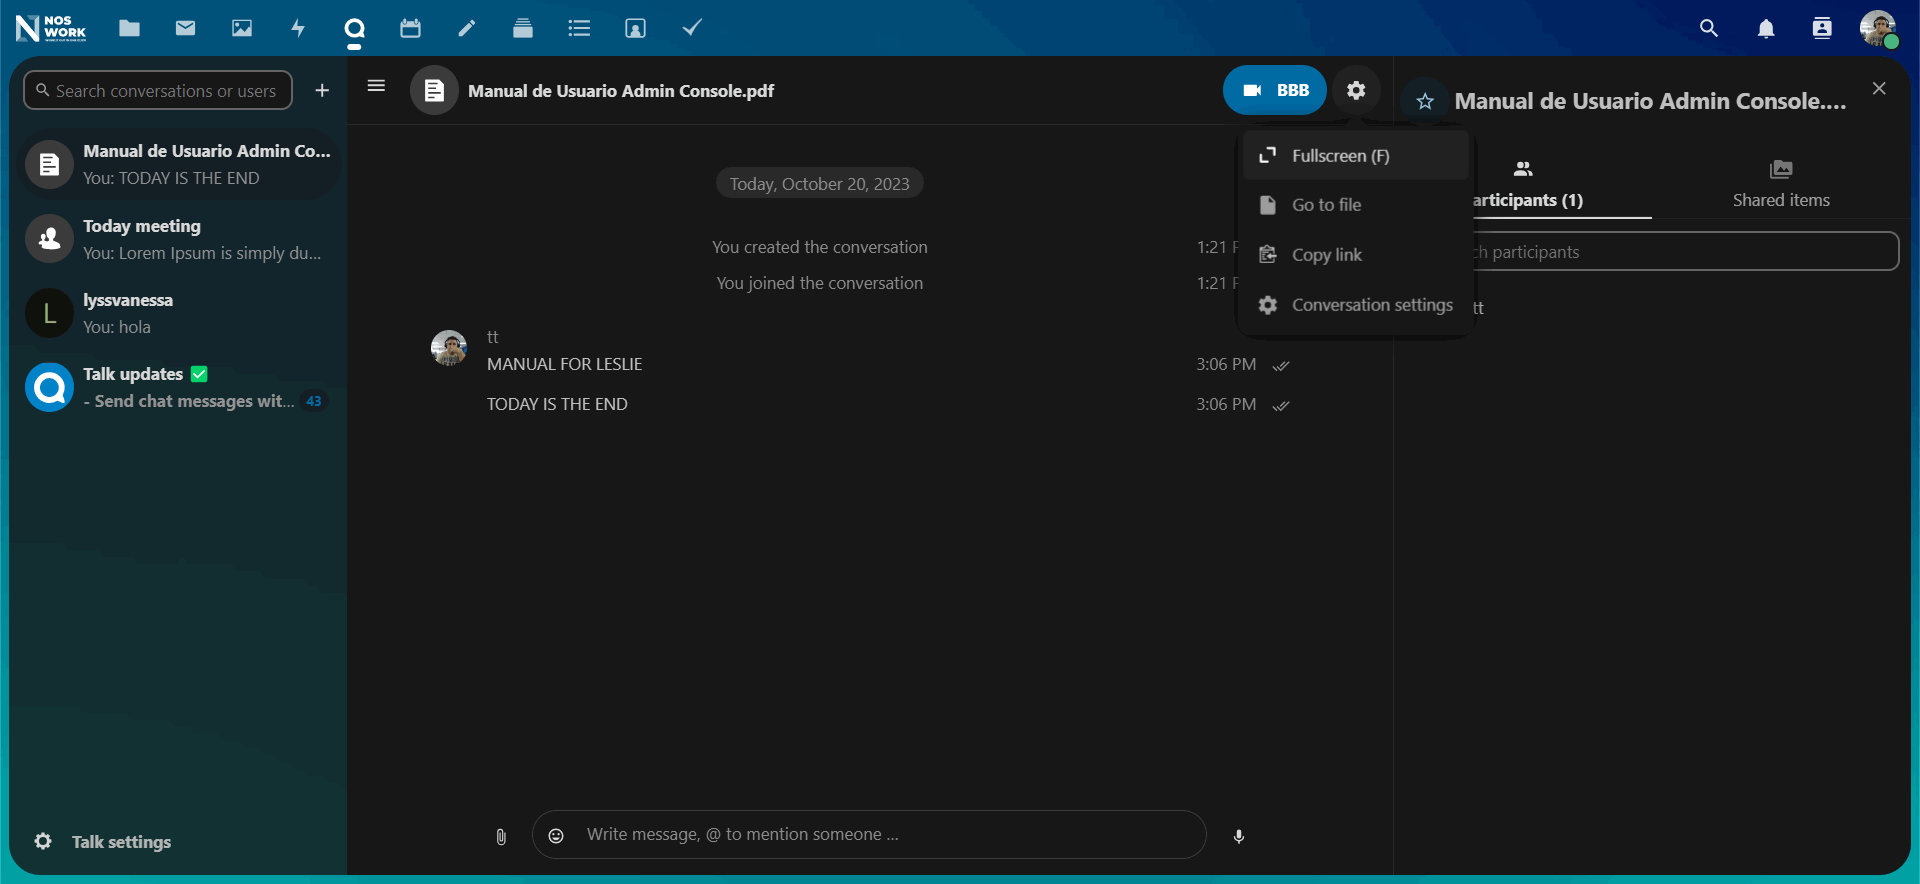 Figure 84 File conversation
4.2.2 Create tasks from chat or share tasks in chat
If Deck is installed, you can use the ... menu of a chat message and convert the message to a Deck task (See Figure 85).
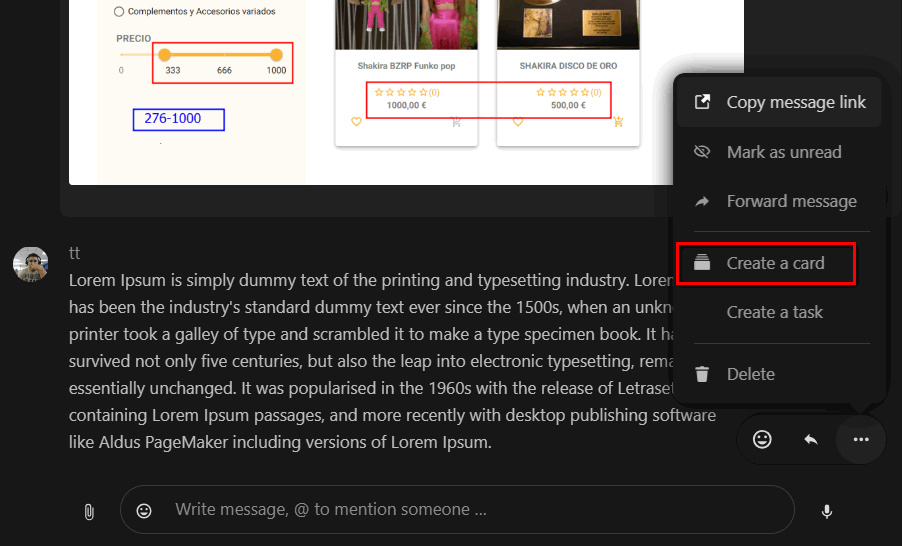 Figure 85 Chat as Card/ Deck
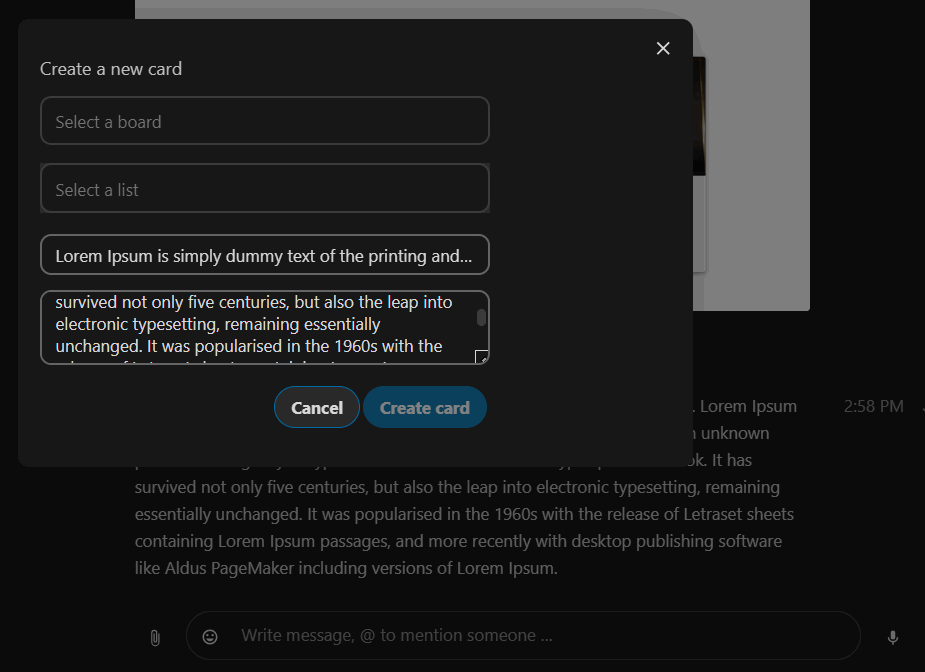
Figure 86 Create new card
From Deck, you can share tasks in chat conversations.
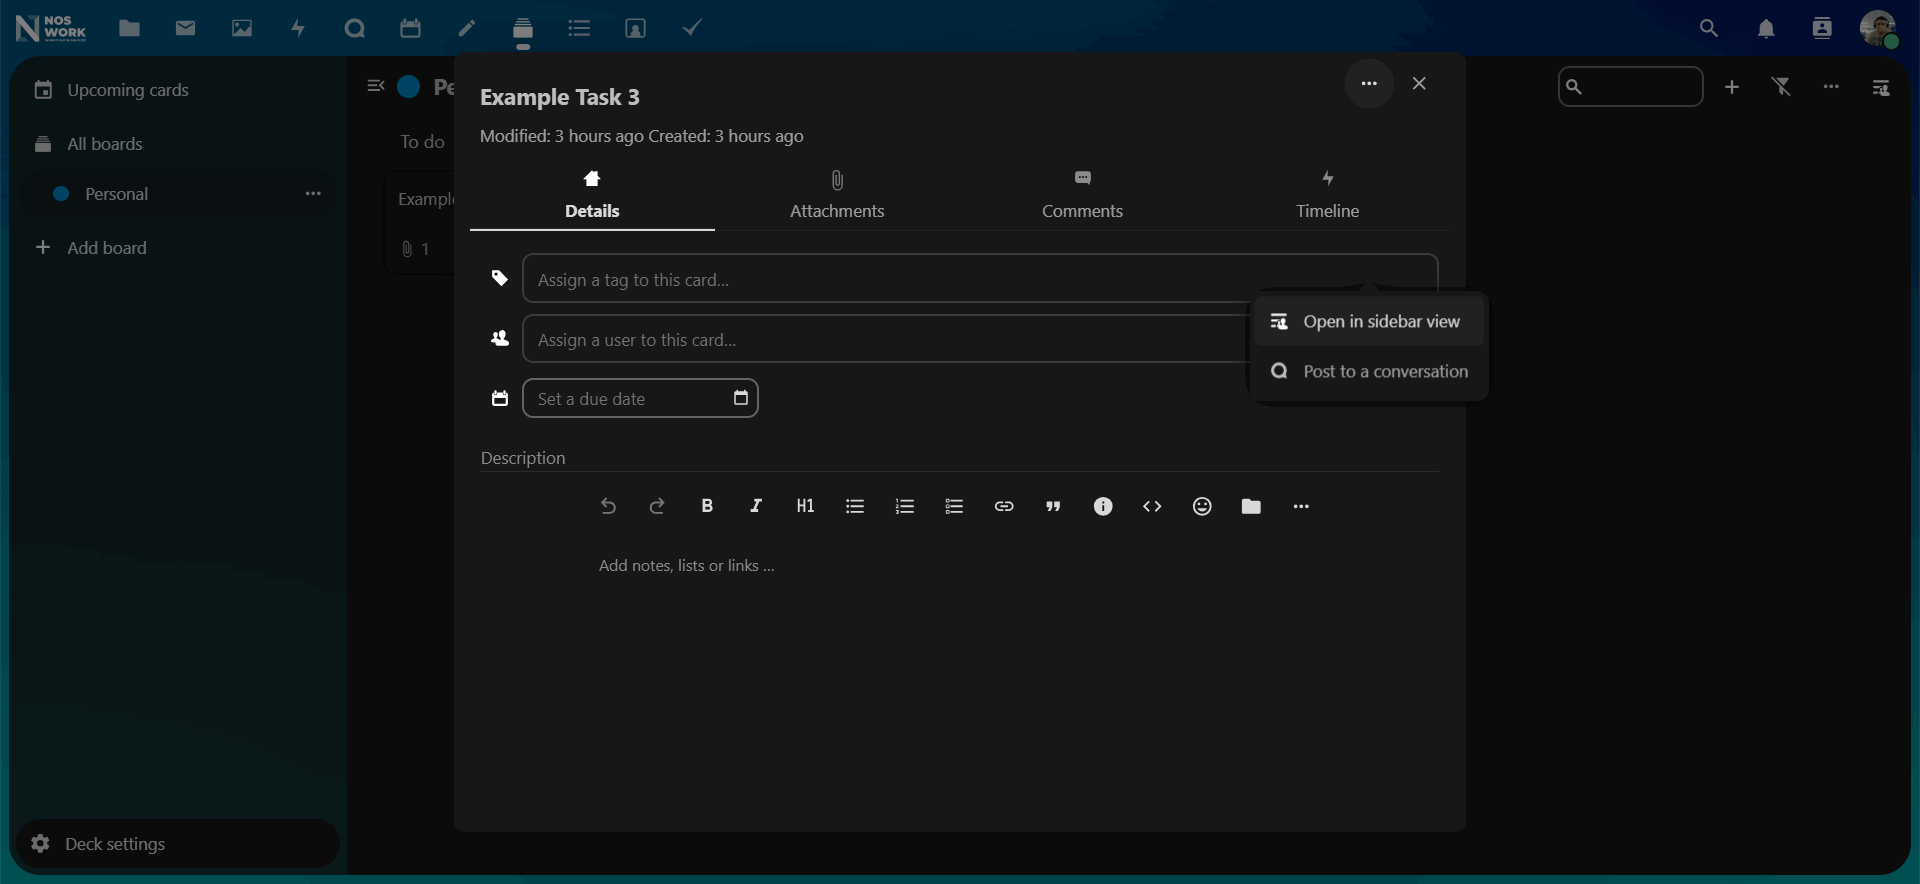 Figure 87 Post conversation from Deck
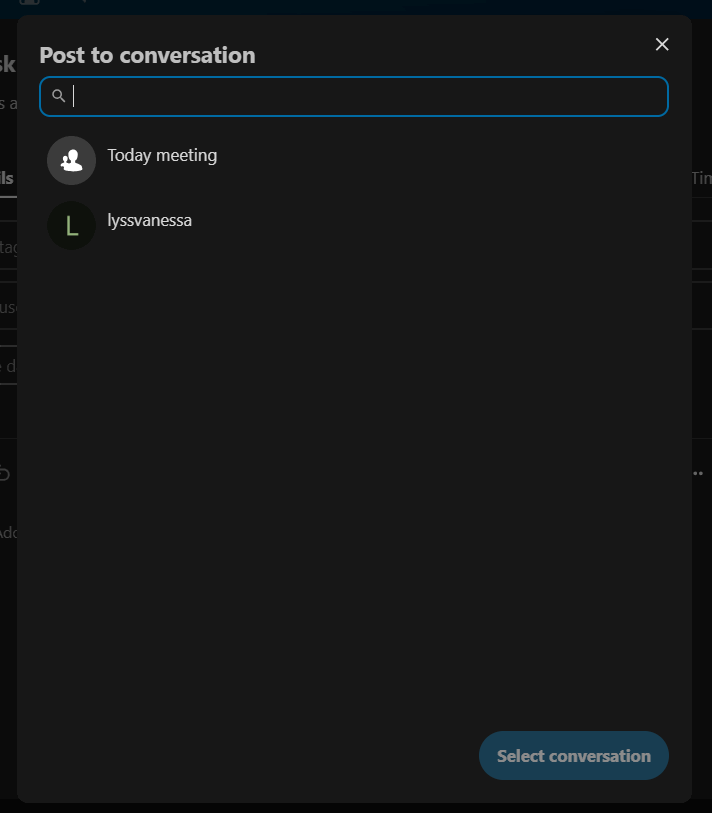
Figure 88 Select conversation
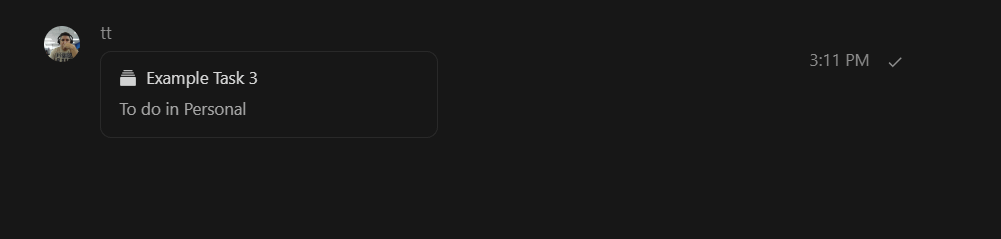 Figure 89 Card posted in a conversation
Your camera and microphone settings can be found in the Settings menu. There you can also find a list of shortcuts that you can use.
4.3 Join a call or use chat as a guest
Nextcloud Talk offers audio/video calling and text chat built into Nextcloud. It is available both as a web interface and for mobile applications.
4.3.1 Joining a chat
If you received a link to a chat conversation, you can open it in your browser to join the chat.
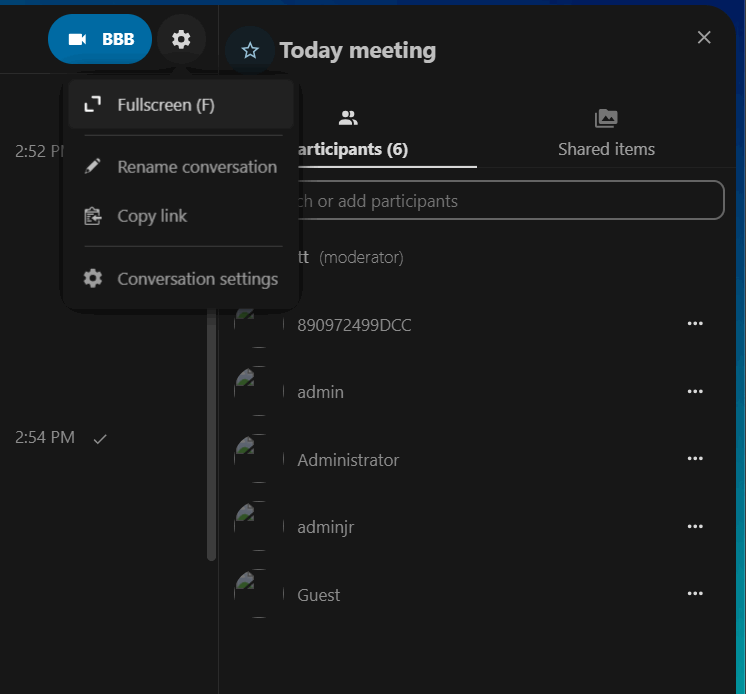
Figure 90 Edit conversation name
You can change your name by clicking on the Edit button, located at the top right. Your camera and microphone settings can be found in the Settings menu. There you can also find a list of shortcuts that you can use.
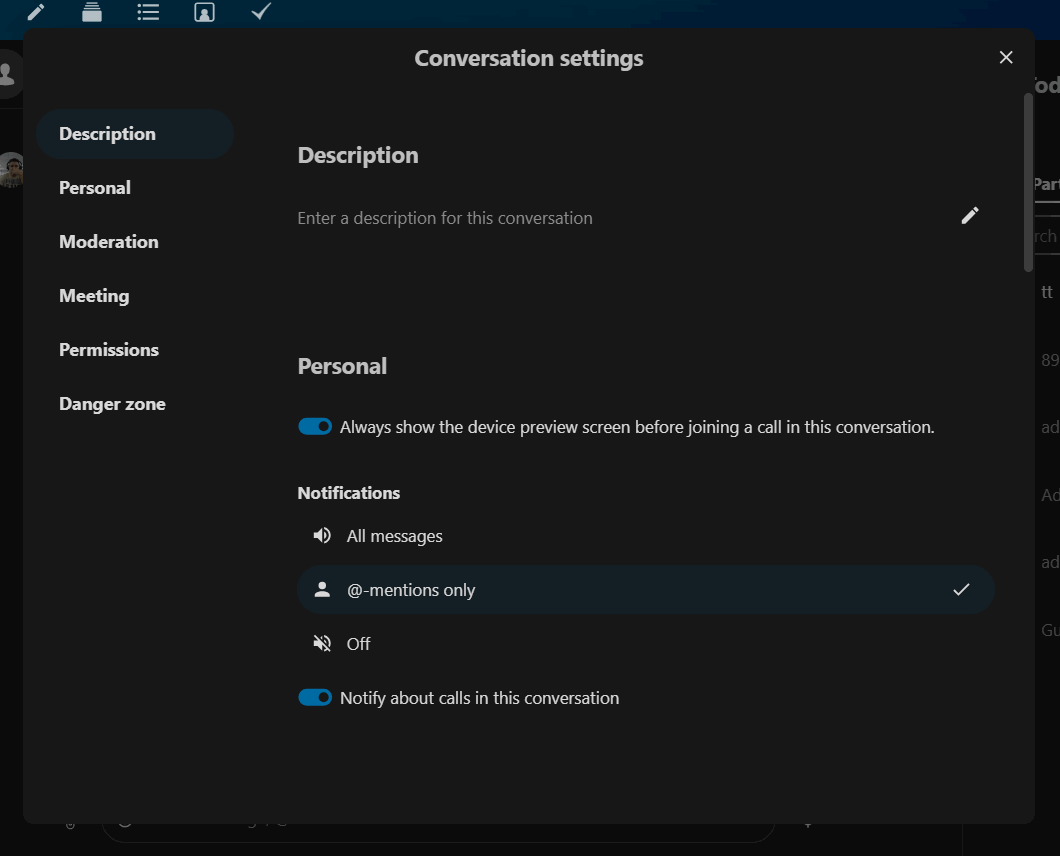 Figure 91 Chat permissions and settings
4.3.2 More settings
In the conversation menu, you can choose to use full screen. You can also do this by using the F key on your keyboard. In the conversation settings, you can find notification options and the full description of the conversation (See Figure 92).
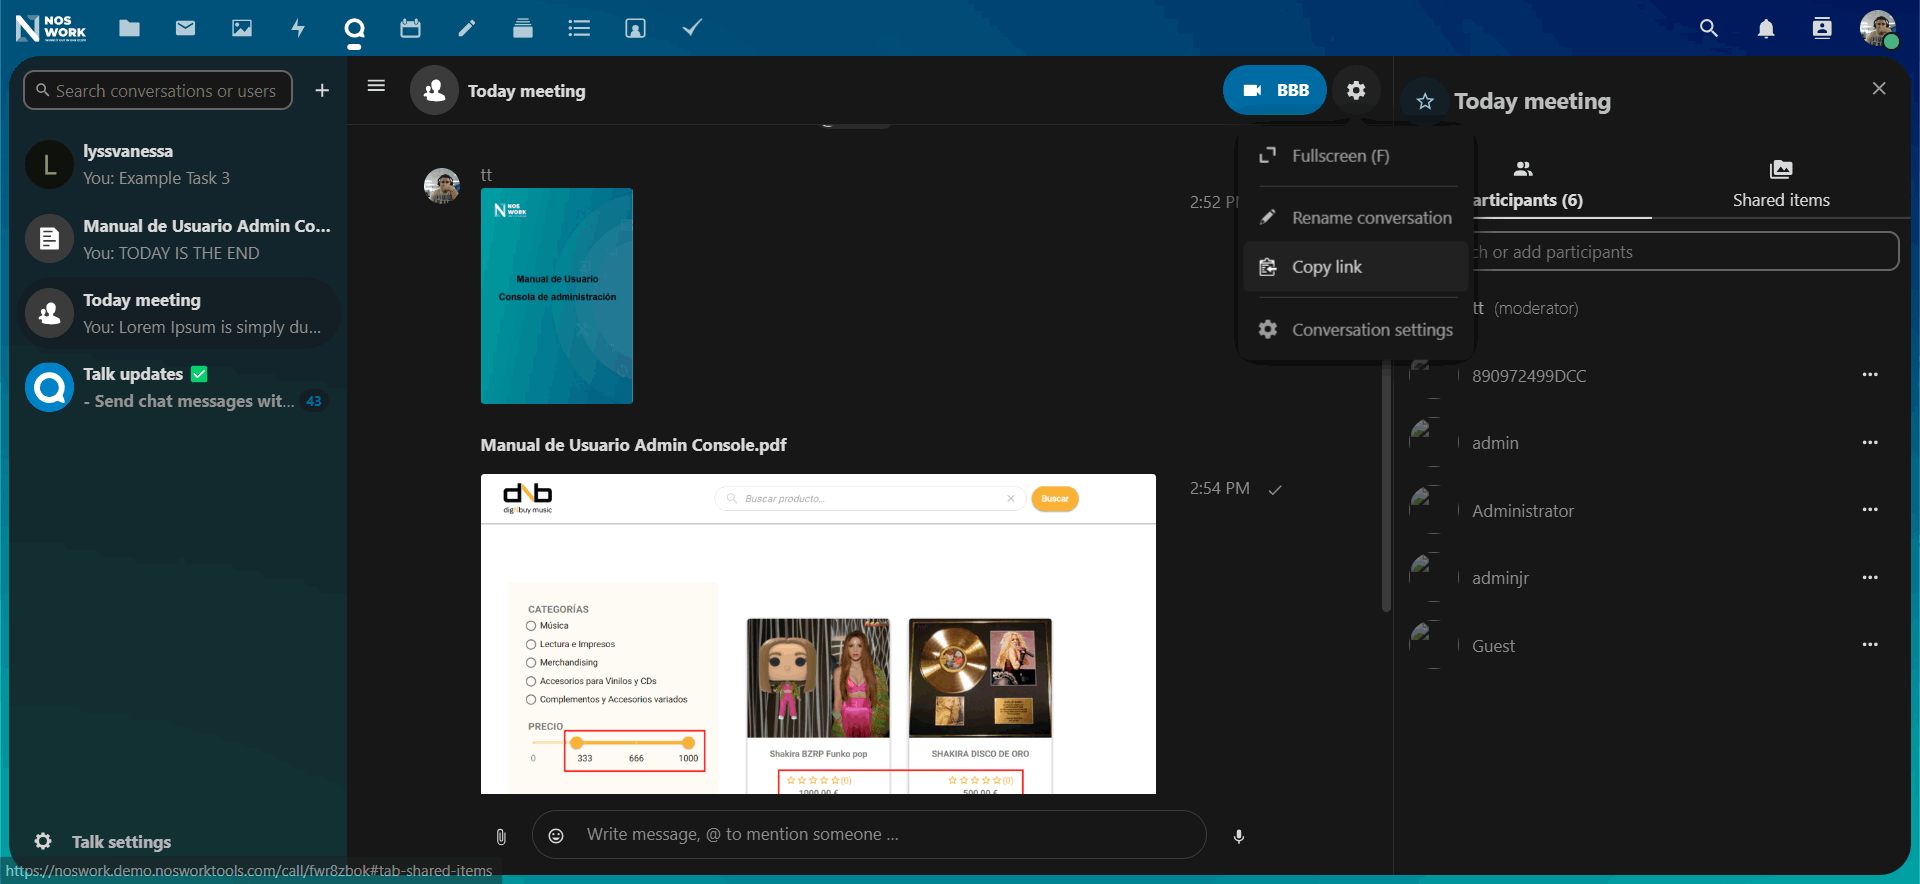 Figure 92 More settings