Noswork Administrator Manual for File Transfer Between Selected Users
This manual provides detailed instructions for Noswork administrators on how to perform file and calendar transfers between selected users. The Ownership Transfer functionality allows efficient and controlled migration of content from one user to another.
Prerequisites
To perform the transfer procedure, the user must have:
- Administrator credentials for Noswork Workspace
- Access to the network where the system is hosted
- Knowledge of the users involved in the transfer
- Sufficient privileges to perform transfer operations
Transfer Procedure
1: System Login
- Access the Noswork workspace URL with administrator credentials
2: Access the administrator profile and select "Administration settings"
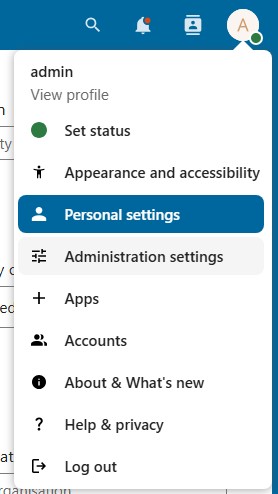
Figure 1. Administration settings panel
3: Select Ownership transfer in the dropdown menu
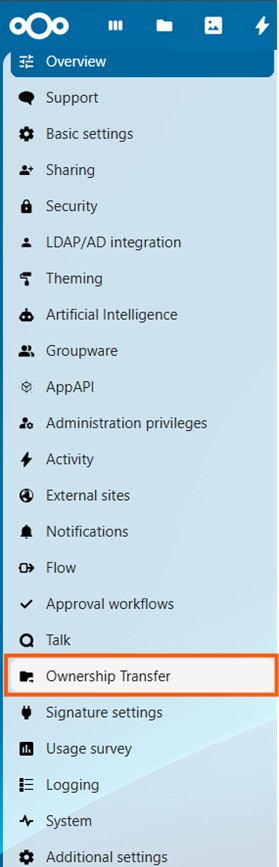
Figure 2. Ownership transfer
4: Selection of users and information type
- In the Ownership transfer window, select:
- Source User: The user whose files/calendars will be transferred
- Use the search field to find the user by name or email
-
Destination User: The user who will receive the files/calendars
- Use the search field to find the user by name or email
-
Select the type of information you want to transfer:
- "Files" option: To transfer files and folders
- "Calendar" option: To transfer events and calendars
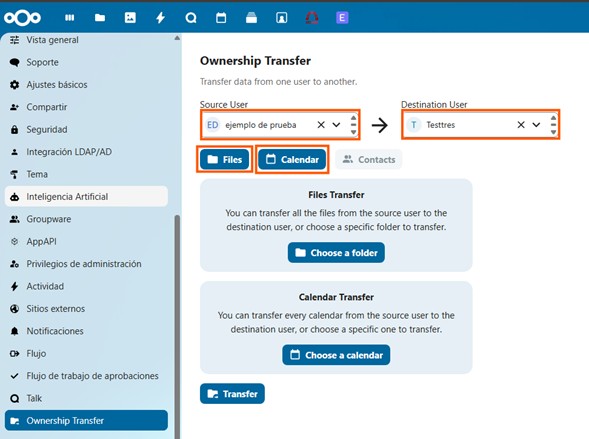
Figure 3. Selection of source and destination users and information type
5: Complete Transfer
If you want to transfer all files or all calendars:
- Click directly on the "Transfer" button
Figure 4. Complete transfer
6: Selective Transfer
If you want to transfer specific files or calendars:
For specific files:
- In the transfer configuration window, click on Choose a folder
- The folder structure of the source user will be displayed
- Select the folder(s) you want to transfer
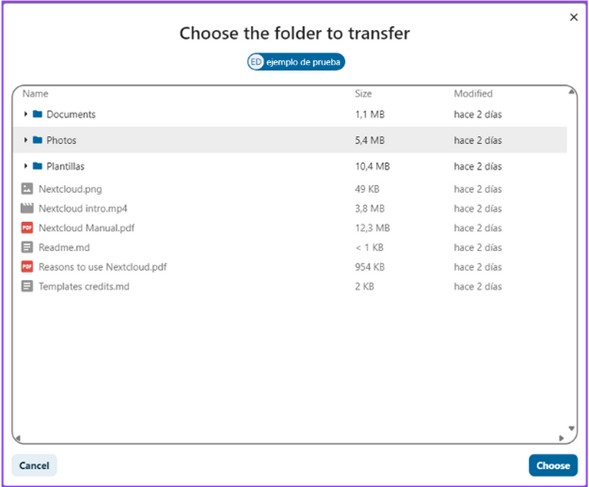
Figure 5. Selective transfer
For specific calendars:
- In the transfer configuration window, click on Choose a calendar
- The list of available calendars from the source user will be displayed
- Select the calendar(s) you want to transfer

Figure 6. Selective transfer
7: Transfer Confirmation
- Once the specific files/calendars have been selected, click on the Transfer button
- Carefully review the information in the confirmation dialog:
- Source user
- Destination user
- Elements to transfer (type and quantity)
- If the information is correct, click Confirm
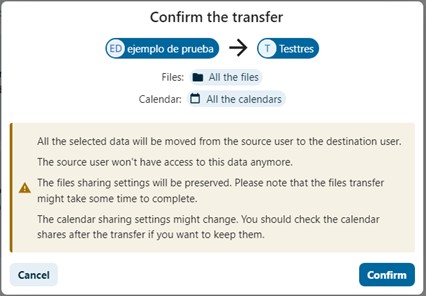
Figure 7. Transfer confirmation
8: Transfer Verification
To verify file transfer:
- Access the destination user's account or request verification
- Check that a transfer folder has been created in their storage space
- Verify that the transferred files are present and accessible
- Try opening some files to confirm their integrity
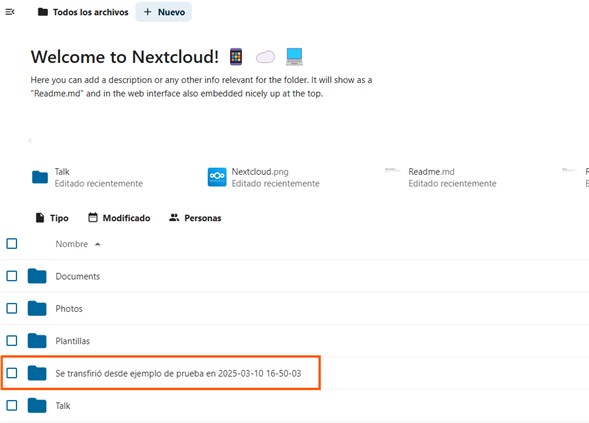
Figure 8. Transfer verification
To verify calendar transfer:
- Access the destination user's account or request verification
- Check that the transferred calendars appear in their calendar list
- Verify that events are correctly scheduled
- Check that calendar settings have been maintained
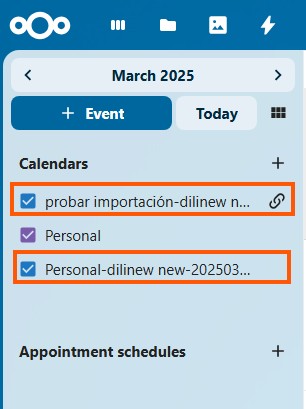
Figure 9. Transfer verification
⚠️ Important Notes about shared elements
- Files shared by the source user:
- Files that the source user has shared with third parties will remain shared with those third parties after the transfer.
-
The destination user will become the new owner of these shared files.
-
Files shared with the source user:
- Files that have been shared with the source user are not transferred to the destination user during the operation.
-
These files remain under the ownership of their original owners.
-
Calendars shared by the source user:
- Calendars that the source user has shared with third parties will remain shared with those third parties after the transfer.
-
The destination user will become the new owner of these shared calendars.
-
Calendars shared with the source user:
- Calendars that have been shared with the source user are not transferred to the destination user during the operation.
- These calendars remain under the ownership of their original owners.